Page 68 of 506
’05 TUNDRA_U (L/O 0408)
57
2005 TUNDRA from Aug. ’04 Prod. (OM34427U)
Rear
For your safety and comfort, adjust the
head restraint before driving.
To raise: Pull it up.
To lower: Push it down while pressing the
lock release button.
Center head restraint—When an occupant
sits on the center position of the seats,
always pull up the center head restraint to
the lock position.
The head restraint is most effective when
it is close to your head. Therefore, using
a cushion on the seatback is not recom-
mended.
CAUTION
�Adjust the center of the head re-
straint so that it is closest to the
top of your ears.
�After adjusting the head restraint,
make sure it is locked in position.
�Do not drive with the head re-
straints removed.
Non−split bench seat
Split bench seat
Armrest
Page 114 of 506

’05 TUNDRA_U (L/O 0408)
103
2005 TUNDRA from Aug. ’04 Prod. (OM34427U)
�When it is unavoidable to install the
forward −facing child restraint sys-
tem on the front passenger seat,
install the child restraint system on
the front passenger seat in the
proper order. (As for the installation
order, see “—Installation with seat
belt” in this Section.)
�Do not remove the front seats.
�Do not kick the front passenger
seat or subject it to severe impact.
Otherwise, the SRS warning light
may come on to indicate a malfunc-
tion of the detection system. In this
case, contact your Toyota dealer im-
mediately.
The front passenger occupant classifica-
tion indicator light may indicate “ON” (the
front passenger airbag and side airbag on
the front passenger seat may deploy)
even if observing the above cautions,
when a child sits in, or a forward −facing
child restraint system is installed on the
front passenger seat. Refer to all the cau-
tions in “SRS driver airbag and front pas-
senger airbag”, “SRS side airbags and
curtain shield airbags” and “Child restraint”
in this Section.
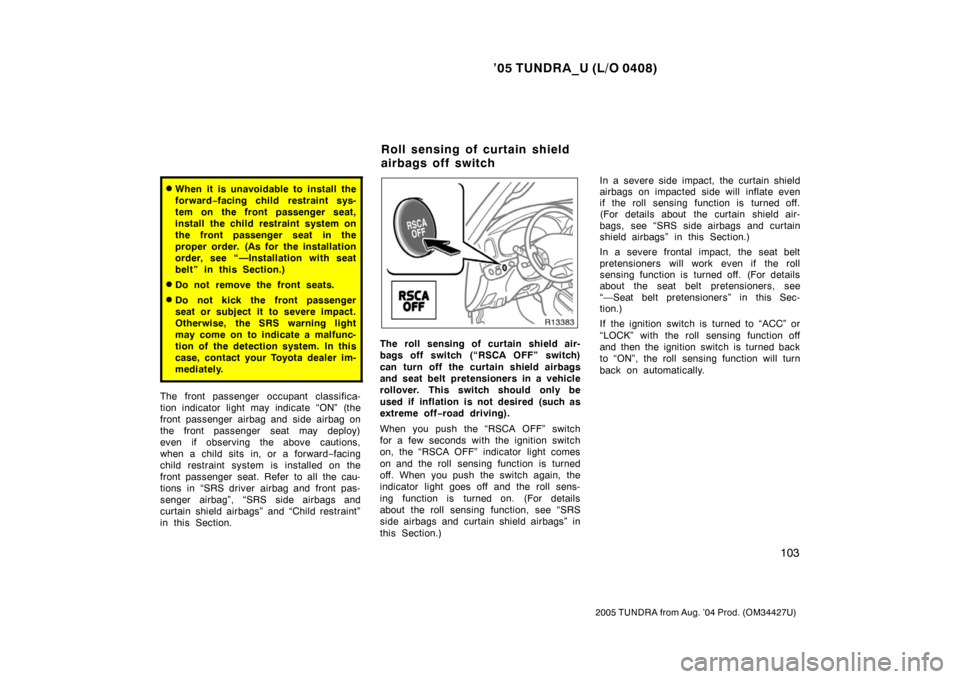
The roll sensing of curtain shield air-
bags off switch (“RSCA OFF” switch)
can turn off the curtain shield airbags
and seat belt pretensioners in a vehicle
rollover. This switch should only be
used if inflation is not desired (such as
extreme off −road driving).
When you push the “RSCA OFF” switch
for a few seconds with the ignition switch
on, the “RSCA OFF” indicator light comes
on and the roll sensing function is turned
off. When you push the switch again, the
indicator light goes off and the roll sens-
ing function is turned on. (For details
about the roll sensing function, see “SRS
side airbags and curtain shield airbags” in
this Section.) In a severe side impact, the curtain shield
airbags on impacted side will inflate even
if the roll sensing function is turned off.
(For details about the curtain shield air-
bags, see “SRS side airbags and curtain
shield airbags” in this Section.)
In a severe frontal impact, the seat belt
pretensioners will work even if the roll
sensing function is turned off. (For details
about the seat belt pretensioners, see
“—Seat belt pretensioners” in this Sec-
tion.)
If the ignition switch is turned to “ACC” or
“LOCK” with the roll sensing function off
and then the ignition switch is turned back
to “ON”, the roll sensing function will turn
back on automatically.
Roll sensing of curtain shield
airbags off switch
Page 120 of 506

’05 TUNDRA_U (L/O 0408)
109
2005 TUNDRA from Aug. ’04 Prod. (OM34427U)
Except for separate seat with automatic
transmission
For separate seat with automatic trans-
mission
When you install a rear −facing child re-
straint system which belongs to a pas-
senger risk group on the right front
seat, turn the passenger airbag manual
on− off switch counterclockwise to the
“OFF” position and remove the key.
(For details, see “SRS driver airbag and
front passenger airbag” in this Section.)
The indicator light comes on when the
system is off.
CAUTION
If you must install a rear −facing child
restraint system on the right front
seat, make sure that the passenger
airbag manual on −off switch is in the
“OFF” position with the key removed
and that the indicator light is on.
CAUTION
�Do not install a child restraint sys-
tem on the rear seat if it interferes
with the lock mechanism of the
front seats. Otherwise, the child or
front seat occupants, may be killed
or seriously injured in case of sud-
den braking or a collision.
�If the driver ’s seat position does
not allow sufficient space for safe
installation, install the child re-
straint system on the rear right
seat.
Page 147 of 506
’05 TUNDRA_U (L/O 0408)
136
2005 TUNDRA from Aug. ’04 Prod. (OM34427U)
Anchor brackets
Use one anchor bracket on the back of
rear seats and two anchor brackets on the
floor as shown above to attach the top
strap.
Anchor brackets are installed for each
rear seating position.TO USE THE ANCHORAGES:
1. Remove the head restraint.Outside position
Center position
Page 153 of 506

’05 TUNDRA_U (L/O 0408)
142
2005 TUNDRA from Aug. ’04 Prod. (OM34427U)
Cap
Covers
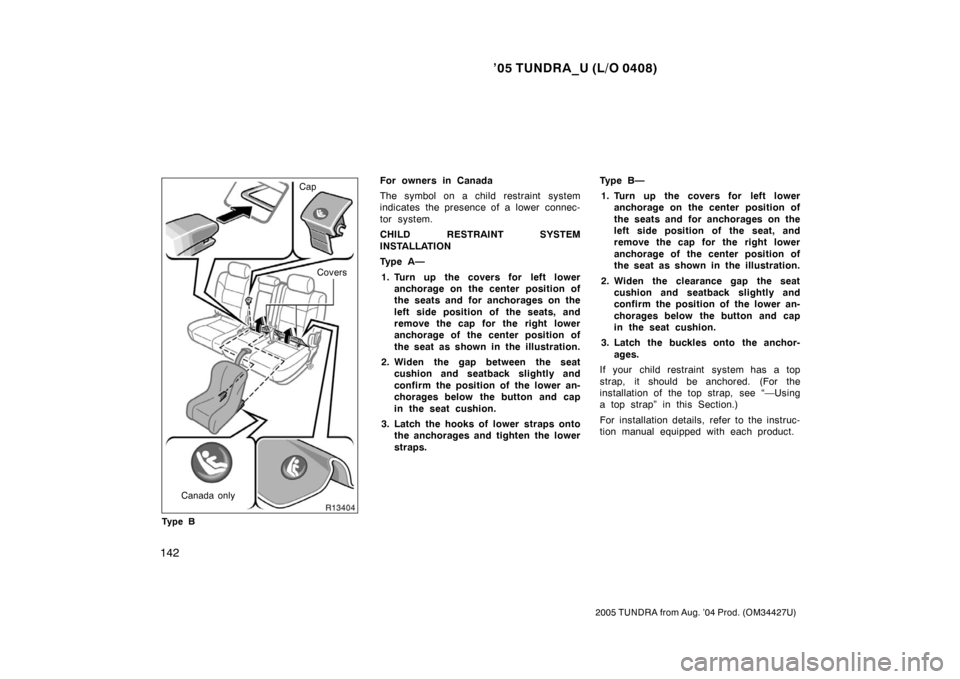
Canada only
Ty p e BFor owners in Canada
The symbol on a child restraint system
indicates the presence of a lower connec-
tor system.
CHILD RESTRAINT SYSTEM
INSTALLATION
Ty p e A — 1. Turn up the covers for left lower anchorage on the center position of
the seats and for anchorages on the
left side position of the seats, and
remove the cap for the right lower
anchorage of the center position of
the seat as shown in the illustration.
2. Widen the gap between the seat cushion and seatback slightly and
confirm the position of the lower an-
chorages below the button and cap
in the seat cushion.
3. Latch the hooks of lower straps onto the anchorages and tighten the lower
straps. Ty p e B —
1. Turn up the covers for left lower anchorage on the center position of
the seats and for anchorages on the
left side position of the seat, and
remove the cap for the right lower
anchorage of the center position of
the seat as shown in the illustration.
2. Widen the clearance gap the seat cushion and seatback slightly and
confirm the position of the lower an-
chorages below the button and cap
in the seat cushion.
3. Latch the buckles onto the anchor- ages.
If your child restraint system has a top
strap, it should be anchored. (For the
installation of the top strap, see “—Using
a top strap” in this Section.)
For installation details, refer to the instruc-
tion manual equipped with each product.