Page 177 of 351
167
If this equipment does cause harmful
interference to radio or television re-
ception, which can be determined by
turning the equipment off and on, the
user is encouraged to try to correct
the interference by one or more of
the following measures:
—Reorient or relocate the receiving
antenna.
—Increase the separation between the
equipment and receiver.
—Connect the equipment into an out-
let on a circuit different from that to
which the receiver is connected.
—Consult the dealer or an experi-
enced radio/TV technician for help.
NOTICE
This XM tuner supports “Audio Ser-
vices” (Music and Talk) of only XM
satellite radio and “Text Information”*
linked to the respective audio ser-
vices.
*Text Information includes, Channel
Name, (Artist) Name, (Song) Title and
Category Name.
CARING FOR YOUR CASSETTE PLAYER
AND TAPES
For the best performance for your cas-
sette player and tapes:
Clean the tape head and other parts regu-
larly.
�A dirty tape head or tape path can
decrease sound quality and tangle your
cassette tapes. The easiest way to
clean them is by using a cleaning tape.
(A wet type is recommended.)
Use high −quality cassettes.
�Low −quality cassette tapes can cause
many problems, including poor sound,
inconsistent playing speed, and
constant auto− reversing. They can also
get stuck or tangled in the cassette
player.
�Do not use a cassette if it has been
damaged or tangled or if its label is
peeling off.
�Do not leave a cassette in the player
if you are not listening to it, especially
if it is hot outside.
�Store cassettes in their cases and out
of direct sunlight.
�Avoid using cassettes with a total play-
ing time longer than 100 minutes (50
minutes per side). The tape used in
these cassettes is thin and could get
stuck or tangled in the cassette player.
Page 179 of 351
169
Low quality discs
Labeled discs
NOTICE
Do not use special shaped, transpar-
ent/translucent, low quality or labeled
discs such as those shown in the il-
lustrations. The use of such discs
may damage the player or changer, or
it may be impossible to eject the
disc.
CorrectWrong
�Handle compact discs carefully, espe-
cially when you are inserting them.
Hold them on the edge and do not
bend them. Avoid getting fingerprints
on them, particularly on the shiny side.
�Dirt, scratches, warping, pin holes, or
other disc damage could cause the
player to skip or to repeat a section of
a track. (To see a pin hole, hold the
disc up to the light.)
�Remove discs from the compact disc
player when you are not listening to
them. Store them in their plastic cases
away from moisture, heat, and direct
sunlight.
Page 187 of 351
177
“AUTO” button
For automatic operation of the air condi-
tioning, press the “AUTO” button. An indi-
cator light will illuminate to show that the
automatic operation mode has been se-
lected.
In the automatic operation mode, the air
conditioning selects the most suitable fan
speed and air flow according to the tem-
perature.
You may use manual controls if you want
to select your own settings.
To turn off the automatic operation, press
the “MODE” or fan speed control button.
Fan speed control button
Push the “�” (increase) or “ �” (decrease)
button to adjust the fan speed.
In automatic operation, you do not have
to adjust the fan speed unless you desire
another fan speed mode.
Temperature selector knob
To increase the temperature, turn the knob
to right side, to decrease it, turn the knob
to left side. “MAX COLD” appears when you adjust to
maximum cooling, and “MAX HOT” ap-
pears when you adjust to maximum warm-
ing.
“OFF” button
Push the button to turn off the air condi-
tioning system.
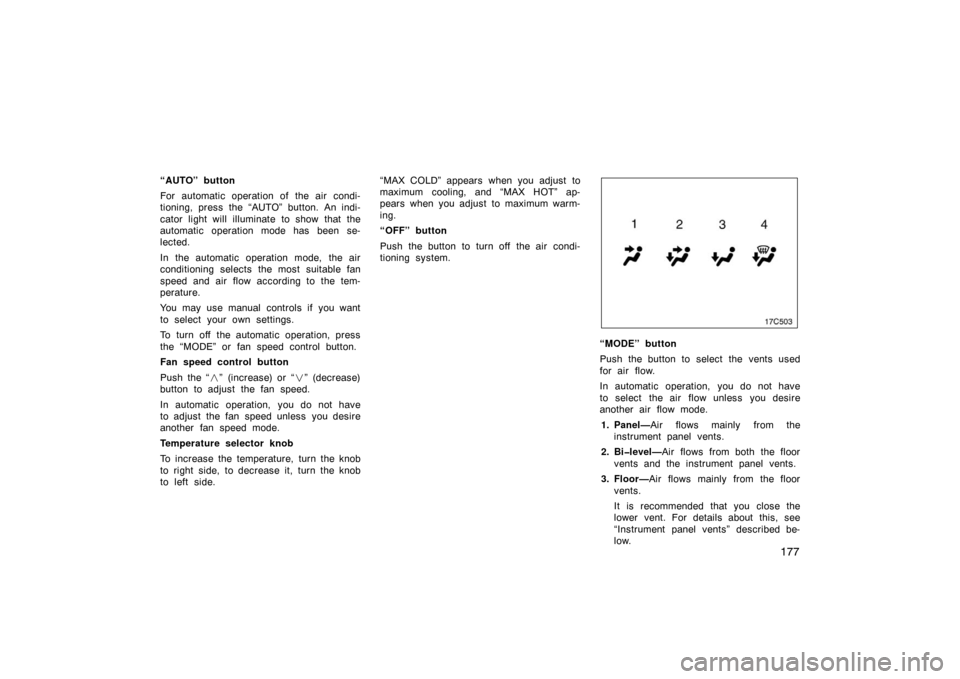
“MODE” button
Push the button to select the vents used
for air flow.
In automatic operation, you do not have
to select the air flow unless you desire
another air flow mode.
1. Panel— Air flows mainly from the
instrument panel vents.
2. Bi�level— Air flows from both the floor
vents and the instrument panel vents.
3. Floor— Air flows mainly from the floor
vents.
It is recommended that you close the
lower vent. For details about this, see
“Instrument panel vents” described be-
low.
Page 189 of 351
179
Air intake control button
Press the button to select the air source.
An indicator light will illuminate to show
which air intake mode is being selected.1. Recirculate— Recirculates the air inside
the vehicle.
2. Fresh— Draws outside air into the sys-
tem. “A/C” button
To turn on the air conditioning, press the
“A/C” button. The “A/C” button indicator
will come on. To turn the air conditioning
off, press the button again.
If the “A/C” button indicator flashes, there
is a problem in the air conditioning system
and the air conditioning automatically
shuts off. If this happens, take your ve-
hicle to a Toyota dealer for service.
Page 195 of 351
185
Rear air conditioning on�off switch
To turn the rear air conditioning on, press
the “REAR” switch. To turn the rear air
conditioning off, press the switch again.
“AUTO” button
For automatic operation of the rear air
conditioning, press the “AUTO” button. An
indicator light will illuminate to show that
the automatic operation mode has been
selected.
In the automatic operation mode, the rear
air conditioning selects the most suitable
fan speed and air flow according to the
temperature.
You may use manual controls if you want
to select your own settings.
Fan speed selector
Press the buttons to adjust the fan speed.
In automatic operation, you do not have
to adjust the fan speed unless you desire
another fan speed mode.Temperature selector
Move the lever to adjust the tempera-
ture—to the right to warm, to the left to
cool.
“OFF” button
Push the button to turn off the rear air
conditioning system.
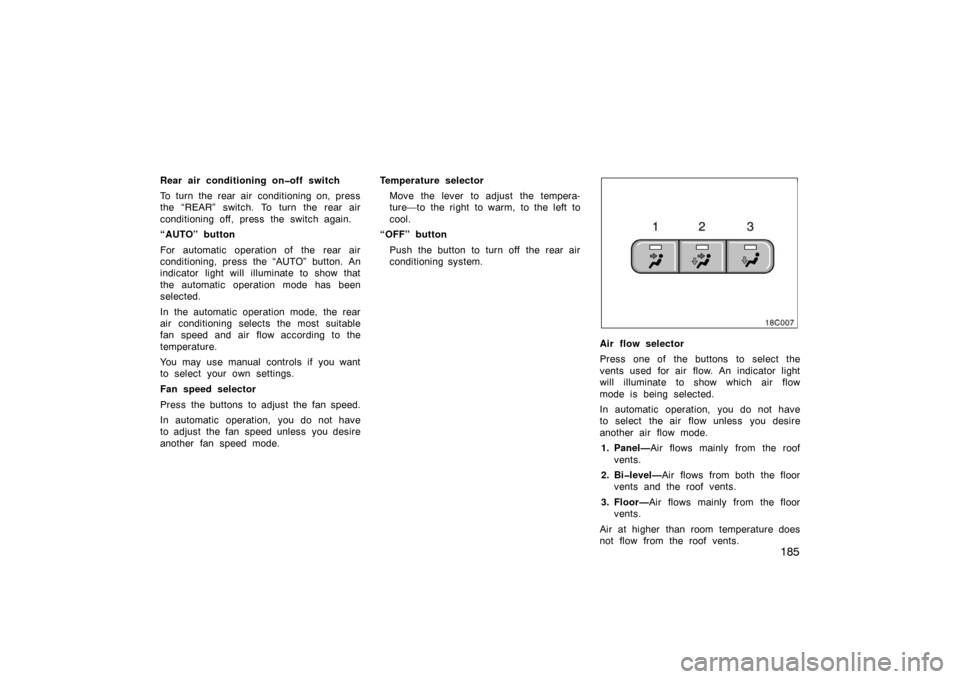
Air flow selector
Press one of the buttons to select the
vents used for air flow. An indicator light
will illuminate to show which air flow
mode is being selected.
In automatic operation, you do not have
to select the air flow unless you desire
another air flow mode.1. Panel— Air flows mainly from the roof
vents.
2. Bi�level— Air flows from both the floor
vents and the roof vents.
3. Floor— Air flows mainly from the floor
vents.
Air at higher than room temperature does
not flow from the roof vents.
Page 197 of 351
187
OPERATION OF INSTRUMENTS AND
CONTROLS
Other equipment
Clock188
. . . . . . . . . . . . . . . . . . . . . . . . . . . . . . . . . . . . .\
. . . . . . . . . . . . . . . . .
Outside temperature display 188
. . . . . . . . . . . . . . . . . . . . . . . . . . . . . . . . .
Rear view monitor system 189
. . . . . . . . . . . . . . . . . . . . . . . . . . . . . . . . . . .
Cigarette lighter and ashtray 192
. . . . . . . . . . . . . . . . . . . . . . . . . . . . . . . . .
Power outlets 192
. . . . . . . . . . . . . . . . . . . . . . . . . . . . . . . . . . . . \
. . . . . . . . . .
Roll sensing of curtain shield airbags off switch 193
. . . . . . . . . . . . . . . .
Rear console box 194
. . . . . . . . . . . . . . . . . . . . . . . . . . . . . . . . . . . . \
. . . . . . .
Glove box 195
. . . . . . . . . . . . . . . . . . . . . . . . . . . . . . . . . . . . \
. . . . . . . . . . . . . .
Garage door opener 195
. . . . . . . . . . . . . . . . . . . . . . . . . . . . . . . . . . . . \
. . . .
Auxiliary boxes 198
. . . . . . . . . . . . . . . . . . . . . . . . . . . . . . . . . . . . \
. . . . . . . . .
Cup holders 199
. . . . . . . . . . . . . . . . . . . . . . . . . . . . . . . . . . . . \
. . . . . . . . . . . .
Card holder 201
. . . . . . . . . . . . . . . . . . . . . . . . . . . . . . . . . . . . \
. . . . . . . . . . . .
Tie −down hooks 201
. . . . . . . . . . . . . . . . . . . . . . . . . . . . . . . . . . . . \
. . . . . . . .
Cargo net hooks 202
. . . . . . . . . . . . . . . . . . . . . . . . . . . . . . . . . . . . \
. . . . . . . .
Roof luggage carrier 202
. . . . . . . . . . . . . . . . . . . . . . . . . . . . . . . . . . . . \
. . . .
Floor mat 204
. . . . . . . . . . . . . . . . . . . . . . . . . . . . . . . . . . . . \
. . . . . . . . . . . . . .
Coat hooks 205
. . . . . . . . . . . . . . . . . . . . . . . . . . . . . . . . . . . . \
. . . . . . . . . . . .
SECTION 1� 10
Page 198 of 351
188
Clock
To reset the hour: Push the “H” button.
To reset the minutes: Push the “M” button.
The key must be in the “ACC” or “ON”
position.
If quick adjustment to a full hour is de-
sired, push the “:00” button.
For example, if the “:00” button is de-
pressed when the time is between
1:01 – 1:29, the time will change to 1:00.
If the time is between 1:30 – 1:59, the
time will change to 2:00.
If the electrical power source has been
disconnected from the clock, the time dis-
play will automatically be set to 1:00 (one
o’clock).When the instrument panel lights are
turned on, the brightness of the time in-
dication will be reduced.
Outside temperature display
The display indicates between the range
of –22
°F and 122 °F.
The key must be in the “ON” position.
Page 199 of 351
189
The rear view monitor system assists
the driver by displaying an image of
the rear of the vehicle while backing
up. The displayed image on the screen
is a horizontally reversed mirror image
of the inside rear view mirror.
To display the rear view image on the
screen, place the selector lever in the
“R” position when the ignition switch
in the “ON” position.
If you move the selector lever out of the
“R” position, the screen returns to the
previous screen. Operating another func-
tion of the navigation system will display
another screen.
The rear view monitor system is a supple-
ment device intended to assist back up.
When backing up, be sure to check be-
hind and all around the vehicle visually.CAUTION
�Never depend on the rear view
monitor system entirely when back-
ing up. Always make sure your in-
tended path is clear.
Use caution just as you would when
backing up any vehicle.
�Never back up while looking only at
the screen. The image on the
screen is different from actual con-
ditions. Depicted distances between
objects and flat surfaces will differ
from actual distances. If you back
up while looking only at the screen,
you may hit a vehicle, a person or
an object. When backing up, be
sure to check behind and all around
the vehicle visually and with mir-
rors before proceeding.
�Do not use the system when the
back door is not completely closed.
�If the back of the vehicle is hit, the
position and mounting angle of the
camera may change. Be sure to
have the camera’s position and
mounting angle checked at your
Toyota dealer.
�If the temperature changes rapidly,
such as when hot water is poured
on the vehicle in cold weather, the
system may not operate normally.
�If the camera lens becomes dirty, it
cannot transmit a clear image. If
water droplets, snow, or mud ad-
here to the lens, rinse with water
and wipe with a soft cloth. If the
lens is extremely dirty, wash it with
a mild cleanser and rinse.
�The displayed image may become
darker and moving images may be
slightly distorted when the system
is cold. When backing up, be sure
to check behind and all around the
vehicle visually and with mirror be-
fore proceeding.
When replacing the tires, please consult
your Toyota dealer. If you replace the
tires, the area displayed on the screen
may change.
Rear view monitor system