Page 13 of 304
’05 Corolla_U (L/O 0409)
3
2005 COROLLA from Sep. ’04 Prod. (OM12891U)
1. Headlight, turn signal and front foglight switches
2. Wiper and washer switches
3. Emergency flasher switch
4. Car audio
5. Clock
6. Front passenger occupant classification indicator light/front passenger ’s seat
belt reminder light
7. Rear window defogger switch
8. Auxiliary boxes
9. “TRAC OFF” (traction control system off) switch
10. Power outlet or cigarette lighter 11. Air conditioning controls
12. Ignition switch
13. Cruise control switch
14. Tilt steering lock release lever
15. Interior/instrument panel light control dial
16. Power rear view mirror control switches
Page 19 of 304
’05 Corolla_U (L/O 0409)
9
2005 COROLLA from Sep. ’04 Prod. (OM12891U)
Overdrive−off indicator light
Cruise control indicator light
∗ 2
∗ 1
: For details, see “Service reminder indicators and warning
buzzers” on page 106 in Section 1 −6.
∗
2: If this light flashes, see “Cruise control” on page 130 in
Section 1 −7.
Turn signal indicator lights Headlight high beam indicator light
Headlight low beam indicator light
Tail light indicator light
Slip indicator light/traction control system off
indicator light
Page 27 of 304

’05 Corolla_U (L/O 0409)
17
2005 COROLLA from Sep. ’04 Prod. (OM12891U)
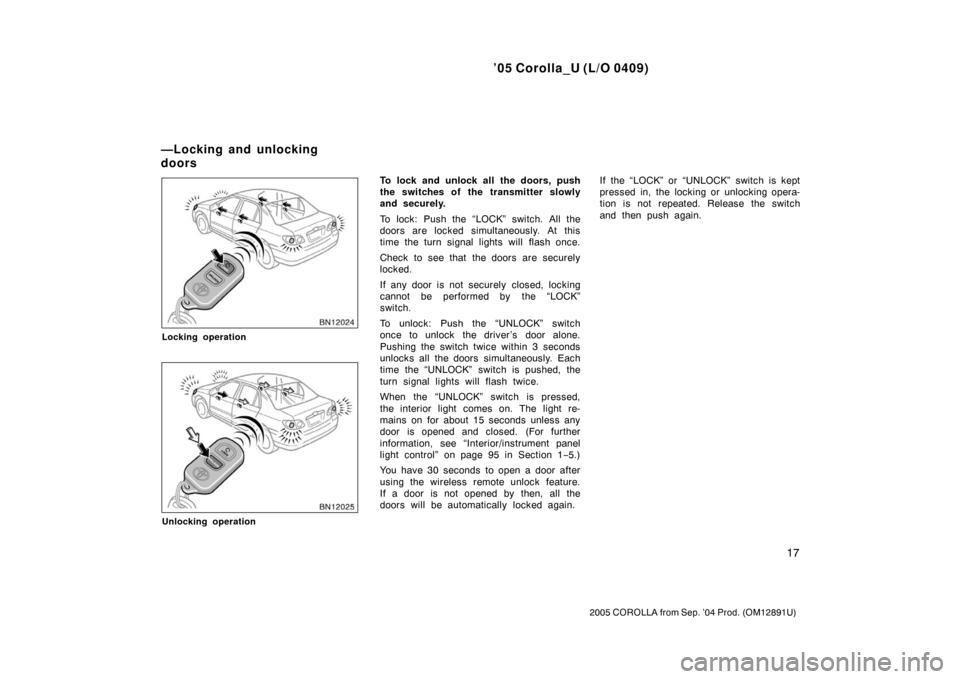
Locking operation
Unlocking operation
To lock and unlock all the doors, push
the switches of the transmitter slowly
and securely.
To lock: Push the “LOCK” switch. All the
doors are locked simultaneously. At this
time the turn signal lights will flash once.
Check to see that the doors are securely
locked.
If any door is not securely closed, locking
cannot be performed by the “LOCK”
switch.
To unlock: Push the “UNLOCK” switch
once to unlock the driver ’s door alone.
Pushing the switch twice within 3 seconds
unlocks all the doors simultaneously. Each
time the “UNLOCK” switch is pushed, the
turn signal lights will flash twice.
When the “UNLOCK” switch is pressed,
the interior light comes on. The light re-
mains on for about 15 seconds unless any
door is opened and closed. (For further
information, see “Interior/instrument panel
light control” on page 95 in Section 1−5.)
You have 30 seconds to open a door after
using the wireless remote unlock feature.
If a door is not opened by then, all the
doors will be automatically locked again. If the “LOCK” or “UNLOCK” switch is kept
pressed in, the locking or unlocking opera-
tion is not repeated. Release the switch
and then push again.
—Locking and unlocking
doors
Page 28 of 304

’05 Corolla_U (L/O 0409)
18
2005 COROLLA from Sep. ’04 Prod. (OM12891U)
Pushing the “PANIC” switch blows the
horn intermittently and flashes the
headlights, tail lights, turn signal lights
and interior light.
The “PANIC” mode is used to deter ve-
hicle theft when you witness anyone at-
tempting to break into or damage your
vehicle.
The alarm will last for one minute. To stop
the alarm midway, push any switch on the
transmitter or turn the ignition key from
the “LOCK” to “ON” position.
The “PANIC” mode does not work when
the ignition key is in the “ON” position.For replacement, use a CR2032 lithium
battery or equivalent.
CAUTION
Special care should be taken to pre-
vent small children from swallowing
the removed transmitter battery or
components.
NOTICE
�
When replacing the transmitter bat-
tery, be careful not to lose the com-
ponents.
� Replace only with the same or
equivalent type recommended by a
Toyota dealer.
� Dispose of used batteries according
to the local laws.
Replace the transmitter battery by follow-
ing these procedures:
1. Using a coin or equivalent, open the
transmitter case.
—Activating panic mode —Replacing transmitter
battery
Page 38 of 304

’05 Corolla_U (L/O 0409)
28
2005 COROLLA from Sep. ’04 Prod. (OM12891U)
SETTING THE SYSTEM
You can set the system as follows.1. Remove the key from the ignition switch.
The indicator light will start flashing when
the key is removed from the ignition
switch. (See “Engine immobilizer system”
on page 14 for details.) 2. Have all passengers get out of the vehicle.
3. Close all the doors and trunk lid secu- rely. 4. Lock all the doors with the key or wire-
less remote control transmitter. At this
time, the TVIP indicator light comes
on.
The system will be set in 30 seconds.
When the system is set, the indicator
light will start to flashing again.
5. Make sure that the indicator light flashes. Then you may leave the ve-
hicle.
Never leave anyone in the vehicle when
you set the system because unlocking
from the inside activates the alarm.
Activating the alarm
If the system detects a threat to the
vehicle, it sounds the alarm for one
minute while flashing headlights and
turn signal lights.
At this time, the interior light also turns
on when the interior light dial is in the
DOOR position. (See “Interior/instrument
panel light control” on page 95 in Section
1 −5.) The system detects a threat under any of
the following conditions:
�Either of the front doors is unlocked by
means other than the key or wireless
remote control transmitter.
If the key is not in the ignition switch,
all the doors will be automatically
locked again.
�Any of the doors or trunk lid are forci-
bly opened.
The alarm will activate when the trunk
lid is opened with a key. Cancel the
system before o
pening the trunk lid.
�The side windows are tapped or bro-
ken.
�The battery terminal is disconnected
and then reconnected.
�The ignition is hotwired.
After one minute, the alarm automatically
stops and the indicator light starts flashing
again.
Page 101 of 304
’05 Corolla_U (L/O 0409)
91
2005 COROLLA from Sep. ’04 Prod. (OM12891U)
OPERATION OF INSTRUMENTS AND
CONTROLS
Lights, Wipers and Defogger
Headlights and turn signals92
. . . . . . . . . . . . . . . . . . . . . . . . . . . . . . . . . . .
Emergency flashers 94
. . . . . . . . . . . . . . . . . . . . . . . . . . . . . . . . . . . . \
. . . . . .
Front fog lights 95
. . . . . . . . . . . . . . . . . . . . . . . . . . . . . . . . . . . . \
. . . . . . . . . .
Interior/instrument panel light control 95
. . . . . . . . . . . . . . . . . . . . . . . . . .
Personal lights 97
. . . . . . . . . . . . . . . . . . . . . . . . . . . . . . . . . . . . \
. . . . . . . . . .
Windshield wipers and washer 98
. . . . . . . . . . . . . . . . . . . . . . . . . . . . . . . .
Rear window defogger 99
. . . . . . . . . . . . . . . . . . . . . . . . . . . . . . . . . . . . \
. . .
SECTION 1� 5
Page 102 of 304

’05 Corolla_U (L/O 0409)
92
2005 COROLLA from Sep. ’04 Prod. (OM12891U)
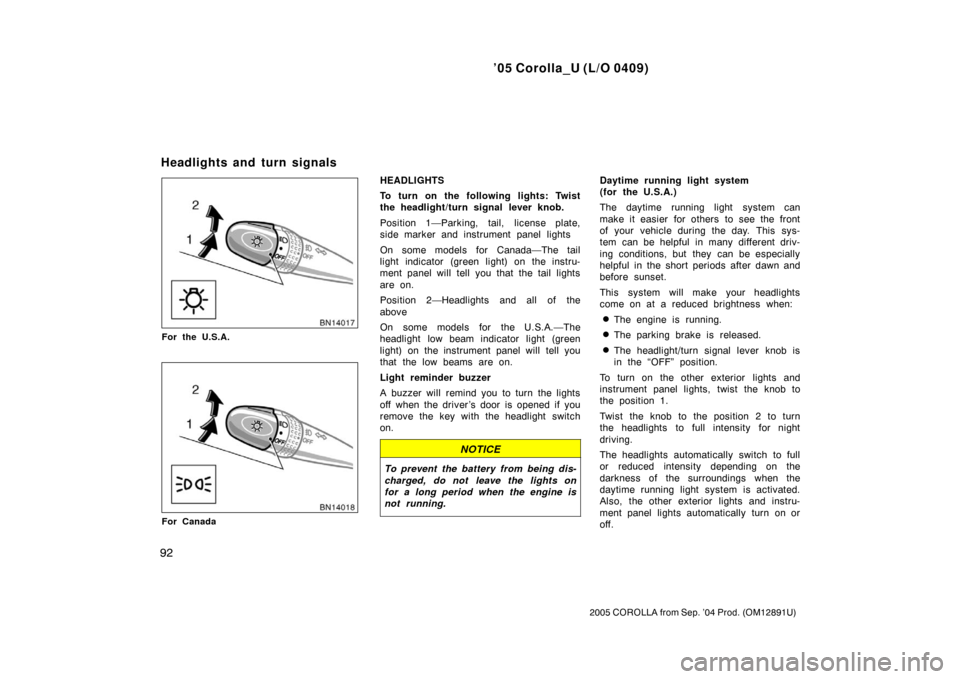
For the U.S.A.
For Canada
HEADLIGHTS
To turn on the following lights: Twist
the headlight/turn signal lever knob.
Position 1—Parking, tail, license plate,
side marker and instrument panel lights
On some models for Canada—The tail
light indicator (green light) on the instru-
ment panel will tell you that the tail lights
are on.
Position 2—Headlights and all of the
above
On some models for the U.S.A.—The
headlight low beam indicator light (green
light) on the instrument panel will tell you
that the low beams are on.
Light reminder buzzer
A buzzer will remind you to turn the lights
off when the driver ’s door is opened if you
remove the key with the headlight switch
on.
NOTICE
To prevent the battery from being dis-
charged, do not leave the lights on
for a long period when the engine is
not running.
Daytime running light system
(for the U.S.A.)
The daytime running light system can
make it easier for others to see the front
of your vehicle during the day. This sys-
tem can be helpful in many different driv-
ing conditions, but they can be especially
helpful in the short periods after dawn and
before sunset.
This system will make your headlights
come on at a reduced brightness when:
�The engine is running.
�The parking brake is released.
�The headlight/turn signal lever knob is
in the “OFF” position.
To turn on the other exterior lights and
instrument panel lights, twist the knob to
the position 1.
Twist the knob to the position 2 to turn
the headlights to full intensity for night
driving.
The headlights automatically switch to full
or reduced intensity depending on the
darkness of the surroundings when the
daytime running light system is activated.
Also, the other exterior lights and instru-
ment panel lights automatically turn on or
off.
Headlights and turn signals
Page 103 of 304

’05 Corolla_U (L/O 0409)
93
2005 COROLLA from Sep. ’04 Prod. (OM12891U)
The daytime running light control sensor
is on the top of the driver’s side instru-
ment panel.
Do not place anything on the instrument
panel, and/or do not affix anything on the
windshield to block this sensor.Daytime running light system
(for Canada)
The daytime running light system can
make it easier for others to see the front
of your vehicle during the day. This sys-
tem can be helpful in many different driv-
ing conditions, but they can be especially
helpful in the short periods after dawn and
before sunset.
This system will make your headlights
come on at a reduced brightness when:
�The engine is running.
�The parking brake is released.
�The headligh
t/turn signal lever knob is
in the “OFF” position or position 1.
To turn on the other exterior lights and
instrument panel lights, twist the knob to
position 1.
Twist the knob to position 2 to turn the
headlights to full intensity for night driving.High�Low beams— For high beams, turn
the headlights on and push the lever away
from you (position 1). Pull the lever to-
ward you (position 2) for low beams.
The headlight high beam indicator light
(blue light) on the instrument panel will
tell you that the high beams are on.
Flashing the high beam headlights
(position 3)—Pull the lever all the way
back. The high beam headlights turn off
when you release the lever.
You can flash the high beam headlights
with the knob turned to “OFF”.