Page 8 of 141

05 CAMRY NAVI_U (L/O 0407)
x
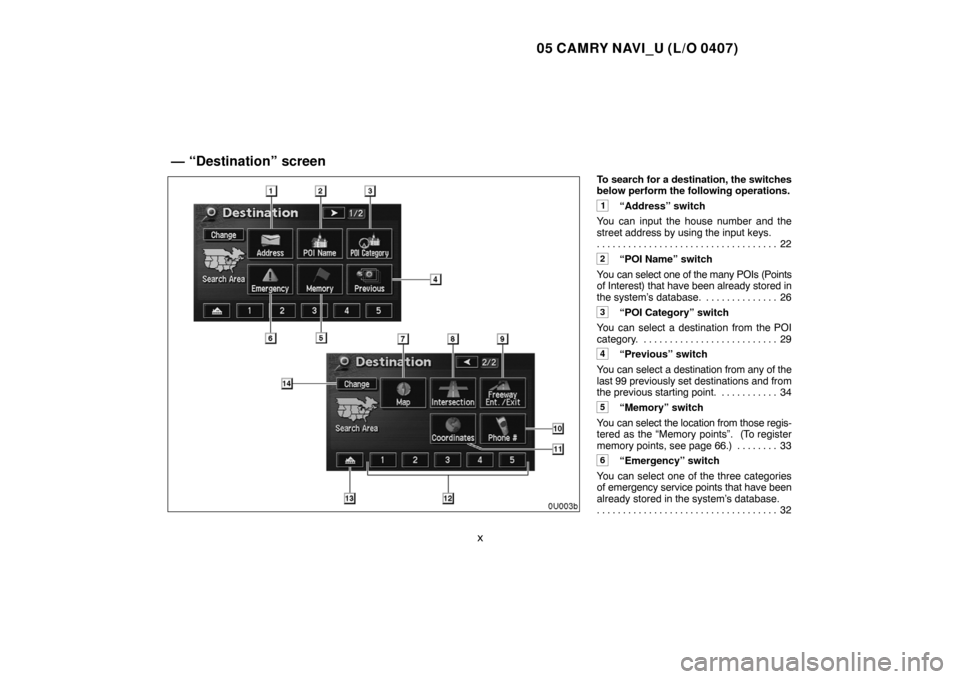
To search for a destination, the switches
below perform the following operations.
1“Address” switch
You can input the house number and the
street address by using the input keys.
22 . . . . . . . . . . . . . . . . . . . . . . . . . . . . . . . . . . .
2“POI Name” switch
You can select one of the many POIs (Points
of Interest) that have been already stored in
the system’s database. 26. . . . . . . . . . . . . .
3“POI Category” switch
You can select a destination from the POI
category. 29. . . . . . . . . . . . . . . . . . . . . . . . . .
4“Previous” switch
You can select a destination from any of the
last 99 previously set destinations and from
the previous starting point. 34. . . . . . . . . . .
5“Memory” switch
You can select the location from those regis-
tered as the “Memory points”. (To register
memory points, see page 66.) 33. . . . . . . .
6“Emergency” switch
You can select one of the three categories
of emergency service points that have been
already stored in the system’s database.
32 . . . . . . . . . . . . . . . . . . . . . . . . . . . . . . . . . . .
— “Destination” screen
Page 13 of 141

05 CAMRY NAVI_U (L/O 0407)
3
Inputting letters and numbers
When searching for an address or a name, or
entering a memo, you can input letters and
numbers via the touch screen.
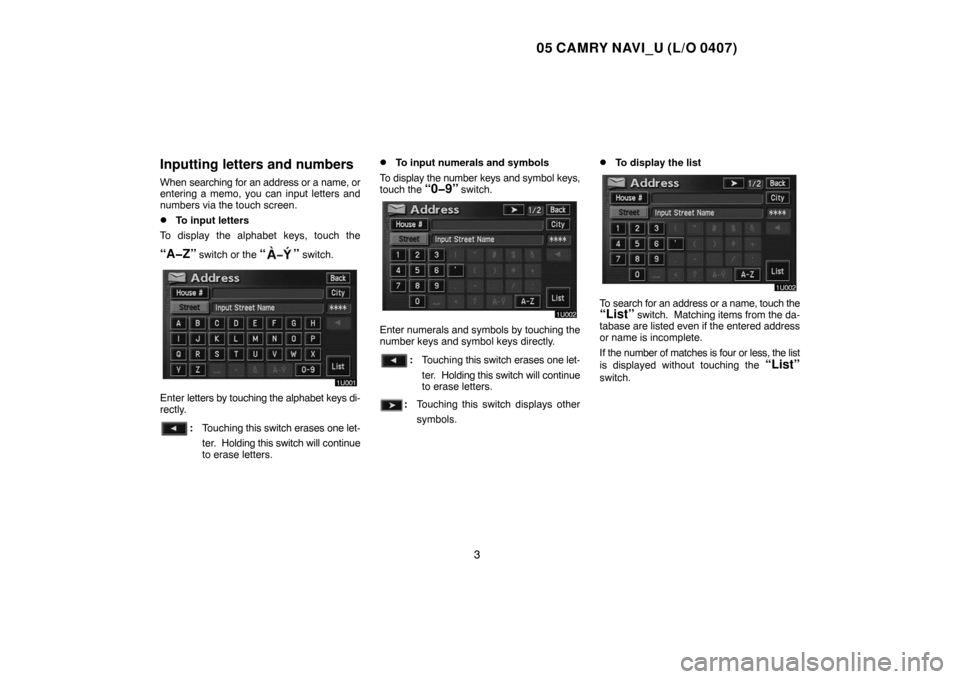
�To input letters
To display the alphabet keys, touch the
“A�Z” switch or the “” switch.
Enter letters by touching the alphabet keys di-
rectly.
:Touching this switch erases one let-
ter. Holding this switch will continue
to erase letters.
�To input numerals and symbols
To display the number keys and symbol keys,
touch the
“0�9” switch.
Enter numerals and symbols by touching the
number keys and symbol keys directly.
:Touching this switch erases one let-
ter. Holding this switch will continue
to erase letters.
:Touching this switch displays other
symbols.
�To display the list
To search for an address or a name, touch the“List” switch. Matching items from the da-
tabase are listed even if the entered address
or name is incomplete.
If the number of matches is four or less, the list
is displayed without touching the
“List”
switch.
Page 81 of 141
05 CAMRY NAVI_U (L/O 0407)
71
To delete an attribute, touch the “Yes”
switch. To return to the previous screen,
touch the “No” or “Back” switch.
�To change “Name”
Touch the alphabet and/or numeral keys.
When the entry has been completed, touch
the
“OK” switch on the screen.
The previous screen will be displayed.
�“Show Name”
You can set the name of a memory point to
be displayed or not on the map.
To show the name, touch the
“On”
switch. Not to show it, touch the “Off”switch.
�To change “Location”
Touch the eight direction switch to move
the cursor to the desired point on the
map.
Touch the
“Enter” switch and the previous
screen will be displayed.
Page 82 of 141
05 CAMRY NAVI_U (L/O 0407)
72 �
To change “Phone #” (telephone num-
ber)
Touch numeral keys.
When the entry has been completed, touch
the
“OK” switch on the screen.
The previous screen will be displayed.
(c) Deleting memory points
1. Push the “MENU” button to display
the “Menu” screen and touch the
“My
Places”
switch.
2. Touch the “Delete” switch of the
“Memory Points”.
3. Touch the corresponding switch. To
delete all memory points, touch the
“De-
lete All” switch.
For efficient memory point search, memory
points can be sorted by the
“Date”,
“Icon”, “Name” or “Attribute” switch.
To delete, touch the
“Yes” switch. To cancel
the deletion, touch the “No” switch.
Page 85 of 141
05 CAMRY NAVI_U (L/O 0407)
75 �
To change “Name”
Touch alphabet or numeral keys.
When the entry has been completed, touch
the
“OK” switch on the screen.
The previous screen will be displayed.
�“Show Name”
The avoid area name can be set to be dis-
played or not on the map. To show the
name, touch the
“On” switch. Not to
show it, touch the
“Off” switch.
�To change “Location”
Set the cursor to the desired location, then
touch the
“Enter” switch. The previous
screen will be displayed.
�To change “Area size”
Touch either or switch to change
the size of area you want to avoid, and touch
the
“OK” switch. The previous screen will
be displayed.
Page 107 of 141

05 CAMRY NAVI_U (L/O 0407)
97
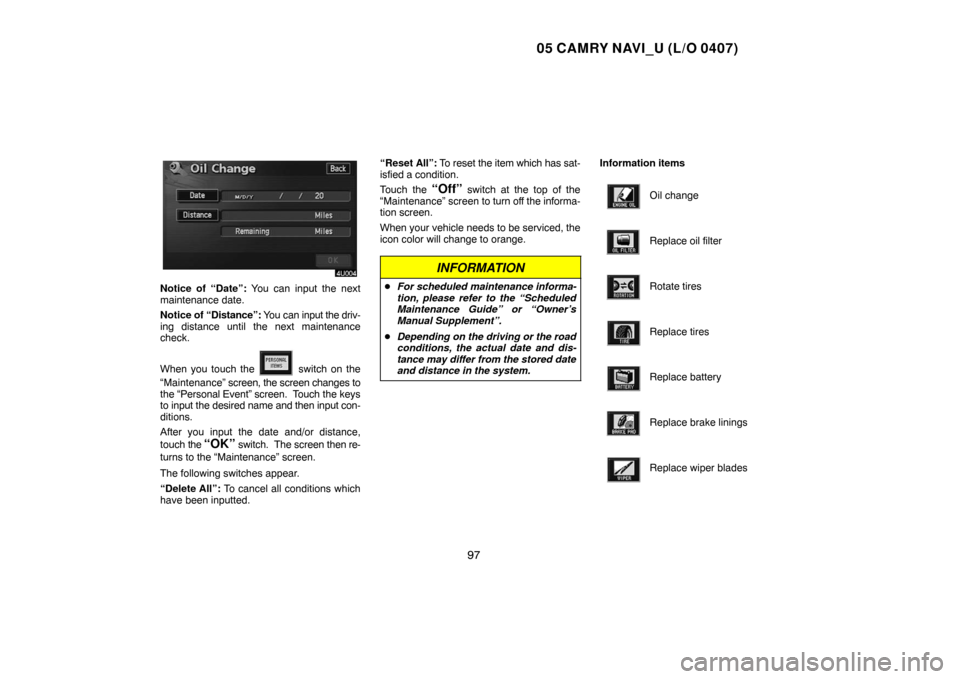
Notice of “Date”: You can input the next
maintenance date.
Notice of “Distance”: You can input the driv-
ing distance until the next maintenance
check.
When you touch the
switch on the
“Maintenance” screen, the screen changes to
the “Personal Event” screen. Touch the keys
to input the desired name and then input con-
ditions.
After you input the date and/or distance,
touch the
“OK” switch. The screen then re-
turns to the “Maintenance” screen.
The following switches appear.
“Delete All”: To cancel all conditions which
have been inputted.“Reset All”: To reset the item which has sat-
isfied a condition.
Touch the
“Off” switch at the top of the
“Maintenance” screen to turn off the informa-
tion screen.
When your vehicle needs to be serviced, the
icon color will change to orange.
INFORMATION
�For scheduled maintenance informa-
tion, please refer to the “Scheduled
Maintenance Guide” or “Owner’s
Manual Supplement”.
�Depending on the driving or the road
conditions, the actual date and dis-
tance may differ from the stored date
and distance in the system.
Information items
Oil change
Replace oil filter
Rotate tires
Replace tires
Replace battery
Replace brake linings
Replace wiper blades
Page 110 of 141
05 CAMRY NAVI_U (L/O 0407)
100 �
To edit “Dealer” or “Contact”
To input the name, touch the alphabet, nu-
meral and/or umlaut keys. You can input
up to 24 letters.
After inputting, touch the
“OK” switch at the
bottom right of the screen. The previous
screen will be displayed.
�To edit “Location”
Set the cursor to the desired point, and
touch the
“Enter” switch on the screen.
�To edit “Phone #” (telephone number)
Touch numeral keys.
After inputting, touch the
“OK” switch. The
previous screen will be displayed.
Page 113 of 141
05 CAMRY NAVI_U (L/O 0407)
103 �
Memo
Touch the “Memo” switch to enter text.
Enter text using the keys. You can enter
text up to 24 letters.
After entering the text, touch the
“OK”
switch at the bottom right of the screen.
�Location
Touch the “Location” switch to set loca-
tion.
A screen similar to the destination input
screen appears. Input the same way as in-
putting a destination. (See page 20.)
You can add the memos up to 100 until
December 31, 2022.