Page 43 of 426

33
To normalize the back door, unlock it with
the key, remote control transmitter or pow-
er door lock switch, see “—Locking and
unlocking doors” on page 16 and “Sid")
’05 4Runner_U (L/O 0504)
33
To normalize the back door, unlock it with
the key, remote control transmitter or pow-
er door lock switch, see “—Locking and
unlocking doors” on page 16 and “Side
doors” on page 22 in this Section.
Make sure that the back door opens. If
the back door cannot be opened properly,
have it checked by your Toyota dealer.
The back door can be locked or unlocked
in the following ways.
�All the side doors and back door lock
and unlock simultaneously with the
back door. Insert the key into the key-
hole, turn it clockwise to lock and turn
it counterclockwise to unlock.
�Operate the power door lock switch.
(See “Side doors” on page 22 in this
Section.)
�Operate the wireless remote control.
(See “—Locking and unlocking doors”
on page 16 in this Section.)
�All the side doors and back door are
locked and unlocked simultaneously
with the driver’s door. (See “Side
doors” on page 22 in this Section.)
If the battery terminal is disconnected and
reconnected, the back door will be auto-
matically locked. Be careful not to lock
your keys in the vehicle. When all the side doors and back door
are unlocked simultaneously with a key,
the interior light, luggage compartment
light, ignition switch light and running
board lights (on some models) will come
on and remain on for about 15 seconds
before fading out. (For details, see “Interi-
or light” on page 134, “Luggage compart-
ment light” on page 135, “Ignition switch
light” on page 136 and “Running board
lights” on page 137 in Section 1
−5.)
The back window can be opened and
closed with the key operation in the back
door keyhole. (For details, see “Power
back window” on page 30 in this Section.)
When closing the back door, the inside
strap can be used to make the reach
easier.
To close the back door, lower it and press
down on it. After closing the back door,
try pulling it up to make sure it is secure-
ly closed.
Back door closer: When the back door
has not been fully closed, it is automati-
cally closed completely.
See “—Stowage precautions” on page 305
in Section 2 for precautions when loading
luggage.
Page 52 of 426

42
While the vehicle is being driven, all ve-
hicle occupants should have the seatback
upright, sit well back in the seat and prop-
erly wear the seat belts provided.
CAUTI")
’05 4Runner_U (L/O 0504)
42
While the vehicle is being driven, all ve-
hicle occupants should have the seatback
upright, sit well back in the seat and prop-
erly wear the seat belts provided.
CAUTION
�Do not drive the vehicle unless the
occupants are properly seated. Do
not allow any passengers to sit on
top of a folded�down seatback, or
in the luggage compartment or car-
go area. Persons not properly
seated and/or not properly re-
strained by seat belts can be se-
verely injured in the event of emer-
gency braking or a collision.
�During driving, do not allow any
passengers to stand up or move
around between seats. Otherwise,
severe injuries can occur in the
event of emergency braking or a
collision.
Driver seat
CAUTION
The SRS driver airbag deploys with
considerable force, and can cause
death or serious injury especially if
the driver is very close to the airbag.
The National Highway Traffic Safety
Administration (“NHTSA”) advises:
Since the risk zone for driver airbag
is the first 50—75 mm (2—3 in.) of
inflation, placing yourself 250 mm (10
in.) from your driver airbag provides
you with a clear margin of safety.
This distance is measured from the
center of the steering wheel to your
breastbone. If you sit less than 250
mm (10 in.) away now, you can
change your driving position in sever-
al ways:
�Move your seat to the rear as far
as you can while still reaching the
pedals comfortably.
�Slightly recline the back of the
seat. Although vehicle designs vary,
many drivers can achieve the 250
mm (10 in.) distance, even with the
driver seat all the way forward, sim-
ply by reclining the back of the
seat somewhat. If reclining the back
of your seat makes it hard to see
the road, raise yourself by using a
firm, non�slippery cushion, or raise
the seat if your vehicle has that
feature.
�If your steering wheel is adjustable,
tilt it downward. This points the air-
bag toward your chest instead of
your head and neck.
The seat should be adjusted as rec-
ommended by NHTSA above, while
still maintaining control of the foot
pedals, steering wheel, and your view
of the instrument panel controls.
Seats Front seats—
—Front seat precautions
Page 58 of 426
’05 4Runner_U (L/O 0504)
48
CAUTION
�Do not allow passengers to ride on
the flattened seat while driving; use
the seat in the normal position.
�After putting back the seat, try
pushing the seat and seatback for-
ward and rearward to make sure it
is secured in place. Be certain to
replace the head restraint.
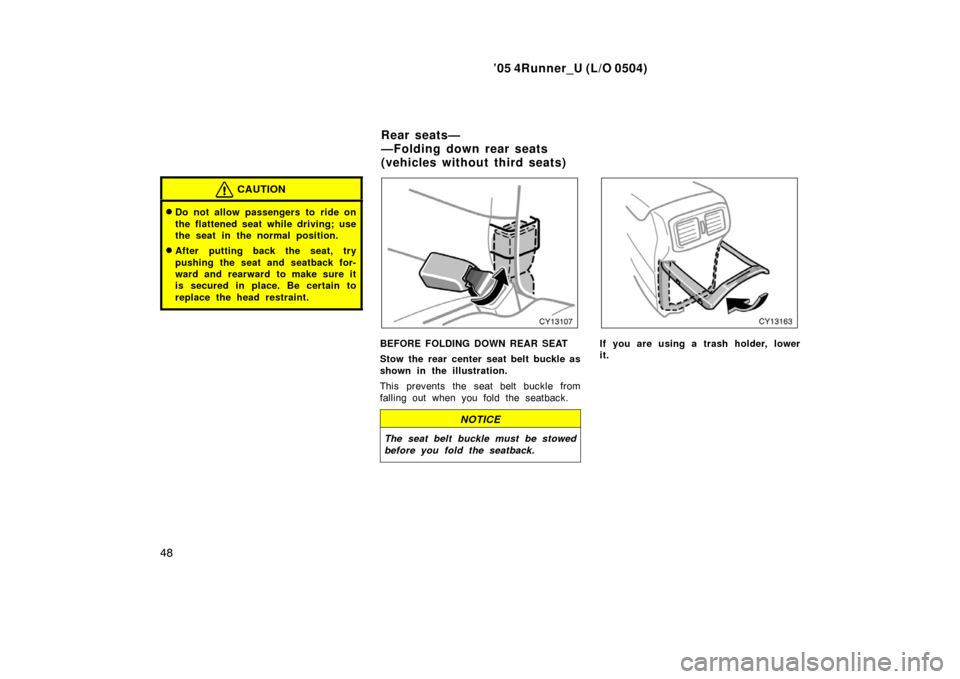
BEFORE FOLDING DOWN REAR SEAT
Stow the rear center seat belt buckle as
shown in the illustration.
This prevents the seat belt buckle from
falling out when you fold the seatback.
NOTICE
The seat belt buckle must be stowed
before you fold the seatback.
If you are using a trash holder, lower
it.
Rear seats—
—Folding down rear seats
(vehicles without third seats)
Page 59 of 426
’05 4Runner_U (L/O 0504)
49
1. Lower the head restraint to the lowe-
st position.2. Swing the bottom cushion up bypulling the lock rel ease strap.
Each bottom cushion can be swung up
separately.3. Push the lock release button and fold down the seatback.
This will enlarge the luggage compartment
as far as the raised seat cushion. See
“—Stowage precautions” on page 305 in
Section 2 for precautions when loading
luggage.
Each seatback can be folded separately.
Page 61 of 426

51
�The third seats have a maximum
capacity of two belted occupants
who do not exceed 150 cm (59 in.)
in height. Exceeding these limits
can result in increased risk of seri-")
’05 4Runner_U (L/O 0504)
51
�The third seats have a maximum
capacity of two belted occupants
who do not exceed 150 cm (59 in.)
in height. Exceeding these limits
can result in increased risk of seri-
ous personal injuries or death.
Folding the seats up will enlarge the lug-
gage compartment. See “—Stowage pre-
cautions” on page 305 in Section 2 for
precautions when loading luggage.
Second seats
Third seats
SEATBACK ANGLE ADJUSTING LEVER
Lean forward and pull the lock release
lever. Then lean back to the desired
angle and release the lever.
CAUTION
Avoid reclining the seatback any
more than needed. The seat belts pro-
vide maximum protection in a frontal
or rear collision when the passengers
are sitting up straight and well back
in the seats. If you are reclined, the
lap belt may slide past your hips and
apply restraint forces directly to the
abdomen. In the event of a frontal
collision, the more the seat is re-
clined, the greater the risk of death
or personal injury.
—Adjusting rear seats
(vehicles with third seats)
Page 62 of 426
’05 4Runner_U (L/O 0504)
52
BEFORE TUMBLING SECOND SEATS
Stow the second seat belt buckles as
shown in the illustration.
This prevents the buckles from falling out
when you tumble the second seat.
NOTICE
The seat belt buckles must be stowed
before you tumble the second seat.
TUMBLING SECOND SEATS
Lower the head restraints to the lowest
position. Fold down the seatback while
pulling the seatback angle adjusting le-
ver, then swing the whole seat up and
forward until they are locked.
Tumbling the second seats will enlarge the
floor space for third seat entry. It will also
enlarge the luggage compartment when
the third seats are not used. See “—Stow-
age precautions” on page 305 in Section
2 for precautions when loading luggage.WHEN RETURNING SECOND SEATS
Push the knob to unlock the seat,
swing the whole seat down and swing
the seatback up.
—Tumbling second seats
Page 64 of 426
’05 4Runner_U (L/O 0504)
54
BEFORE FOLDING UP THIRD SEATS
1. Stow the third seat belt buckles as shown in the illustration.
This prevents the buckles from falling out
when you fold up the third seats.
NOTICE
The seat belt buckles must be stowed
before you fold up the third seats.
2. Make sure the shoulder belt passes through the hanger.
This prevents the shoulder belt from being
damaged.
CAUTION
The seat belt must be removed from
the hanger when the seat belt is in
use.
FOLDING UP THIRD SEATS 1. Lower the head restraint to the low- est position. Fold down the seatback
while pushing the seatback angle ad-
justing lever.
Folding up the third seats will enlarge the
luggage compartment. See “—Stowage
precautions” on page 305 in Section 2 for
precautions when loading luggage.
—Folding up third seats
Page 65 of 426
’05 4Runner_U (L/O 0504)
55
2. Unlock the seat leg by pulling the
handle behind the seat, and swing
the whole seat up and sideward.3. Stow the seat leg in the back of theseat cushion. Take the holding strap
out of its holder, and attach the
strap to the assist grip. Tighten the
strap by pulling the end and fix it
with Velcro.
CAUTION
When folding up the third seats, fix
the seats securely by adjusting the
length of the holding strap. Failure to
do so may cause an unexpected inju-
ry in the event of emergency braking
or collision.
4. Remove the seat anchor covers fromthe back of the seat cushion, and
install them over the seat anchors.
CAUTION
Be sure to apply the covers on the
seat anchors, or you may get burned
when they become hot.

49
1. Lower the head restraint to the lowe-
st position.2. Swing the bottom cushion up bypulling the lock rel ease strap.
Each bottom cushion can be swung up
separately.3. P")

52
BEFORE TUMBLING SECOND SEATS
Stow the second seat belt buckles as
shown in the illustration.
This prevents the buckles from falling out
when you tumble the second seat.")

54
BEFORE FOLDING UP THIRD SEATS
1. Stow the third seat belt buckles as shown in the illustration.
This prevents the buckles from falling out
when you fold up the third seat")

55
2. Unlock the seat leg by pulling the
handle behind the seat, and swing
the whole seat up and sideward.3. Stow the seat leg in the back of theseat cushion. Take the holdi")