Page 67 of 426
’05 4Runner_U (L/O 0504)
57
2. Make sure the shoulder belt passes
through the hanger.
This prevents the shoulder belt from being
damaged.
CAUTION
The seat belt must be removed from
the hanger when the seat belt is in
use.
REMOVING THIRD SEATS 1. Lower the head restraint to the low- est position. Fold down the seatback
while pushing the seatback angle ad-
justing lever.2. Unlock the seat leg by pulling thehandle behind the seat, and lift the
whole seat up. Retract the seat leg
into the back of the seat cushion.
Then, place the seat on the floor.
Page 69 of 426
’05 4Runner_U (L/O 0504)
59
REINSTALLING THIRD SEATS
1. Remove the seat anchor covers from the floor and install them in the
back of the seat cushion. Hold the
seat and engage the seat striker to
the seat lock, then place the seat on
the floor. Press down the seatback
to securely lock the seat to the
body.
2. Pull out the seat leg from the backof the seat cushion and lock it on
the anchor. Reinstall the cover.3. Raise the seatback while pushingdown the seatback angle adjusting
lever.
CAUTION
When removing or reinstalling the
seat, observe the following to prevent
personal injury:
�Do not fold or remove the seat
while the vehicle is moving.
�Be careful not to get your hands or
feet pinched in the seat.
�Be careful not to hit the removed
seat against a person or drop it on
yourself.
Page 70 of 426

’05 4Runner_U (L/O 0504)
60
�When reinstalling the seat, be care-
ful not to hit the seat against your-
self or the vehicle.
To prevent personal injury in a colli-
sion or sudden stop:
�Do not sit on or place anything on
the folded seatback while driving.
�Do not leave the removed seat un-
secured in the vehicle.
�Do not try to sit on or place any-
thing on the removed seat.
�Reinstall each seat in its original
position. Failure to do so will pre-
vent third seat occupants from us-
ing seat belts properly.
�Make sure the seat is securely
locked by pushing forward and rear-
ward on the top of the seatback or
by trying to pull up the edge of the
bottom cushion. Failure to do so
will prevent the seat belt from oper-
ating properly.
�Make sure the seat belts are not
twisted or caught under the seat
and are arranged in their proper
position and are ready to use.
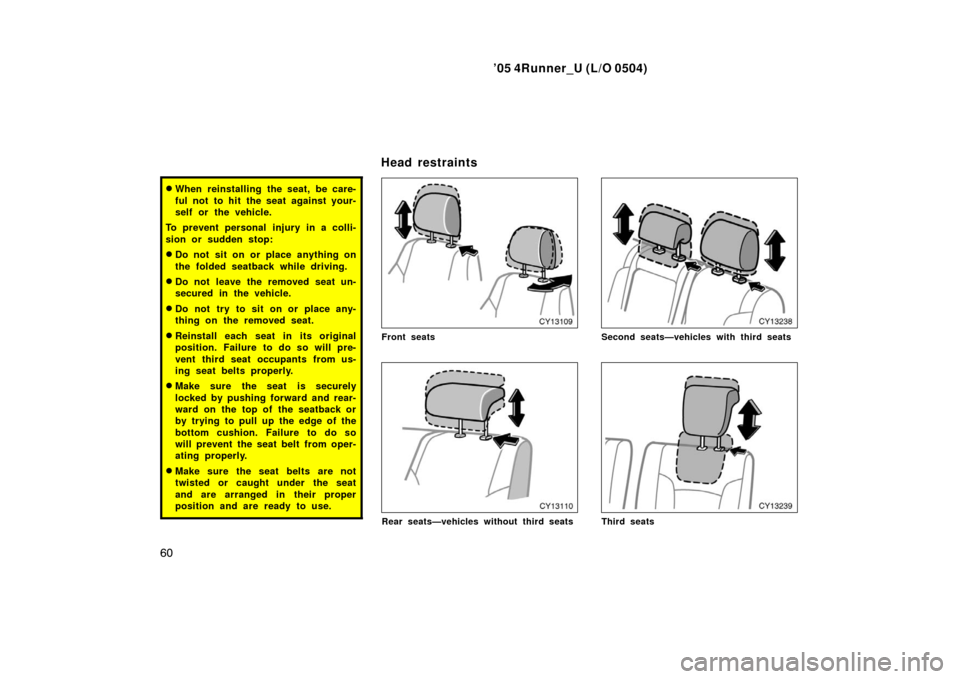
Front seats
Rear seats—vehicles without third seats
Second seats—vehicles with third seats
Third seats
Head restraints
Page 77 of 426

’05 4Runner_U (L/O 0504)
67
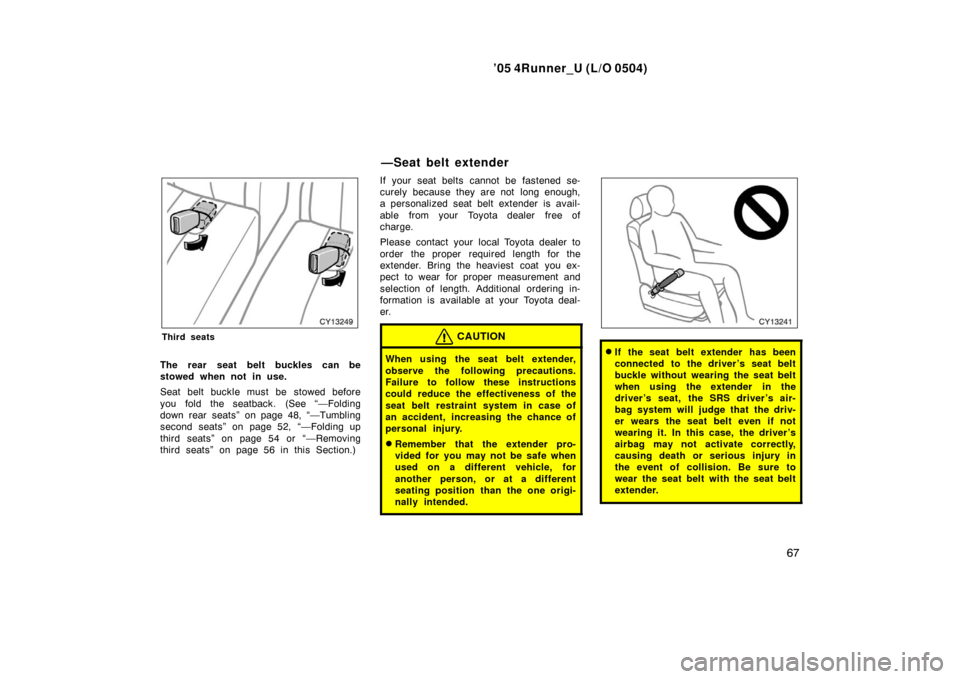
Third seats
The rear seat belt buckles can be
stowed when not in use.
Seat belt buckle must be stowed before
you fold the seatback. (See “—Folding
down rear seats” on page 48, “—Tumbling
second seats” on page 52, “—Folding up
third seats” on page 54 or “—Removing
third seats” on page 56 in this Section.) If your seat belts cannot be fastened se-
curely because they are not long enough,
a personalized seat belt extender is avail-
able from your Toyota dealer free of
charge.
Please contact your local Toyota dealer to
order the proper required length for the
extender. Bring the heaviest coat you ex-
pect to wear for proper measurement and
selection of length. Additional ordering in-
formation is available at your Toyota deal-
er.
CAUTION
When using the seat belt extender,
observe the following precautions.
Failure to follow these instructions
could reduce the effectiveness of the
seat belt restraint system in case of
an accident, increasing the chance of
personal injury.
�Remember that the extender pro-
vided for you may not be safe when
used on a different vehicle, for
another person, or at a different
seating position than the one origi-
nally intended.
�If the seat belt extender has been
connected to the driver ’s seat belt
buckle without wearing the seat belt
when using the extender in the
driver ’s seat, the SRS driver ’s air-
bag system will judge that the driv-
er wears the seat belt even if not
wearing it. In this case, the driver ’s
airbag may not activate correctly,
causing death or serious injury in
the event of collision. Be sure to
wear the seat belt with the seat belt
extender.
—Seat belt extender
Page 124 of 426

’05 4Runner_U (L/O 0504)
11 4
CAUTION
�When using the lower anchorages
for the child restraint system, be
sure that there are no irregular ob-
jects around the anchorages or that
the seat belt is not caught.
�Push and pull the child restraint
system in different directions to be
sure it is secure. Follow all the
installation instructions provided by
its manufacturer.
�Do not install a child restraint sys-
tem on the rear seat if it interferes
with the lock mechanism of the
front seats. Otherwise, the child or
front seat occupant(s) may be killed
or seriously injured in case of sud-
den braking or a collision.Lower anchorages for the child restraint
systems complying with the FMVSS225
or CMVSS210.2 specifications are
installed in the second seats.
The anchorages are installed in the seat
cushion of the right side seating position
and between the center and left side seat-
ing position.
Child restraint systems complying with the
FMVSS213 or CMVSS213 specification
can be fixed to these anchorages. In this
case, it is not necessary to fix the child
restraint system with a seat belt on the
vehicle.
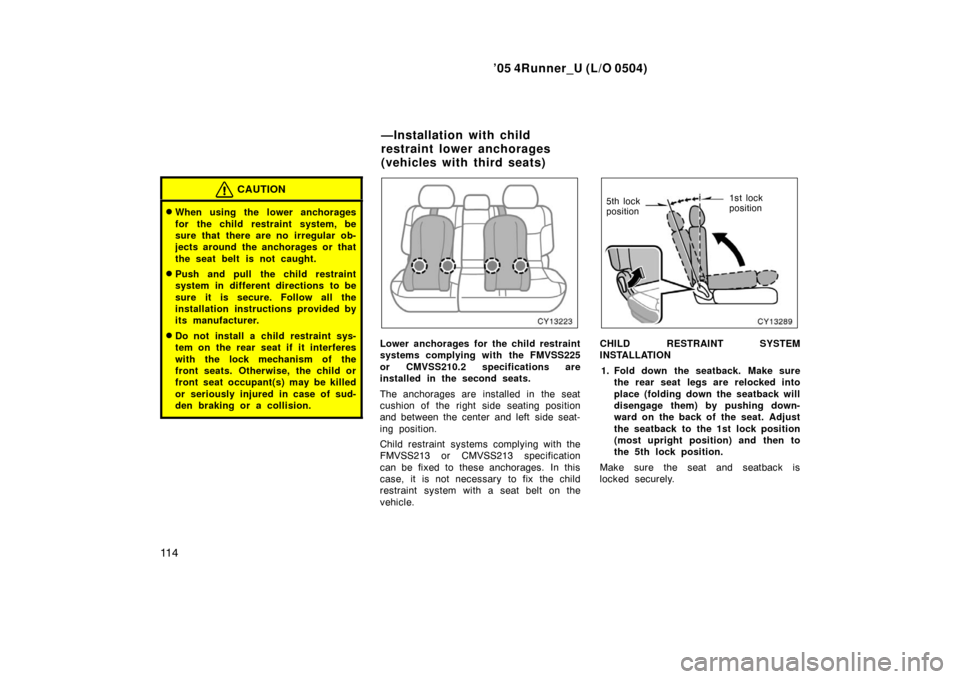
1st lock
position
5th lock
position
CHILD RESTRAINT SYSTEM
INSTALLATION
1. Fold down the seatback. Make sure the rear seat legs are relocked into
place (folding down the seatback will
disengage them) by pushing down-
ward on the back of the seat. Adjust
the seatback to the 1st lock position
(most upright position) and then to
the 5th lock position.
Make sure the seat and seatback is
locked securely.
—Installation with child
restraint lower anchorages
(vehicles with third seats)
Page 374 of 426

’05 4Runner_U (L/O 0504)
364
Power steering fluid level
Check the level through the reservoir. The
level should be in the “HOT” or “COLD”
range depending on the fluid temperature.
See page 381 in Section 7 −2 for addition-
al information.
Exhaust system
If you notice any change in the sound of
the exhaust or smell exhaust fumes, have
the cause located and corrected immedi-
ately. (See “Engine exhaust cautions” on
page 287 in Section 2.)
INSIDE THE VEHICLE
Items listed below should be checked
regularly, e.g. while performing periodic
services, cleaning the vehicle, etc.
Lights
Make sure the headlights, stop lights, tail
lights, turn signal lights, and other lights
are all working. Check headlight aim.
Service reminder indicators and warning
buzzers
Check that all service reminder indicators
and warning buzzers function properly.
Steering wheel
Check that it has the specified free play.
Be alert for changes in steering condition,
such as hard steering or strange noise. Seats
Check that all front seat controls such as
seat adjusters, seatback recliner, etc. op-
erate smoothly and that all latches lock
securely in any position. Check that the
head restraint move up and down smooth-
ly and that the locks hold securely in any
latched position. For folding
−down rear
seatbacks and swing −up rear seat cush-
ions (vehicles without third seats), tum-
bling second seats (vehicles with third
seats), folding −up third seats and detach-
able third seats, check that the latches
lock securely.
Seat belts
Check that the seat belt system such as
buckles, retractors and anchors operate
properly and smoothly. Make sure that the
belt webbing is not cut, frayed, worn or
damaged.
Accelerator pedal
Check the pedal for smooth operation and
uneven pedal effort or catching.
Brake pedal
Check the pedal for smooth operation and
that the pedal has the proper clearance.
Check the brake booster function. Brakes
In a safe place, check that the brakes do
not pull to one side when applied.
Parking brake
Check that the pedal has the proper travel
and that, on a safe incline, your vehicle
is held securely with only the parking
brake applied.
Automatic transmission “Park” mecha-
nism
On a safe incline, check that your vehicle
is held securely with the selector lever in
“P” position and all brakes released.
OUTSIDE THE VEHICLE
Items listed below should be performed
from time to time, unless otherwise
specified.
Fluid leaks
Check underneath for leaking fuel, oil, wa-
ter or other fluid after the vehicle has
been parked for a while. If you smell fuel
fumes or notice any leak, have the cause
found and corrected immediately.