Page 205 of 426
’05 4Runner_U (L/O 0504)
195
RESUMING THE PRESET SPEED
If the preset speed is cancelled by pulling
the control lever or by depressing the
brake pedal, pushing the lever up in the
“+ RES” direction will restore the speed
set prior to cancellation.
CRUISE CONTROL FAILURE WARNING
If the “CRUISE” indicator light in the
instrument cluster flashes when using the
cruise control, press the “ON −OFF” button
to turn the system off and then press it
again to turn it on.
If any of the following conditions then oc-
curs, there is some trouble in the cruise
control system.
�The indicator light does not come on.
�The indicator light flashes again.
�The indicator light goes out after it
comes on.
If this is the case, contact your Toyota
dealer and have your vehicle inspected.
Page 228 of 426
’05 4Runner_U (L/O 0504)
218
The rear seat audio system consists of
following components.
1. Front audio system
2. Rear seat audio system display
3. Rear seat audio system controller
4. Controller holder The rear seat audio system can be oper-
ated with the rear seat audio system con-
troller.
CAUTION
Do not disassemble or modify the
controller. It may cause an accident,
fire or electric shock.
NOTICE
Keep the controller away from direct
sunlight, high heat and high humidity.
These conditions could cause the
case to deform or the battery to ex-
plode or leak.
—Rear seat audio system
controller
Page 229 of 426
’05 4Runner_U (L/O 0504)
219
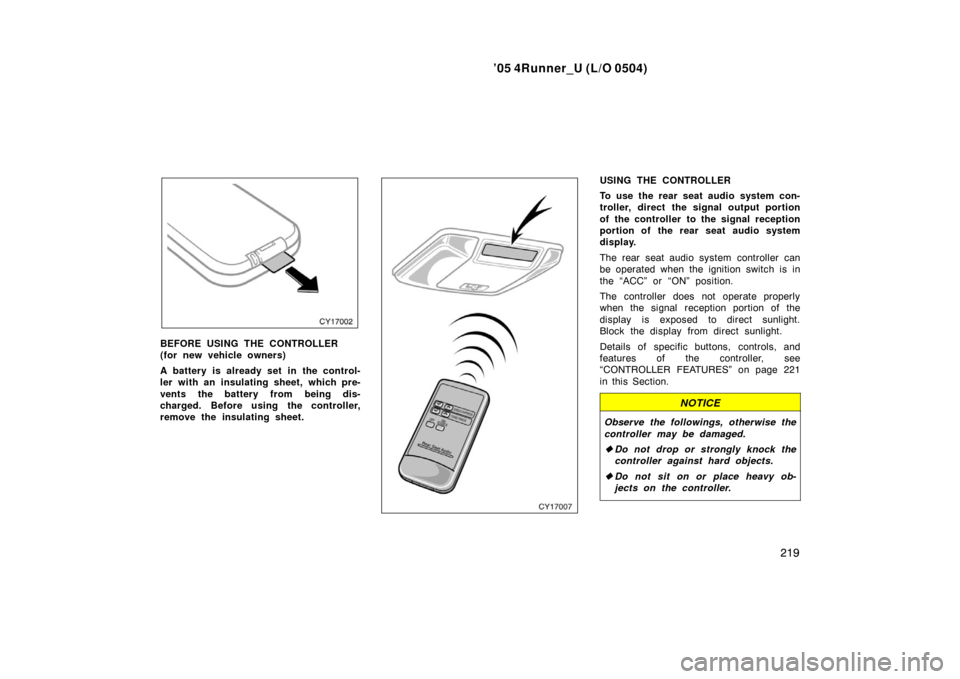
BEFORE USING THE CONTROLLER
(for new vehicle owners)
A battery is already set in the control-
ler with an insulating sheet, which pre-
vents the battery from being dis-
charged. Before using the controller,
remove the insulating sheet.
USING THE CONTROLLER
To use the rear seat audio system con-
troller, direct the signal output portion
of the controller to the signal reception
portion of the rear seat audio system
display.
The rear seat audio system controller can
be operated when the ignition switch is in
the “ACC” or “ON” position.
The controller does not operate properly
when the signal reception portion of the
display is exposed to direct sunlight.
Block the display from direct sunlight.
Details of specific buttons, controls, and
features of the controller, see
“CONTROLLER FEATURES” on page 221
in this Section.
NOTICE
Observe the followings, otherwise the
controller may be damaged.
�Do not drop or strongly knock the
controller against hard objects.
� Do not sit on or place heavy ob-
jects on the controller.
Page 236 of 426
’05 4Runner_U (L/O 0504)
226
AM
Fading—AM broadcasts are reflected by
the upper atmosphere—especially at night.
These reflected signals can interfere with
those received directly from the radio sta-
tion, causing the radio station to sound
alternately strong and weak.
Station interference—When a reflected sig-
nal and a signal received directly from a
radio station are very nearly the same
frequency, they can interfere with each
other, making it difficult to hear the broad-
cast.
Static—AM is easily affected by external
sources of electrical noise, such as high
tension power lines, lightening, or electri-
cal motors. This results in static.
CARING FOR YOUR CASSETTE PLAYER
AND TAPES
For the best performance for your cas-
sette player and tapes:
Clean the tape head and other parts regu-
larly.
�A dirty tape head or tape path can
decrease sound quality and tangle your
cassette tapes. The easiest way to
clean them is by using a cleaning tape.
(A wet type is recommended.) Use high
−quality cassettes.
�Low −quality cassette tapes can cause
many problems, including poor sound,
inconsistent playing speed, and
constant auto− reversing. They can also
get stuck or tangled in the cassette
player.
�Do not use a cassette if it has been
damaged or tangled or if its label is
peeling off.
�Do not leave a cassette in the player
if you are not listening to it, especially
if it is hot outside.
�Store cassettes in their cases and out
of direct sunlight.
�Avoid using cassettes with a total play-
ing time longer than 100 minutes (50
minutes per side). The tape used in
these cassettes is thin and could get
stuck or tangled in the cassette player. CARING FOR YOUR COMPACT DISC
PLAYER AND DISCS
�Your compact disc player is intended
for use with 12 cm (4.7 in.) discs only.
�Extremely high temperatures can keep
your compact disc player from working.
On hot days, use the air conditioning
to cool the vehicle interior before you
listen to a disc.
�Bumpy roads or other vibrations may
cause your compact disc player to
skip.
�If moisture gets into your compact disc
player, you may not hear any sound
even though your compact disc player
appears to be working. Remove the
disc from the player and wait until it
dries.
CAUTION
Compact disc players use an invisible
laser beam which could cause hazard-
ous radiation exposure if directed
outside the unit. Be sure to operate
the player correctly.
Page 238 of 426
’05 4Runner_U (L/O 0504)
228
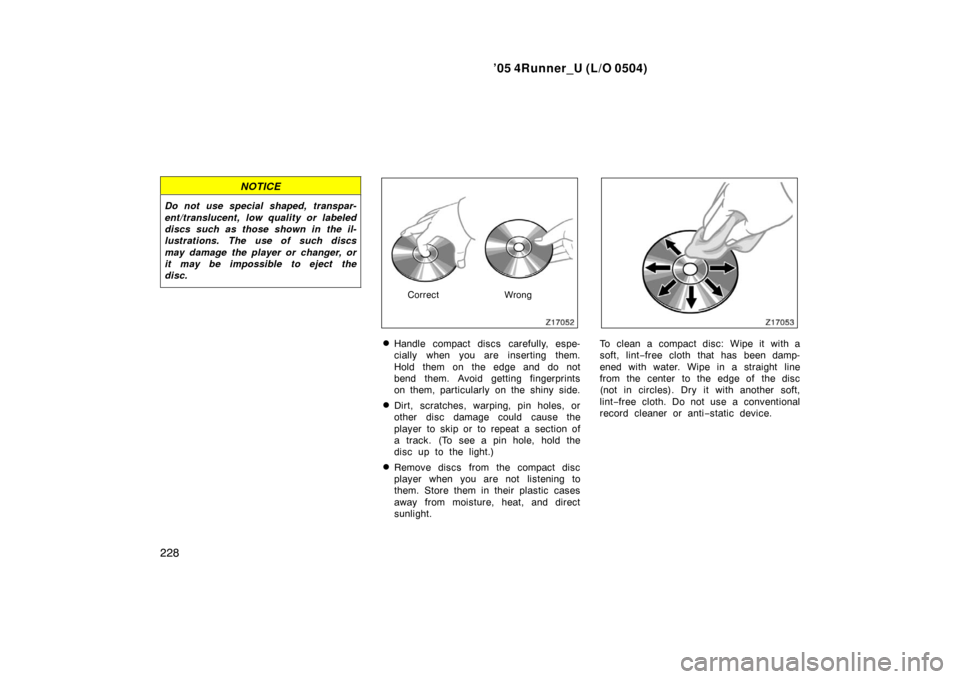
NOTICE
Do not use special shaped, transpar-
ent/translucent, low quality or labeled
discs such as those shown in the il-
lustrations. The use of such discs
may damage the player or changer, or
it may be impossible to eject the
disc.
CorrectWrong
�Handle compact discs carefully, espe-
cially when you are inserting them.
Hold them on the edge and do not
bend them. Avoid getting fingerprints
on them, particularly on the shiny side.
�Dirt, scratches, warping, pin holes, or
other disc damage could cause the
player to skip or to repeat a section of
a track. (To see a pin hole, hold the
disc up to the light.)
�Remove discs from the compact disc
player when you are not listening to
them. Store them in their plastic cases
away from moisture, heat, and direct
sunlight.
To clean a compact disc: Wipe it with a
soft, lint−free cloth that has been damp-
ened with water. Wipe in a straight line
from the center to the edge of the disc
(not in circles). Dry it with another soft,
lint −free cloth. Do not use a conventional
record cleaner or anti −static device.
Page 241 of 426
’05 4Runner_U (L/O 0504)
231
“AUTO” button
For automatic operation of the air condi-
tioning, push the “AUTO” button. An indi-
cator light will illuminate to show that the
automatic operation mode has been se-
lected.
In the automatic operation mode, the air
conditioning selects the most suitable fan
speed, air flow, air intake and on −off of
the air conditioning according to the tem-
perature.
When you push the “AUTO” button with
the air intake mode at FRESH, internal
circulation may be applied for maximum
cooling.
You may use manual controls if you want
to select your own settings.
Fan speed selector
Select the mode button you desire to ad-
just the fan speed and push it. An indica-
tor light will illuminate to show which fan
speed mode is being selected.
In automatic operation, you do not have
to adjust the fan speed unless you desire
another fan speed mode. Temperature selector
To increase the temperature, push the
“UP” side, to decrease it, push the
“DOWN” side.
“LO” appears when you adjust to maxi-
mum cooling, and “HI” appears when you
adjust to maximum warming.
“OFF” button
Push the “OFF” button to turn off the air
conditioning system.
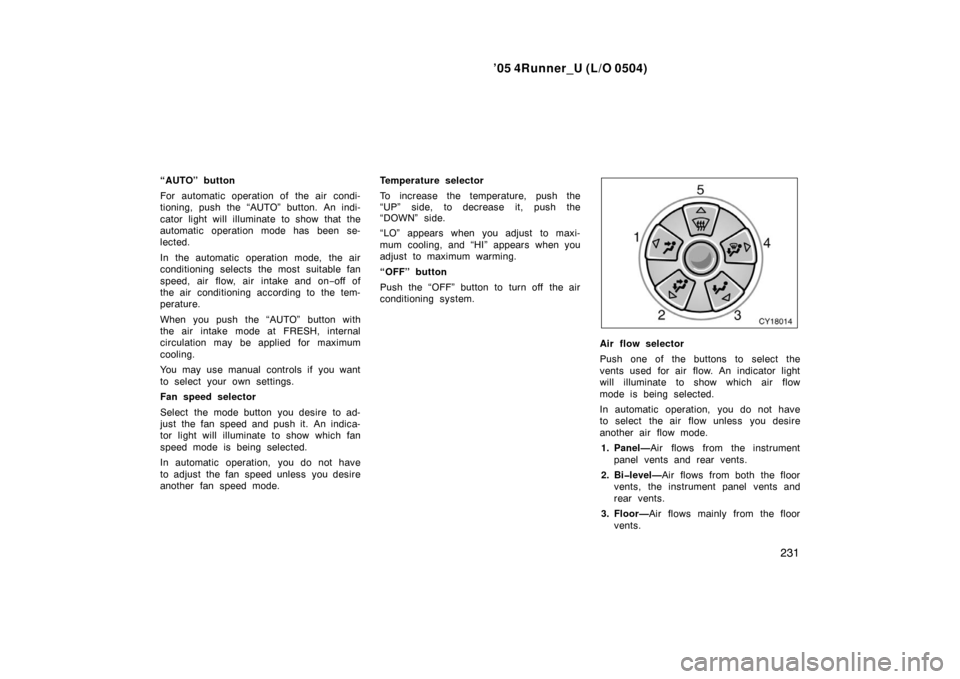
Air flow selector
Push one of the buttons to select the
vents used for air flow. An indicator light
will illuminate to show which air flow
mode is being selected.
In automatic operation, you do not have
to select the air flow unless you desire
another air flow mode.
1. Panel— Air flows from the instrument
panel vents and rear vents.
2. Bi�level— Air flows from both the floor
vents, the instrument panel vents and
rear vents.
3. Floor— Air flows mainly from the floor
vents.
Page 242 of 426
’05 4Runner_U (L/O 0504)
232
4. Floor/Windshield— Air flows mainly
from the floor vents and windshield
vents.
5. Windshield— Air flows mainly from the
windshield vents.
When this button is pressed, air flows
mainly from the windshield vents and
turns on the defogging function with the
purpose of clearing the front view.
Pressing this button once again returns
the air flow mode to the last one used.
This button allows the air intake to
select FRESH automatically. This is to
clean up the front view more quickly.
If you want to return the setting to
RECIRCULATE mode, press the air in-
take selector button once again.
Press the “A/C” button for dehumidified
heating or cooling. This setting clears
the front view more quickly.
For details about air flow selector settings,
see “Air flow selector settings” described
below.
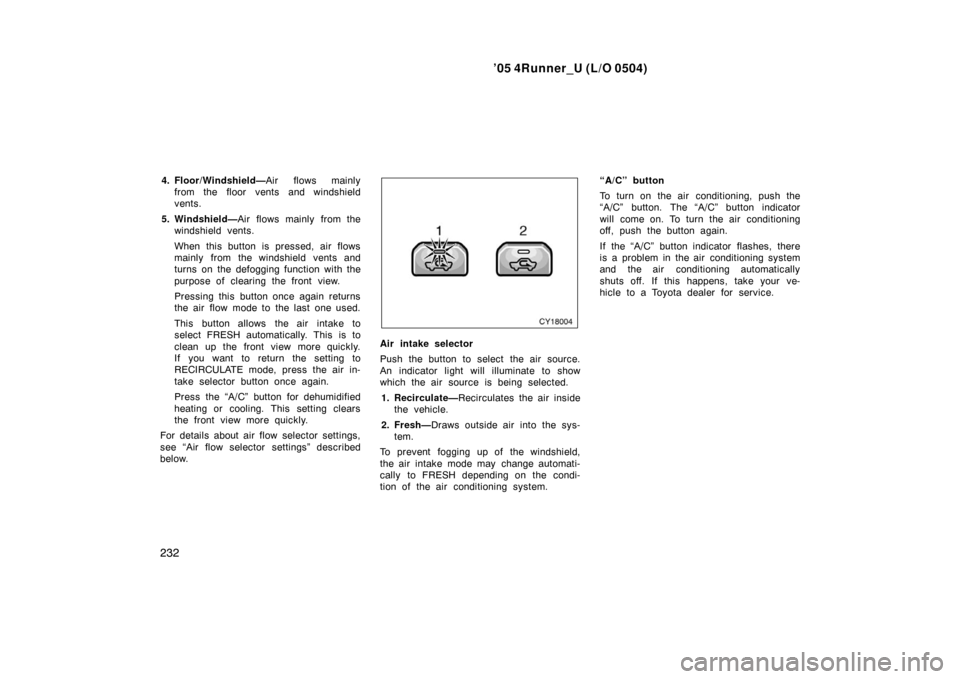
Air intake selector
Push the button to select the air source.
An indicator light will illuminate to show
which the air source is being selected.
1. Recirculate— Recirculates the air inside
the vehicle.
2. Fresh— Draws outside air into the sys-
tem.
To prevent fogging up of the windshield,
the air intake mode may change automati-
cally to FRESH depending on the condi-
tion of the air conditioning system. “A/C” button
To turn on the air conditioning, push the
“A/C” button. The
“A/C” button indicator
will come on. To turn the air conditioning
off, push the button again.
If the “A/C” button indicator flashes, there
is a problem in the air conditioning system
and the air conditioning automatically
shuts off. If this happens, take your ve-
hicle to a Toyota dealer for service.
Page 244 of 426
’05 4Runner_U (L/O 0504)
234
“AUTO” button
For automatic operation of the air condi-
tioning, push the “AUTO” button. An indi-
cator light will illuminate to show that the
automatic operation mode has been se-
lected.
In the automatic operation mode, the air
conditioning selects the most suitable fan
speed, air flow, air intake and on −off of
the air conditioning according to the tem-
perature.
When you push the “AUTO” button with
the air intake mode at FRESH, internal
circulation may be applied for maximum
cooling.
You may use manual controls if you want
to select your own settings.
Fan speed selector
Select the mode button you desire to ad-
just the fan speed and push it. An indica-
tor light will illuminate to show which fan
speed mode is being selected.
In automatic operation, you do not have
to adjust the fan speed unless you desire
another fan speed mode. Temperature selector
To increase the temperature, push the “
�”
side, to decrease it, push the “ �” side.
“LO” appears when you adjust to maxi-
mum cooling, and “HI” appears when you
adjust to maximum warming.
“DUAL” button
This button is used to set the tempera-
tures independently for the driver ’s seat
and front passenger seat.
Pushing the button changes the mode
from independent and linked.
Independent mode: Temperatures can be
set independently for the driver ’s seat and
front passenger ’s seat. An indicator light
will illuminated to show that the indepen-
dent mode has been selected.
Linked mode: The same temperature is
set for the driver’s seat and front passen-
ger ’s seat.
When the temperature for the front pas-
senger ’s seat is changed in linked mode,
the mode is changed automatically to in-
dependent mode.
“OFF” button
Push the “OFF” button to turn off the air
conditioning system.
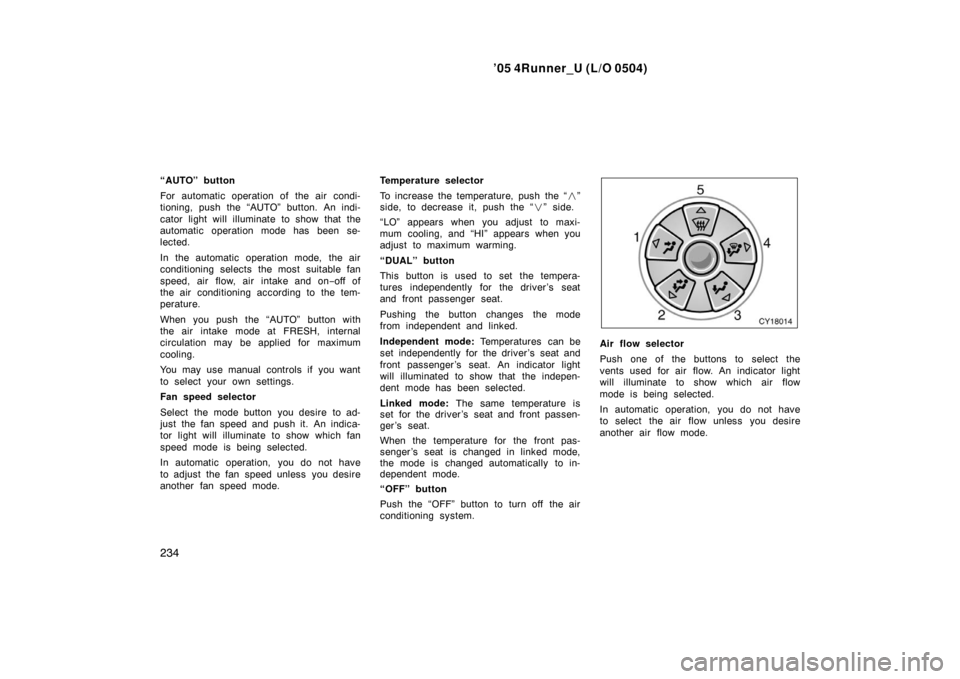
Air flow selector
Push one of the buttons to select the
vents used for air flow. An indicator light
will illuminate to show which air flow
mode is being selected.
In automatic operation, you do not have
to select the air flow unless you desire
another air flow mode.