Page 142 of 477

3-1
3
Instruments and controls
Ignition switch .............................................. 3-3 LOCK .................................................................. 3-3
ACC .................................................................... 3-4
ON ....................................................................... 3-4
START ................................................................ 3-4
Key reminder chime .......................................... 3-5
Ignition switch light (if equipped) .................... 3-5
Key interlock release (AT vehicles only) ........ 3-6
Hazard warning flasher ................................ 3-7
Meters and gauges ....................................... 3-7 Speedometer ..................................................... 3-7
Odometer/Trip meter ........................................ 3-7
Tachometer ........................................................ 3-8
Fuel gauge ......................................................... 3-9
Temperature gauge ........................................... 3-10
Outside temperature indicator ......................... 3-11
Warning and indicator lights ....................... 3-12 Seatbelt warning light and chime .................... 3-13
SRS airbag system warning light .................... 3-13
CHECK ENGINE warning light/Malfunction indicator lamp ................................................. 3-13
Charge warning light ........................................ 3-14
Oil pressure warning light ................................ 3-15
AT OIL TEMPerature warning light
(AT vehicles) ................................................... 3-15
ABS warning light ............................................. 3-15
Vehicle Dynamics Control warning light (if equipped)/Vehicle Dynamics Control
OFF indicator light (if equipped) ................... 3-16
Brake system warning light ............................. 3-18
Door open warning lights ................................. 3-19 Low fuel warning light ...................................... 3-19
All-Wheel Drive warning light (AT vehicles) ... 3-19
Vehicle Dynamics Control operation
indicator light (if equipped) ........................... 3-20
Shift position indicator (AT vehicles) ............. 3-20
Turn signal indicator lights .............................. 3-21
High beam indicator light ................................. 3-21
Cruise control indicator light (if equipped) .... 3-21
Cruise control set indicator light (if equipped) .................................................... 3-21
Clock .............................................................. 3-22
Light control switch ...................................... 3-23 Headlights ......................................................... 3-23
High/low beam change (dimmer) .................... 3-24
Headlight flasher ............................................... 3-24
Daytime running light system ......................... 3-25
Turn signal lever ........................................... 3-25
Illumination brightness control ................... 3-26
Parking light switch ...................................... 3-27
Fog light button (if equipped) ...................... 3-27
Wiper and washer ......................................... 3-28 Windshield wiper and washer switches ......... 3-29
Rear window wiper and washer switch .......... 3-31
Windshield wiper deicer (if equipped) ........ 3-32
Rear window defogger button ..................... 3-33
Mirrors ............................................................ 3-35 Inside mirror ...................................................... 3-35
Outside mirrors ................................................. 3-37
Tilt steering wheel ......................................... 3-39
Page 163 of 477
3-22
Instruments and controls
Clock
To adjust the clock, open the small article storage
compartment in the dashboard with the vehicle parked
in a safe place.
To set the hour, press the “H” button. To set the min-
utes, press the “M” button. To reset the minutes to “00”
with a radio time signal, push the “Reset” button.
To ensure safety, do not attempt to set the time
while driving, as an accident from inadequate
attention to the road could result.
HS3025BA
HS3018BA
Page 194 of 477

4-13
Climate control
– CONTINUED –
NOTE
With the fan speed control dial in the AUTO posi-
tion and the air flow control dial in the “ ”,
“ ”, or “ ” position, the fan does not oper-
ate during engine warmup until the engine coolant
temperature exceeds approx. 122 °F (50 °C).
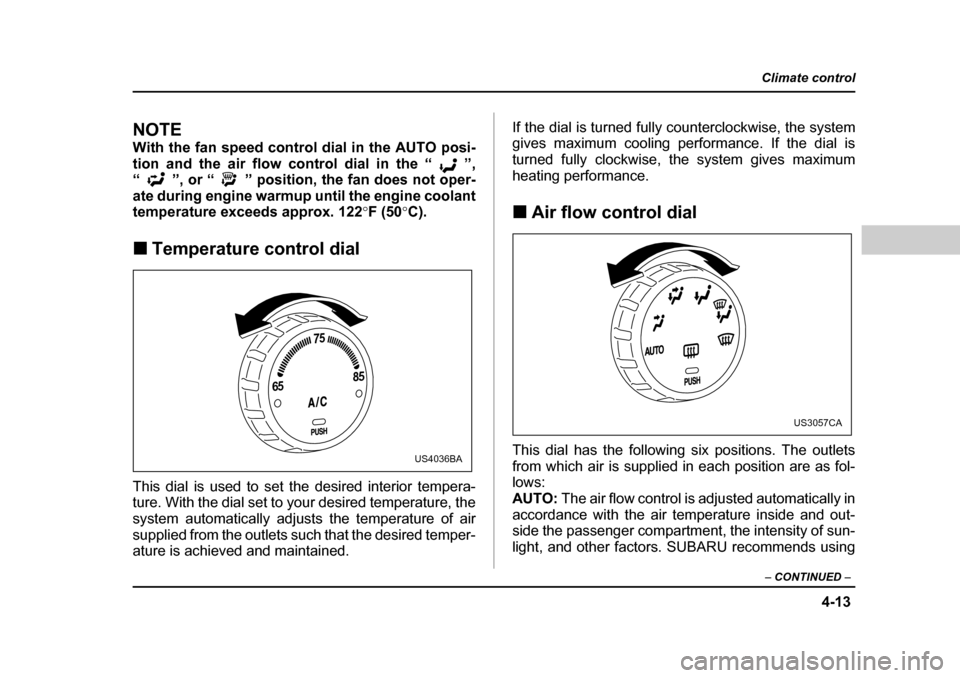
�„ Temperature control dial
This dial is used to set the desired interior tempera-
ture. With the dial set to your desired temperature, the
system automatically adjusts the temperature of air
supplied from the outlets such that the desired temper-
ature is achieved and maintained. If the dial is turned fully counterclockwise, the system
gives maximum cooling performance. If the dial is
turned fully clockwise, the system gives maximum
heating performance. �„
Air flow control dial
This dial has the following six positions. The outlets
from which air is supplied in each position are as fol-
lows:AUTO: The air flow control is adjusted automatically in
accordance with the air temperature inside and out-
side the passenger compartment, the intensity of sun-
light, and other factors. SUBARU recommends using
65 75
85
US4036BA
US3057CA
Page 435 of 477
11 - 7 0
Maintenance and service
6. Remove the bulb socket from the headlight assem-
bly by turning it counterclockwise.
7. Pull the bulb out of the socket. Install a new bulb.
8. Set the bulb socket into the headlight assembly and
turn it clockwise until it locks.
9. Reinstall all the removed parts by following the re-
moval sequence in reverse. �„
Front fog light
It may be difficult to replace the bulbs. Have your
SUBARU dealer replace the bulbs if necessary. �„ Rear combination lights
1. Remove the upper and lower screws. Then, slide
the rear combination lamp assembly to the rear and
HSB073CAHSB080BA
Page 436 of 477
11 -7 1
Maintenance and service
– CONTINUED –
remove it from the vehicle.
A) Tail/stop light
B) Rear turn signal light
C) Backup light
D) Tail/stop light
2. Remove the bulb holder from the rear combination
light assembly by turning it counterclockwise.
3. Pull the bulb from the holder. Install a new bulb.
4. Set the bulb holder into the rear combination light
assembly and turn it clockwise until it locks.
5. Reinstall the rear combination light assembly.
HSB085BA
C
B
A
D
HSB086BC