2005 SUBARU FORESTER engine coolant
[x] Cancel search: engine coolantPage 151 of 477
3-10
Instruments and controls
NOTE
This light does not go out unless the tank is re-
plenished up to an internal fuel quantity of about
4.0 US gal (15 liters, 3.3 Imp gal).
Promptly put fuel in the tank whenever the low
fuel warning light comes on. If the engine mis-
fired as a result of an empty tank, resulting cat-
alytic converter damage could cause damage
to the turbocharger.
�„
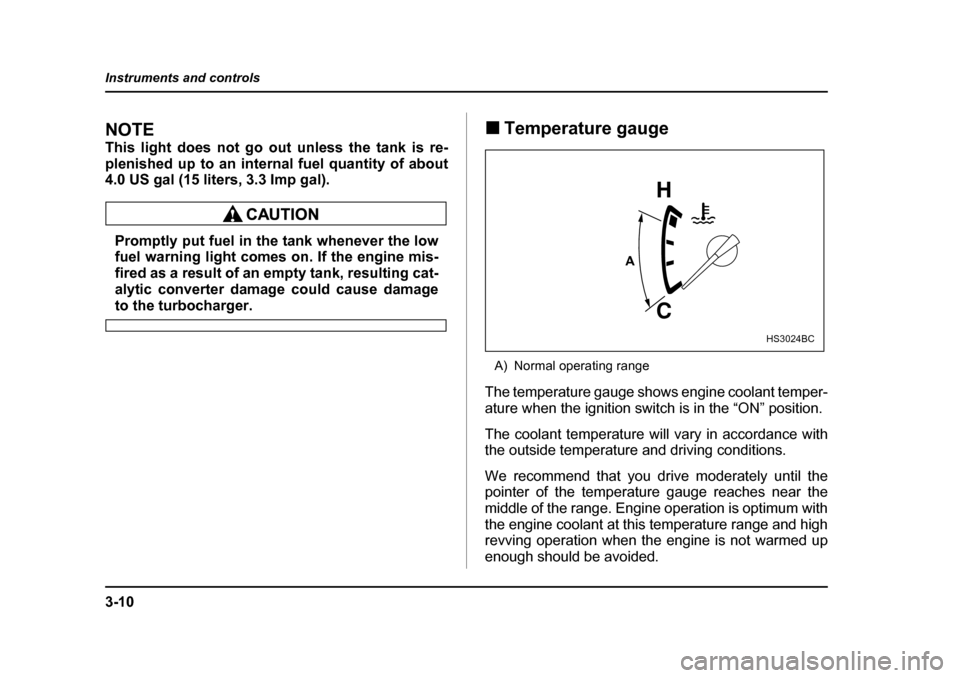
Temperature gauge
A) Normal operating range
The temperature gauge shows engine coolant temper-
ature when the ignition switch is in the “ON” position.
The coolant temperature will vary in accordance with
the outside temperature and driving conditions.
We recommend that you drive moderately until the
pointer of the temperature gauge reaches near the
middle of the range. Engine operation is optimum with
the engine coolant at this temperature range and high
revving operation when the engine is not warmed up
enough should be avoided.
A
HS3024BC
Page 192 of 477
4-11
Climate control
– CONTINUED –
Automatic climate control system (if
equipped)
Although this climate control system can be used as a
full-automatic climate control system, it can also, if de-
sired, be used as a semi-automatic climate control system.
When it is used as a full-automatic climate control sys-
tem, the outlet air temperature, fan speed, air flow dis-
tribution, air inlet control, and air conditioner compres-
sor operation are all automatically controlled to main-
tain a constant, comfortable temperature inside the vehicle.
NOTE �yOperate the automatic climate control system
when the engine is running. �y When the engine coolant is cold, the blower
does not run.�y In the “AUTO” mode, when the air temperature
in the passenger compartment is sufficiently cool,
the air conditioner compressor does not operate.
For efficient defogging or dehumidifying in cold
weather, press the “A/C” button to operate the air
conditioner compressor. �y Even when cooling is not necessary, setting the
temperature much lower than the current outlet air temperature turns on the air conditioner compres-
sor automatically and the “A/C” indicator light on
the control panel comes on. �„
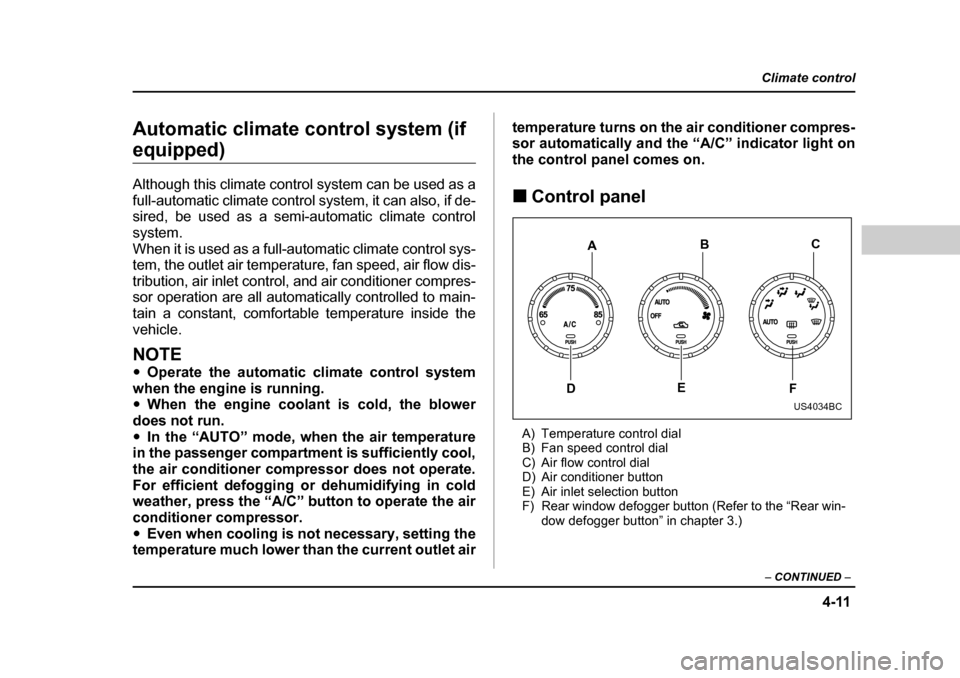
Control panel
A) Temperature control dial
B) Fan speed control dial
C) Air flow control dial
D) Air conditioner button
E) Air inlet selection button
F) Rear window defogger button (Refer to the “Rear win- dow defogger button” in chapter 3.)
C
E F
D B
A
US4034BC
Page 194 of 477
4-13
Climate control
– CONTINUED –
NOTE
With the fan speed control dial in the AUTO posi-
tion and the air flow control dial in the “ ”,
“ ”, or “ ” position, the fan does not oper-
ate during engine warmup until the engine coolant
temperature exceeds approx. 122 °F (50 °C).
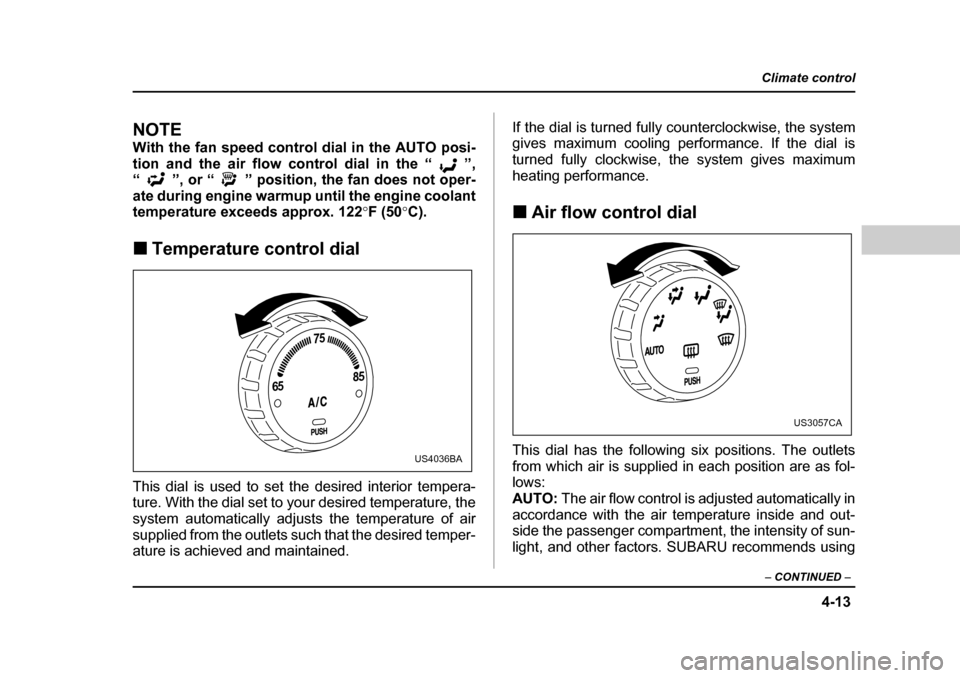
�„ Temperature control dial
This dial is used to set the desired interior tempera-
ture. With the dial set to your desired temperature, the
system automatically adjusts the temperature of air
supplied from the outlets such that the desired temper-
ature is achieved and maintained. If the dial is turned fully counterclockwise, the system
gives maximum cooling performance. If the dial is
turned fully clockwise, the system gives maximum
heating performance. �„
Air flow control dial
This dial has the following six positions. The outlets
from which air is supplied in each position are as fol-
lows:AUTO: The air flow control is adjusted automatically in
accordance with the air temperature inside and out-
side the passenger compartment, the intensity of sun-
light, and other factors. SUBARU recommends using
65 75
85
US4036BA
US3057CA
Page 266 of 477

7-9
Starting and operating
– CONTINUED –
Preparing to drive
You should perform the following checks and adjust-
ments every day before you start driving.
1. Check that all windows, mirrors, and lights are
clean and unobstructed.
2. Check the appearance and condition of the tires.
Also check tires for proper inflation.
3. Look under the vehicle for any sign of leaks.
4. Check that the hood and rear gate are fully closed.
5. Check the adjustment of the seat.
6. Check the adjustment of the inside and outside mir-
rors.
7. Fasten your seatbelt. Check that your passengers
have fastened their seatbelts.
8. Check the operation of the warning and indicator
lights when the ignition switch is turned to the “ON” po-sition.
9. Check the gauges, indicator and warning lights af-
ter starting the engine.
NOTE
Engine oil, engine coolant, brake fluid, washer flu-
id and other fluid levels should be checked daily,
weekly or at fuel stops.
Starting the engine
Do not operate the starter motor continuously
for more than ten seconds. If the engine fails to
start after operating the starter for five to ten
seconds, wait for ten seconds or more before
trying again.
�„ Manual transmission vehicle
1. Apply the parking brake.
2. Turn off unnecessary lights and accessories.
3. Press the clutch pedal to the floor and shift the shift
lever into neutral. Hold the clutch pedal to the floor
while starting the engine.
The starter motor will only operate when the clutch
pedal is pressed fully to the floor.
4. Turn the ignition switch to the “ON” position and
check the operation of the warning and indicator lights.
Refer to the “Warning and indicator lights” section(chapter 3).
5. Turn the ignition switch to the “START” position
without depressing the accelerator pedal. Release
the key immediately after the engine has started.
Page 272 of 477
7-15
Starting and operating
– CONTINUED –
Automatic transmission
The automatic transmission is electronically controlled
and provides 4 forward speeds and 1 reverse speed.
NOTE �yWhen the engine coolant temperature is still
low, your vehicle’s automatic transmission will
up-shift at higher engine speeds than when the
coolant temperature is sufficiently high in order to
shorten the warm-up time and improve driveabili-
ty. The gearshift timing will automatically shift to
the normal timing after the engine has warmed up. �y Immediately after ATF (automatic transmission
fluid) is replaced, you may feel that the automatic
transmission operation is somewhat unusual.
This results from erasure or invalidation of data
the on-board computer has collected and stored in memory to allow the transmission to shift at the
most appropriate times for the current condition
of your vehicle. Optimized shifting will be restored
as the vehicle continues to be driven for a while.
Do not shift from the “P” or “N” position into
the “D”, “3”, “2”, “1” or “R” position while de-
pressing the accelerator pedal. This may cause
the vehicle to jump forward or backward.
�y Shift into the “P” or “R” position only after
the vehicle is completely stopped. Shifting
while the vehicle is moving may cause damage
to the transmission. �y Do not race the engine for more than five sec-
onds in any position except the “N” or “P” po-
sition when the brake is set or the tires are on
blocks. This may cause the automatic transmis-
sion fluid to overheat.�y Avoid shifting from one of the forward driving
positions into the “R” position or vice versa un-
til the vehicle has completely stopped. Such
shifting may cause damage to the transmis-
sion.
Page 349 of 477
9-12
In case of emergency
Engine overheating
Never attempt to remove the radiator cap until
the engine has been shut off and has fully
cooled down. When the engine is hot, the cool-
ant is under pressure. Removing the cap while
the engine is still hot could release a spray of
boiling hot coolant, which could burn you very
seriously.
If the engine overheats, safely pull off the road and
stop the vehicle in a safe place. �„ If steam is coming from the engine
compartment
Turn the engine off and get everyone away from the
vehicle until it cools down. �„ If no steam is coming from the engine
compartment
1. Keep the engine running at idling speed.
2. Open the hood to ventilate the engine compart- ment. Confirm that the cooling fan is turning. If the fan is not
turning, immediately turn the engine off and contact
your authorized dealer for repair.
3. After the engine coolant temperature has dropped,
turn off the engine.
If the temperature gauge stays at the overheated
zone, turn the engine off.
4. After the engine has fully cooled down, check the
coolant level in the reserve tank.
If the coolant level is below the “LOW” mark, add cool-
ant up to the “FULL” mark.
5. If there is no coolant in the reserve tank, add cool-
ant to the reserve tank. Then remove the radiator cap
and fill the radiator with coolant.
If you remove the radiator cap from a hot radiator, first
wrap a thick cloth around the radiator cap, then turn
the cap counterclockwise slowly without pressing
down until it stops. Release the pressure from the ra-
diator. After the pressure has been fully released, re-
move the cap by pressing down and turning it.
Page 366 of 477

11 - 1
11
Maintenance and service
Maintenance schedule ................................. 11-3
Maintenance precautions ............................ 11-3 Before checking or servicing in the engine compartment .................................................. 11-4
When you do checking or servicing in the engine compartment while the engine is
running ............................................................ 11-5
Engine hood .................................................. 11-5
Engine compartment overview ................... 11-8 Non-turbo models ............................................. 11-8
Turbo models .................................................... 11-9
Engine oil ...................................................... 11-10 Checking the oil level ....................................... 11-10
Changing the oil and oil filter .......................... 11-11
Recommended grade and viscosity ................ 11-13
Recommended grade and viscosity under severe driving conditions .............................. 11-15
Synthetic oil ....................................................... 11-15
Cooling system ............................................. 11-16 Cooling fan, hose and connections ................ 11-16
Engine coolant .................................................. 11-17
Air cleaner element ...................................... 11-21 Replacing the air cleaner element ................... 11-21
Spark plugs ................................................... 11-25 Recommended spark plugs ............................. 11-26
Drive belts ..................................................... 11-26
Manual transmission oil ............................... 11-27 Checking the oil level ....................................... 11-27
Recommended grade and viscosity ................ 11-28 Automatic transmission fluid ...................... 11-29
Checking the fluid level .................................... 11-29
Recommended fluid ......................................... 11-31
Front differential gear oil (AT vehicles) ...... 11-31 Checking the oil level ....................................... 11-31
Recommended grade and viscosity ............... 11-32
Rear differential gear oil ............................... 11-33 Checking the gear oil level .............................. 11-33
Recommended grade and viscosity ............... 11-34
Power steering fluid ...................................... 11-34 Checking the fluid level .................................... 11-34
Recommended fluid ......................................... 11-35
Brake fluid ..................................................... 11-36 Checking the fluid level .................................... 11-36
Recommended brake fluid ............................... 11-36
Clutch fluid (MT vehicles) ............................ 11-37 Checking the fluid level .................................... 11-37
Recommended clutch fluid .............................. 11-37
Brake booster ................................................ 11-38
Brake pedal .................................................... 11-38 Checking the brake pedal free play ................ 11-38
Checking the brake pedal reserve distance ... 11-39
Clutch pedal (MT vehicles) ........................... 11-39 Checking the clutch function .......................... 11-39
Checking the clutch pedal free play ............... 11-40
Hill holder (MT vehicles – if equipped) ....... 11-40
Replacement of brake pad and lining ......... 11-41 Breaking-in of new brake pads and linings .... 11-41
Parking brake stroke .................................... 11-42
Page 369 of 477
11 - 4
Maintenance and service
the materials in the vehicle may be hazardous if
improperly used or handled, for example, bat-tery acid. �y
Your vehicle should only be serviced by per-
sons fully competent to do so. Serious person-
al injury may result to persons not experienced
in servicing vehicles. �y Always use the proper tools and make certain
that they are well maintained. �y Never get under the vehicle supported only
by a jack. Always use a safety stands to sup-
port the vehicle. �y Never keep the engine running in a poorly
ventilated area, such as a garage or other
closed areas. �y Do not smoke or allow open flames around
the fuel or battery. This will cause a fire. �y Because the fuel system is under pressure,
replacement of the fuel filter should be per-
formed only by your SUBARU dealer.�y Wear adequate eye protection to guard
against getting oil or fluids in your eyes. If
something does get in your eyes, thoroughly
wash them out with clean water. �y Do not tamper with the wiring of the SRS air-
bag system or seatbelt pretensioner system, or
attempt to take its connectors apart, as that may activate the system or it can render it inop-
erative. The wiring and connectors of these
systems are yellow for easy identification. NEV-
ER use a circuit tester for these wiring.
If your SRS airbag or seatbelt pretensioner
needs service, consult your nearest SUBARU
dealer.
�„ Before checking or servicing in the en-
gine compartment
�yAlways stop the engine and set the parking
brake firmly to prevent the vehicle from mov-
ing. �y Always let the engine cool down. Engine
parts become very hot when the engine is run-
ning and remain hot for some time after the en-
gine is stopped.�y Do not spill engine oil, engine coolant, brake
fluid or any other fluid on hot engine compo-
nents. This may cause a fire.�y Always remove the key from the ignition
switch. When the ignition switch is in the “ON”
position, the cooling fan may operate suddenly