2005 SKODA FABIA door lock
[x] Cancel search: door lockPage 91 of 260

Seats and Stowage
90
•The pull-out storage compartment must always be kept closed
when driving for safety reasons.
Storage compartment in the front seat*
The storage compartment is foreseen for storing small objects of
up to 1 kg. in weight.
– Tilt the lock to open the flap and pull out the flap ⇒fig. 79 .
– Tilt the lock to close the flap and press flap close.
Storage compartment in the front doors
WARNING
Use the stowage compartments in the door panels only for small
items which do not project out of the compartment in order to avoid
any interference with the proper operation of the side airbags.
WARNING (continued)
Fig. 79 Front seat:
Storage compartment
Fig. 80 Stowage
compartment in door
panel
sqc.1.book Seite 90 Mittwoch, 13. April 2005 1:09 13
Page 139 of 260

Airbag system
138
•The service life of the airbag system is 15 years from the date of
manufacture of the vehicle. Have the airbag system replaced by a
specialist garage after this period. If the modules of the system are
replaced before the expiry of the term (e.g. because of an accident),
the new change interval has to be entered in the service brochure.
•If you sell your car, please hand over the complete vehicle docu-
mentation to the new owener. Please note that the documents
relating to the possibility of deactivating the front passenger airbag
are also part of the vehicle documents!
•If the vehicle or individual parts of the airbag system are
scrapped, it is essential to observe the relevant safety precautions.
Škoda dealers are familiar with these regulations.
•When disposing of vehicle or parts of the airbag system, it is
important to comply with the national legal requirements.
When are the airbags deployed?
The airbag system is designed in such a way that the driver and the front
passenger airbag* are deployed in the event of a frontal collision of
major severity.
In the case of a violent side crash the side airbags* on the front seat of
the vehicle on the side on which the collision occurs are deployed.
It is also possible under certain special accident situations that the front
as well as the side airbags are deployed.
The airbags are not deployed in the case of minor frontal and side colli-
sions, in the case of rear-end collisions and vehicle rollover. Deployment factors
It is not possible to state globally which deployment conditions apply to the
airbag system in every situation as the circumstances which exist in the
case of accidents vary greatly. An important role in this case, for example,
is played by factors such as the type of object against which the vehicle
impacts (hard, soft), the angle of impact, the vehicle speed etc.
A decisive factor for the deployment of the airbags is the deceleration
which occurs during a collision. The control unit analyses the nature of the
collision and activates the relevant restraint system. If the vehicle decel-
eration which occurs and is measured during the collision remains below
the prescribed reference values specified in the control unit, the airbags
are not deployed although the vehicle may well suffer severe damage to
the bodywork as a consequence of the accident.
The airbags are not deployed if:
•ignition off,
•a minor frontal collision,
•a minor side collision,
•a rear-end collision,
•rollover.
Note
•A grey white, non harmful gas is released when airbag is inflated. This
is perfectly normal and is not an indication of a fire in the vehicle.
•The dash panel must be replaced after the front passenger airbag has
been deployed.
•In the event of an accident in which the airbags are deployed:
− The interior lighting comes on (if the switch for the interior light is in
the door contact position),
− The hazard warning light is switched on,
− All the doors are unlocked.
WARNING (continued)
sqc.1.book Seite 138 Mittwoch, 13. April 2005 1:09 13
Page 179 of 260

Care and cleaning
178
WARNING
When washing your vehicle in the winter: Water and ice in the brake
system can affect the braking efficiency - risk of accident!
Automatic vehicle wash systems
The paintwork of the vehicle is sufficiently resistant that the vehicle can be
washed normally in automatic vehicle wash plants without any problem.
The actual stress to which the paintwork is subjected, however, depends
greatly on the design of the vehicle wash system, the filtering of the water
and the type of washing and care products used. If the paintwork of your
vehicle appears mat after being washed or even has scratches, point this
out to the operator of the vehicle wash plant. Use a different vehicle wash
plant, if necessary.
There are no particular points to note before washing your vehicle in such
a plant other than the usual precautionary measures (closing windows
and sliding/tilting roof, moving any factory-fitted aerials down flat against
the bodywork, etc.).
If you have any particular attached parts fitted to your car - such as spoiler,
roof rack system, two-way radio aerial - it is best to first of all consult the
operator of the car wash plant.
It is important to degrease the lips of the windscreen wiper rubbers after
passing through the automatic vehicle wash system.
Caution
Do not screw the swivelling down roof aerial tight before washing the
vehicle in an automatic vehicle wash system - risk of damage!
Washing vehicle by hand
It is important to first soften the dirt with plenty of water and rinse it off as
thoroughly as possible before washing your vehicle by hand.
One should then clean the vehicle using a soft washing sponge,
washing glove or a washing brush and only slight pressure. Work from
the top to the bottom - beginning with the roof. Only place slight pressure
on the vehicle paintwork during cleaning Only use a shampoo for stub-
born dirt.
Wash out the sponge or washing glove thoroughly at short intervals.
Clean wheels, door sills and similar parts last. Use a second sponge for
such areas.
Rinse off the vehicle well after giving it a wash and dry it off using a
chamois leather.
WARNING
•The ignition should always be switched off when you wash your
vehicle - risk of accident!
•Protect your hands and arms from sharp-edged metal parts
when you are cleaning the underfloor, the inside of the wheel hous-
ings or the wheel trims - risk of cuts.
Caution
•Do not wash your vehicle in bright sunlight - risk of paint damage.
•Ensure that the jet of water is not aimed directly at the locks or at the
door and panel joints if you spray your vehicle in winter down with a hose
- risk of freezing.
•Do not use any insect sponges, rough kitchen sponges or similar
cleaning products - risk of damage to the surface of paintwork.
sqc.1.book Seite 178 Mittwoch, 13. April 2005 1:09 13
Page 182 of 260

Care and cleaning181
Using the systemSafetyDriving TipsGeneral MaintenanceBreakdown assist-
anceTechnical DataFabia Praktik
Caution
Never remove snow or ice from the glass parts with warm or hot water -
risk of formation of cracks in the glass!
The headlight lenses
Please do not use any aggressive cleaning or chemical solvent products
- risk of damage to the plastic lenses Please use soap and clean warm
water.
Caution
Never wipe the headlights dry and do not use any sharp objects for
cleaning the plastic lenses, this may result in damage to the protective
paintwork and consequently in formation of cracks on the headlight
lenses, e.g through effect of chemical products.
Door and window seals
The rubber seals on the doors, boot lid, bonnet, sliding roof and windows
remain supple and last longer if you treat them from time to time with a
rubber care product (e.g. silicone spray). You also avoid premature wear
of the seals and prevent leakages in this way. It is also easier to open the
doors. Rubber seals which are well cared for also do not stick together in
cold winter weather.
Locks
We recommend that you use the spray from Škoda original accessories
with regreasing and anticorrosive effect for de-icing locks.
Note
When washing your vehicle, ensure that as little water as possible gets
into the locks.
Wheels
Steel wheels
You should also thoroughly wash the wheels and wheel trims when giving
your vehicle its regular wash. This prevents any brake dust, dirt and road
salt from sticking to the wheel hubs. You can remove stubborn brake abra-
sion adhering to the wheels with an industrial cleaner. Touch up any
damage to the paintwork on the wheels before rust is able to form.
Light alloy wheels
Regular care of light alloy wheels is necessary in order to retain their deco-
rative appearance over long periods. It is particularly important to remove
any road salt and brake abrasion from light alloy wheels every two weeks,
otherwise the surface will suffer. Wash thoroughly and then treat the
wheels with a protective product for light alloy wheels which does not
contain any acidic components. You should provide the wheel hubs with a
hard wax layer every three months. You must not use any products which
cause abrasion when treating the wheel hubs. Any damage to the paint
layer on the wheel hubs must be touched up immediately.
We recommend using a preservative from Škoda genuine accessories
offered by your Škoda dealer.
sqc.1.book Seite 181 Mittwoch, 13. April 2005 1:09 13
Page 226 of 260

Breakdown assistance225
Using the systemSafetyDriving TipsGeneral MaintenanceBreakdown assist-
anceTechnical DataFabia Praktik
– Position the lifting jack by selecting the jacking point - lower sill
- which is closest to the wheel to be removed ⇒page 224,
fig. 161.
– Position the lifting jack below the jacking point and move it up until its claw is positioned directly below the vertical web of the
lower sill.
– Align the lifting jack so that its claw grasps the web of the lower sill and the moving base plate of the jack is resting flat
against firm ground.
– Turn the lifting jack up further until the wheel is just clear of the ground.
Ground below the lifting jack which is soft and slippery can cause the
vehicle to slip off the jack. It is therefore always necessary to place the
lifting jack on a solid surface or use a wide and stable base. Use a non-
slip base (e.g. a rubber foot mat) if the surface is smooth, such as
cobbled stones, a tiled floor,etc.
WARNING
•Always raise the vehicle with th e doors closed - risk of injury.
•Take suitable measures to prevent the base of the lifting jack
from slipping off - risk of injury!
•Place the lifting jack only on a solid and even surface.
•Not positioning the lifting jack at the specified points can result
in damage to the vehicle. The jack can also slip off if it does not
have sufficient grip - risk of injury!
•Never start the engine if the vehicle is lifted - risk of accident.
•Never lie under the vehicle if the vehicle is only lifted with the
vehicle lifting jack.
•It is important to support the vehicle with suitable supporting
blocks if you wish to work under the lifted vehicle - risk of injury!
Securing wheels against being stolen*
You need a special adapter for slackening the safety
wheel bolts.
– Pull off the full wheel trim/cap from the wheel hub or cap from the safety wheel bolt.
– Insert the adapter with its toothed side fully into the inner toothing of the safety wheel bolt right down in such a way
that only the outer hexagon is jutting out ⇒ fig. 162.
– Insert the wheel wrench fully onto the adapter .
AAAB
WARNING (continued)
Fig. 162 Safety wheel
bolt with adapter
AB
AA
AB
sqc.1.book Seite 225 Mittwoch, 13. April 2005 1:09 13
Page 235 of 260

Fuses and light bulbs
234
10S-contact a)5
11Electrically adjustable rear mirror b)5
12Ventilation system, air-conditioning system, Xenon
headlight5
13Reversing light10
14Diesel engine control unit10
15Headlight cleaning system, window wiper10
16Instrument cluster5
17Petrol engine - control unit c)5
18Phone5
19Automatic gearbox10
20Control unit for lamp failure5
21Heated windscreen washer nozzles5
22Not assigned
23Right main beam10
24Engine electronics10
25Control unit for ABS, TCS
control unit for ESP5
10
26Not assigned
27Not assigned
28Cruise control, switch for the brake and clutch pedal5
29Not assigned
30Main beam on the left and indicator light10
31Central locking system - door lock for the boot lid10
No.Power consumerAmperes
32Rear window wiper10
33Parking light on the right5
34Parking light on the left5
35Injector - petrol engine10
36Licence plate light5
37Rear fog light and indicator light5
38Heating of the external mirror5
39Rear window heater20
40Horn20
41Front window wiper20
42Cigarette lighter, power socket15
43Central control unit, selector lever lock for the auto-
matic gearbox20
44Turn signals15
45Radio, navigation system20
46Electrical power window (at the front on the right)25
47Not assigned
48Diesel engine - control unit, injector30
49Central locking system15
50Low beam on the right15
51Power socket in the luggage compartment15
52Ignition15
53Electrical power window (at the rear on the right)25
54Low beam on the left15
No.Power consumerAmperes
sqc.1.book Seite 234 Mittwoch, 13. April 2005 1:09 13
Page 245 of 260
Fuses and light bulbs
244
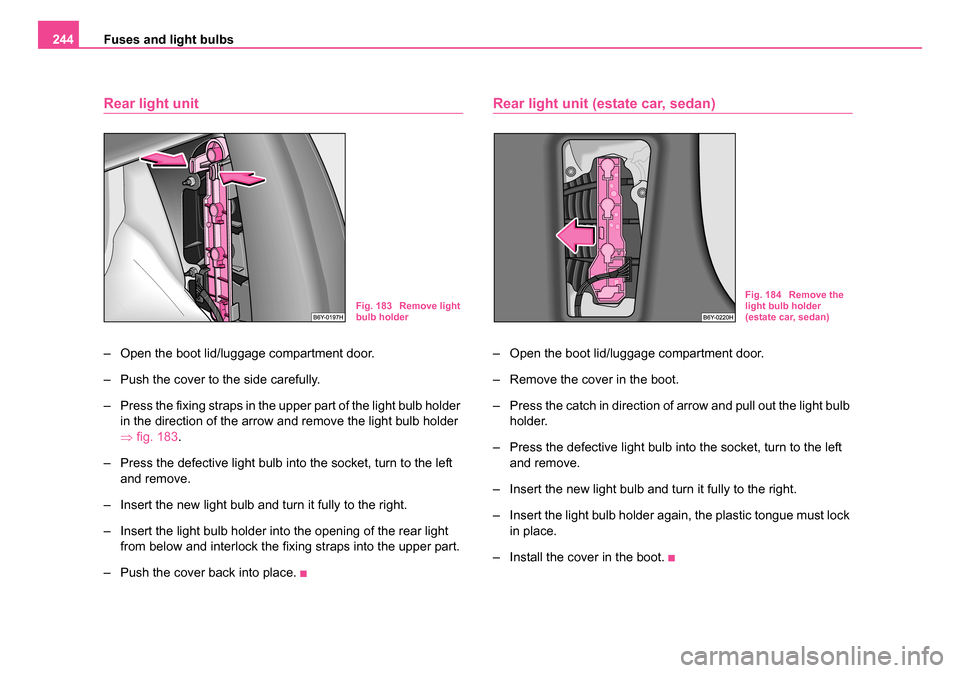
Rear light unit
– Open the boot lid/luggage compartment door.
– Push the cover to the side carefully.
– Press the fixing straps in the upper part of the light bulb holder
in the direction of the arrow and remove the light bulb holder
⇒fig. 183.
– Press the defective light bulb into the socket, turn to the left and remove.
– Insert the new light bulb and turn it fully to the right.
– Insert the light bulb holder into the opening of the rear light from below and interlock the fixing straps into the upper part.
– Push the cover back into place.
Rear light unit (estate car, sedan)
– Open the boot lid/luggage compartment door.
– Remove the cover in the boot.
– Press the catch in direction of arrow and pull out the light bulb
holder.
– Press the defective light bulb into the socket, turn to the left and remove.
– Insert the new light bulb and turn it fully to the right.
– Insert the light bulb holder again, the plastic tongue must lock in place.
– Install the cover in the boot.
Fig. 183 Remove light
bulb holderFig. 184 Remove the
light bulb holder
(estate car, sedan)
sqc.1.book Seite 244 Mittwoch, 13. April 2005 1:09 13
Page 251 of 260

Praktik
250
tries). Never seek to open this door by force since this could lead
to damage to the door or to the lock.
Fixing of the loading floor
You can fix the raised loading floor with a hook to the top edge of
the tailgate cutout, as if one needs to reach the spare wheel.
– First unlock the loading floor by folding back the lever in posi-
tion ⇒fig. 190.
– Raise the loading floor at the handle and fix it with a plastic hook (it is located below the loading floor edge) to the top
edge of the tailgate cutout ⇒fig. 191 .
WARNING (continued)
Fig. 190 Unlocking the
loading floor
Fig. 191 Fixing the
loading floor with
plastic hooks
A1
AA
AB
sqc.1.book Seite 250 Mittwoch, 13. April 2005 1:09 13