2005 SKODA FABIA park assist
[x] Cancel search: park assistPage 202 of 260

Inspecting and Replenishing201
Using the systemSafetyDriving TipsGeneral MaintenanceBreakdown assist-
anceTechnical DataFabia Praktik
The battery
Working on the battery
The battery is located in the engine compartment below a plastic
box.
– Unlock the interlock on the positive terminal side of the battery
⇒fig. 145 .
– Open the cover in direction of arrow.
– The installation of the battery cover on the positive terminal side takes place in the reverse order.
Removal and installation of the battery is not recommended since it can,
under certain circumstances, lead to major damage to the battery and
fuse boxes. Contact a specialist garage. There is a risk of injuries, scalding, accidents and burns when carrying out
any work on the battery and on the electrical system. It is essential to
comply with the warning instructions stated below ⇒
and with the
general applicable rules of safety.
WARNING
•The battery acid is strongly corrosive and must, therefore, be
handled with the greatest of care. Always wear protective gloves,
eye and skin protection when handling batteries. Corrosive fumes
in the air irritate the air passages and lead to conjunctivitis and
inflammation of the air passages in the lungs. Battery acid
corrodes dental enamel and creates deep wounds after contact
with the skin which take a long time to heal. Repeated contact with
diluted acids causes skin diseases (inflammations, ulcers, slin
cracks). Acids coming into contact with water are diluted accompa-
nied by significant development of heat.
•Do not tilt the battery otherwise battery electrolyte may flow out
of the battery vent openings. Protect the eyes with safety glasses
or a shield! There is the danger of suffering blindness! If any
battery electrolyte gets into your eye, rinse out your eye immedi-
ately with clear water for several minutes. Contact a doctor without
delay.
•Splashes of acid on your skin or clothes should be neutralised
as soon as possible using soap suds and then rinsed with plenty
of water. Contact a doctor immediately if you swallow battery elec-
trolyte.
•Keep batteries out of the reach of children.
•Hydrogen is released when you charge a battery and a highly
explosive gas mixture is produced . An explosion can be caused
through sparkling over during unclamping or loosening of the
cable plug while the ignition is on.
•Bridging of the poles will create a short circuit (e.g. through
metal objects, cables). Possible consequences of a short circuit:
Fig. 145 The battery:
Open up the cover
sqc.1.book Seite 201 Mittwoch, 13. April 2005 1:09 13
Page 221 of 260

Breakdown assistance
220
Spare wheel*
The spare wheel is stowed in the spare wheel well in the
luggage compartment below the floor covering.
The spare wheel lies in a well under the luggage compartment floor and is
fixed in place along with the vehicle tool kit box using special screws
⇒ fig. 156 .
One should check the inflation pressure in the spare wheel (at best when
generally checking the tyre air pressures - see sign on the fuel filler flap
⇒ page 188) to ensure that the spare wheel is always ready to use.
Unidirectional tyres*
If you have such tyres on your vehicle, please refer to the notes below:
•The spare wheel provided with a car fitted with unidirectional tyres has
different dimensions. The wheel is provided with a warning sticker.
•After fitting on the wheel, the warning sticker must not be concealed
(e.g. by the wheel trim).
•Do not drive with this spare wheel at more than 80 km/h - risk of acci-
dent. Avoid accelerating at full throttle, sharp braking and fast cornering.
•The inflation pressure for this spare wheel is identical to the inflation
pressure of the standard tyres.
•Use this spare wheel only to reach the nearest service station as it is
not intended for continuous use.
Note
Some vehicles are only fitted with spray to make tyre repairs
⇒ page 219.
Changing a wheel
Preliminary work
The following steps should be carried out before actually
changing the wheel.
– If it is necessary to change a wheel, park the vehicle as far
away as possible from the traffic flow. The place you choose
should be level.
– Have all the occupants get out. While changing a wheel, the
occupants of the vehicle should not stand on the road (it is
better behind a crash barrier).
– Apply the handbrake firmly.
– Engage 1st gear or if your vehicle is fitted with an automatic
gearbox, position the selector lever into position P .
Fig. 156 Luggage
compartment: Spare
wheel
sqc.1.book Seite 220 Mittwoch, 13. April 2005 1:09 13
Page 229 of 260

Breakdown assistance
228
out the battery being ignited by the strong spark which results from
the engine being started.
•Do not affix the cable end to parts of the fuel and brake
system.
•Run the jump-start cables so that they cannot be caught by any
rotating parts in the engine compartment.
•Do not bend over the batteries - risk of caustic burns!
•The vent screws of the battery cells must be tightened firmly.
•Keep any sources of ignition (naked flame, smouldering ciga-
rettes etc.) away from the battery - risk of an explosion!
Tow-starting and towing vehicle
General
Please pay attention to the following instructions if you are going
to use a tow rope:
Driver of the towing vehicle
– Do not drive off until the tow rope is taught.
– Release the clutch particularly gently when starting off or depress the accelerator particularly gently if your vehicle is
fitted with an automatic gearbox. Driver of the towed vehicle
– Switch the ignition on so that the steering wheel is not blocked
and you can also operate the turn signal lights, the headlight
flasher, the windscreen wipers and windscreen washer
system.
– Take the vehicle out of gear or move the selector lever into position N if your vehicle is fitted with an automatic gearbox.
– Note that the brake servo unit and power steering only operate if the engine is running. You will require significantly greater
physical force to depress the brake pedal and to steer the
vehicle if the engine is not running.
– Ensure that the tow rope is always kept taught.
Tow rope or tow bar
A tow bar is safest way of towing a vehicle and also minimizes any
shocks. You can use a tow rope only if a suitable tow bar is not available.
The tow rope must be elastic to protect the vehicle. Thus one should only
use plastic fibre rope or a rope made out of a similarly elastic material.
Attach the tow rope or the tow bar only to the towing eyes provided for
this purpose ⇒page 229, “Front towing eye” and ⇒ page 230, “Rear
towing eye”.
Driving style
Towing another vehicle requires a certain amount of practice. Both drivers
should be familiar with the particular points about towing a vehicle.
Unskilled drivers should not attempt to tow in another vehicle or to be
towed in.
One should be constantly vigilant not to allow impermissibly high towing
forces or jerky loadings. There is always a risk of excessive stresses and
WARNING (continued)
A4
sqc.1.book Seite 228 Mittwoch, 13. April 2005 1:09 13
Page 239 of 260

Fuses and light bulbs
238
Do not take hold of the glass bulb with naked fingers (even the smallest
amount of dirt reduces the working life of the light bulb). Use a clean cloth,
serviette or something similar.
Defect light bulbs should only be replaced with light bulbs of the same
type. The designation is located on the light socket or the glass bulb.
Changing certain bulbs is not something which you can do yourself, but
requires to be done by a specialist. Other parts of the vehcle must be
removed in order to change the light bulbs. This applies, in particular, to
bulbs which can only be reached from the engine compartment.
We therefore recommend that you have any bulbs changed by a Škoda
dealer or, in exceptional cases, by calling on other professional assist-
ance.
Please note that the engine compartment is a hazardous area
⇒ page 191, “Working in the engine compartment”.
We recommend that you carry the set of light bulbs with you which was
delivered in your vehicle. Replacement light bulbs
7) are available at
Škoda dealers.
The set of light bulbs can be stowed in the spare wheel well.
Fitted with a xenon headlight
Change of light bulbs on Xenon lights (low beam lights, parking lights and
main beam lights) should be undertaken by a Škoda dealer.
Overview of bulbs
7)Replacement light bulbs are, on the other hand, part of the basic equipping of the
vehicle in some countries.
Front headlightHalogen headlightXenon headlight
Low beamH7D2S
Main beamH3H7
Parking lightsW5W
Turn signalsPY21W
Fog lightsHB4
Rear light unitBulb
Reversing lightP21W
Turn signalsPY21W
Brake lightsP21W
Parking light and rear fog lightP21/4W
OthersBulb
Side turn signal lightsWY5W
Licence plate lightC5W
3. Brake lightLED
Interior lightC10W
Reading lightsW5W
Luggage compartment lightW5W
Door warning lightW5W
Storage compartment light - front pas-
senger sideC3W
sqc.1.book Seite 238 Mittwoch, 13. April 2005 1:09 13
Page 240 of 260
Fuses and light bulbs239
Using the systemSafetyDriving TipsGeneral MaintenanceBreakdown assist-
anceTechnical DataFabia Praktik
WARNING
•Bulbs H7 and H3 are pressurised and may burst when changing
the bulb - risk of injury!
•It is recommended to wear gloves and eye protection when
changing a light bulb.
•Gas discharge bulbs* (xenon bulbs) operate with a high voltage,
professional knowledge is required - danger to life!
Note
This Owner's Manual only describes the replacement of bulbs where it is
assumed that no major complications will arise. Other light bulbs should
be changed by your specialist garage.
Front headlight
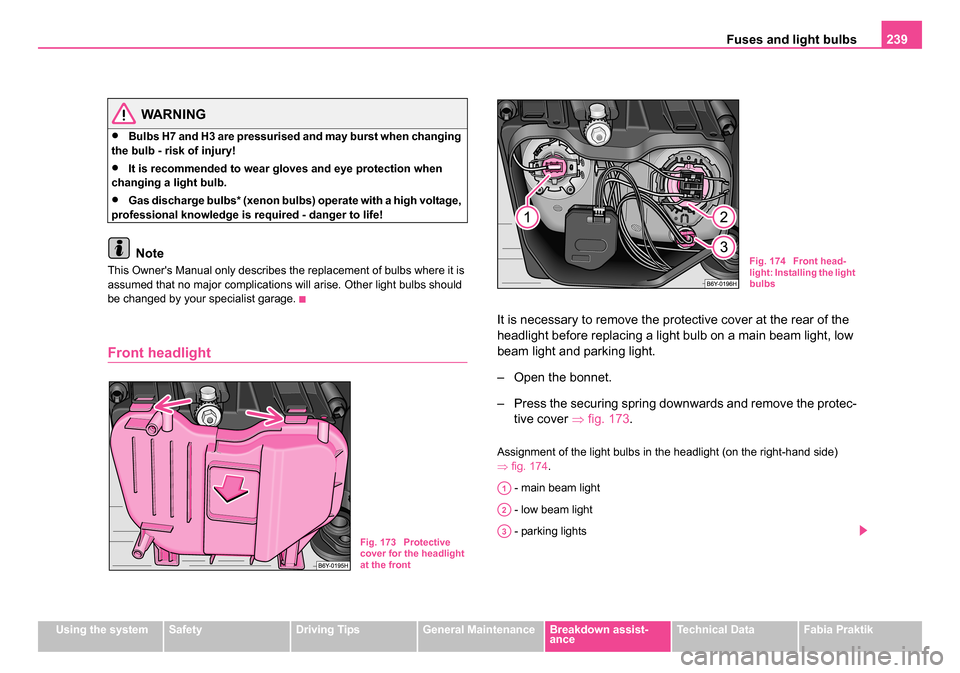
It is necessary to remove the protective cover at the rear of the
headlight before replacing a light bulb on a main beam light, low
beam light and parking light.
– Open the bonnet.
– Press the securing spring downwards and remove the protec- tive cover ⇒fig. 173 .
Assignment of the light bulbs in the headlight (on the right-hand side)
⇒fig. 174 .
- main beam light
- low beam light
- parking lights
Fig. 173 Protective
cover for the headlight
at the front
Fig. 174 Front head-
light: Installing the light
bulbs
A1
A2
A3
sqc.1.book Seite 239 Mittwoch, 13. April 2005 1:09 13
Page 242 of 260
Fuses and light bulbs241
Using the systemSafetyDriving TipsGeneral MaintenanceBreakdown assist-
anceTechnical DataFabia Praktik
– Pull the lamp holder with light bulb for the parking light out of
the headlight ⇒page 240, fig. 176.
– Pull the defect light bulb out of the lamp holder.
– Insert the new light bulb.
– Insert the lamp holder with new light bulb into of the headlight.
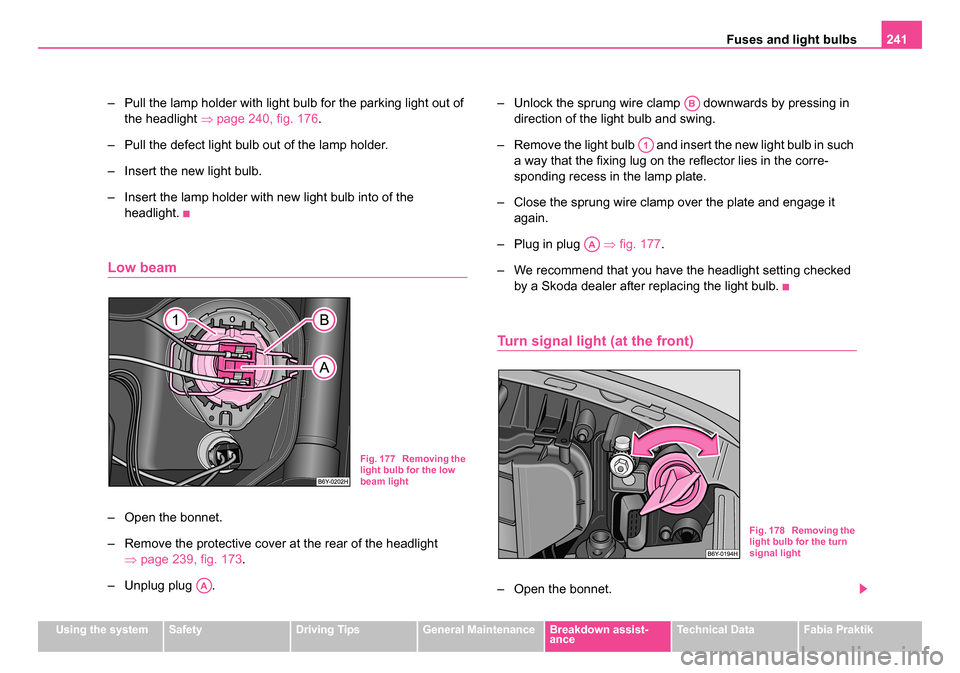
Low beam
– Open the bonnet.
– Remove the protective cover at the rear of the headlight ⇒page 239, fig. 173 .
– Unplug plug . – Unlock the sprung wire clamp downwards by pressing in
direction of the light bulb and swing.
– Remove the light bulb and insert the new light bulb in such a way that the fixing lug on the reflector lies in the corre-
sponding recess in the lamp plate.
– Close the sprung wire clamp over the plate and engage it again.
– Plug in plug ⇒fig. 177.
– We recommend that you have the headlight setting checked by a Skoda dealer after replacing the light bulb.
Turn signal light (at the front)
– Open the bonnet.
Fig. 177 Removing the
light bulb for the low
beam light
AA
AB
A1
AA
Fig. 178 Removing the
light bulb for the turn
signal light
sqc.1.book Seite 241 Mittwoch, 13. April 2005 1:09 13