2005 Seat Toledo key
[x] Cancel search: keyPage 15 of 50
Radio / CD / Sound
14
– Press the button ⇒
page 4, fig. 1 to open the Sound main
menu.Function keys in Sound main menu:
or – Treble or Bass settings ⇒
page 13, fig. 11 .
– Volume setting for the mid-range frequencies. – Sound focus setting left / right.
– Sound focus setting front / rear. – Opens the volume set-up where in dividual volume settings can be
made for the different audio sources ⇒
page 13, fig. 12 .
Function keys in the volumes set-up function: – The setting for the sensitivity of the speed-dependent v olume adjust-
ment (GALA). The greater the vehicle speed, more noise i s percieved in the
interior. This system increases the equipment volume h igher or lower
according to the position selected.
– Minimum volume of traffic announcements.
– Minimum volume for telephone conversations.
– Minimum volume for naviga tion system announcements.
– The traffic announcements are mu ted as long as a red bar can be
seen next to the function key.
– Sets the minimum volume for when the unit is switched on.
Note
By pressing buttons ⇒ page 4, fig. 1 , and status button
at the same time, you can reset the MFD2 radio na vigation system to the
factory settings. Appears the message Factory settings. Wait...
.
A3
Treble
Graves
MidBalanceFaderVolum eGALATA -M in .Tel ep h on eNAV-Min.Nav muteInitial volume
A3
TELE
A15
A10
radionaving Seite 14 Mittwoch, 30. März 2005 12 :26 12
Page 18 of 50

Navigation17
A variety of different information on th e route can be called up during active
route guidance. The scroll function can be used to page th rough lists shown
on the screen, either line by line or page by page.
If the display “ Off Road
” appears on the screen, it means you are locate d on
a non-digitalised street, (e.g. on a fa rm track). The GPS satellites will not be
able to reach your antenna when you are in a tunnel or underground garage,
meaning that the unit orientates itself via the wheel sensors. If you try to carry
out a route calculation in this situation you may hear the announcement:
“You are located on a non-digitalised street”. Drive on until the display “Off
Road ” disappears.Main menu - Navigation– Press to display the main Menu of the navigation sy stem
⇒ page 4, fig. 1 .
Function keys in the Navigation main menu
– Starts route guidance to the entered destinatio n. Pressing this
button again will stop the route guidance function ⇒ page 38, “Route guid-
ance”.
– Field for entering your destination ⇒
page 18, “Destination
entry”.
–Allows entering a previous destination to the fina l
destination. A stopover destination is entered in the sa me way as a destina-
tion. Upon reaching the stopover, this disappears fr om the display, but stays
in the memory of the Last destinations
⇒ page 18, “Destination entry”.If the
stopover destination is reached, (you will be informed that “you have reached
your destination”), and route guidance to the fina l destination is started
automatically. If the stopover destin ation is not reached exactly, e.g.,
because it is not located directly on a road, you will be informed that “you
have reached the destination del destino” area. Route guidance to the next
destination is not started automatically.
– Defines the parameters for route calculation
⇒page 27,
“Parameters for route calculation”.
– Enter your location manually or start a demonstration ⇒
page 29,
“Settings”.
Fig. 13 Main Menu of the
navigation system
NAVI
A13
Begin GuideDestinationIntermediate destinationRoute optionsSettings
radionaving Seite 17 Mittwoch, 30. März 2005 12 :26 12
Page 19 of 50

Navigation
18Destination entryStarting destination entry
Two addresses can be entered for the route calculation; the
address of the destination and the address of the stopover
destination.
– Press the key to display the main Menu of the nav igation
system ⇒
page 4, fig. 1 .
– Press or in the navigation main menu
⇒ page 17, fig. 13 to select one of the two options. You will see a message that states that a destination h as not yet been defined
if the destination is being entered for the first time . The last used destination
will be displayed if a destination has already be en entered.
There are various methods of entering a destination or a s topover destina-
tion. The procedure for entering the stopover dest ination is the same as for
the destination.
– Enter the destination using town and street names
⇒ page 19, “Entering a new address (town, street, h ouse number)”.
or – Select a destination from a list of desti-
nations that have already been stored ⇒
page 20, “Last destinations”.
Fig. 14 Destination
Fig. 15 Stopover destina-
tion
NAVI
A13Destination
Stopover.
New direction.Last destinations.
From dst.mem.
radionaving Seite 18 Mittwoch, 30. März 2005 12 :26 12
Page 21 of 50
Navigation
20
– Enter the letters or numbers by turning and pressing the me nu
knob.
– A list of names or numbers is seen on the lower part of the screen. Press to go to the list.
– Select a name from the list by turning and pushing the menu
knob. You can scroll through several pages of the list u sing the
scroll markers , , and and confirm your selection by
pressing .
– Press to select a special destination close to
the destination address (town, str eet etc.) that you have already
entered. and mark characters and deleted characters.
will display language-specific characters as necessary.
The term “Town” is used regardless of how many peopl e live there. Both a
village of 100 inhabitants and a city with 1 million are named as towns. A list
of names to choose from will appear for town name s which are used more
than once. The system will automatically switch to str eet entry after town
entry and then to house number entry. The centre of the town will be offered
as a destination if the town is so small that none of the streets have been
digitally mapped.
The keys and will not be active if a town name has not
been entered.
Note
Enter an intersection and house number as described.
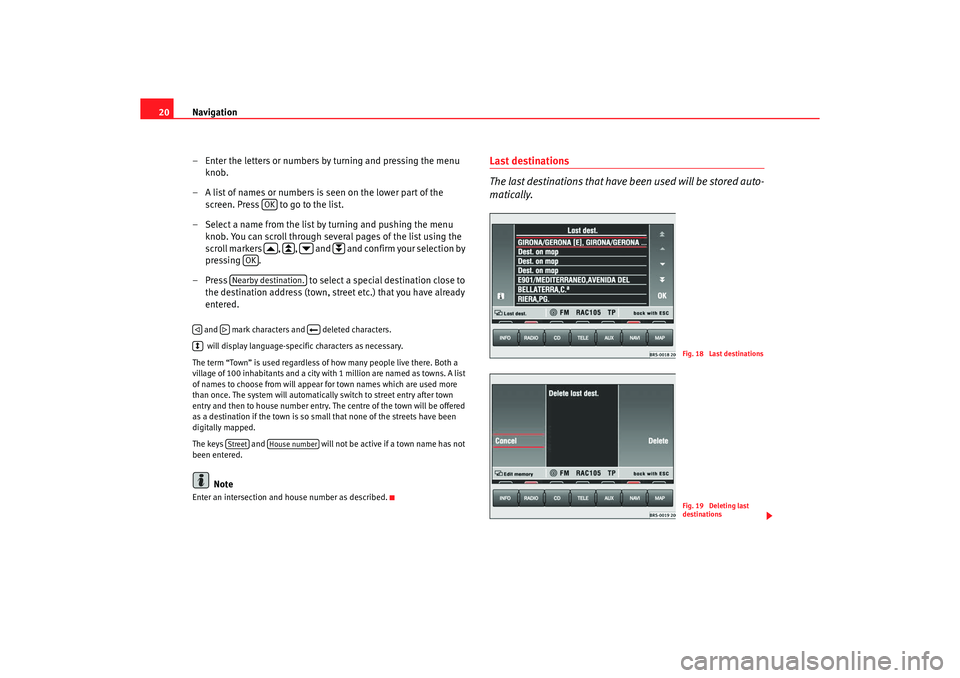
Last destinations
The last destinations that have been used will be stored auto-
matically.
OK
OK
Nearby destination.
Street
House number
Fig. 18 Last destinationsFig. 19 Deleting last
destinations
radionaving Seite 20 Mittwoch, 30. März 2005 12 :26 12
Page 22 of 50

Navigation21
Making a selection from the last destinations
–Press ⇒page 18, fig. 14 to make a selection
from the list of the last destinations stored ⇒
page 18.
–Turn the menu knob to make a sele ction from the list of the last
used destinations ⇒
page 20, fig. 18 . Press to make an
address fully visible, if it cannot be read fully.
– Press the menu knob to select the address marked in red . The
Navigation main menu will appear with your selected address
after a few seconds.
Deleting the list of last destinations
– Starting in the Navigation main menu ⇒
page 17, fig. 13 press
the following function keys in the order indicated: ,
and .
– Select or when confirmation is asked for. If you
select , all
of the last destinations, including the current
destination, will be deleted.
The addresses collected in the Last dest.
memory can only be deleted all at
once, not individually.
A total of 14 last destinations can be st ored in the memory. A destination will
not be stored in Last dest. until route guidance has started. If you are not able
to store any more destinations, the destination memor y is full. Delete either
the last destinations memory or destinations fr om the destination memory
⇒ page 26.
Addresses from the destination memory– Press ⇒
page 18, fig. 14 to display the stored
destination list.
– You can move the red bar ,by turning the menu knob. Press to
make an address marked in this way fully visible, if it cannot be
read fully.
– The address marked in red will be activated if the menu knob is
pressed. The Navigation main menu will appear with your
selected address after a few seconds.You will be shown a message if the dest ination memory is full. Some of the
destinations should then be deleted manually.
Last destinations.
Destination
Edit memory
Delete last dest.
Cancel
Delete
Delete
Fig. 20 Complete desti-
nation address
From dst.mem.
radionaving Seite 21 Mittwoch, 30. März 2005 12 :26 12
Page 23 of 50
Navigation
22Special destinations close to the address
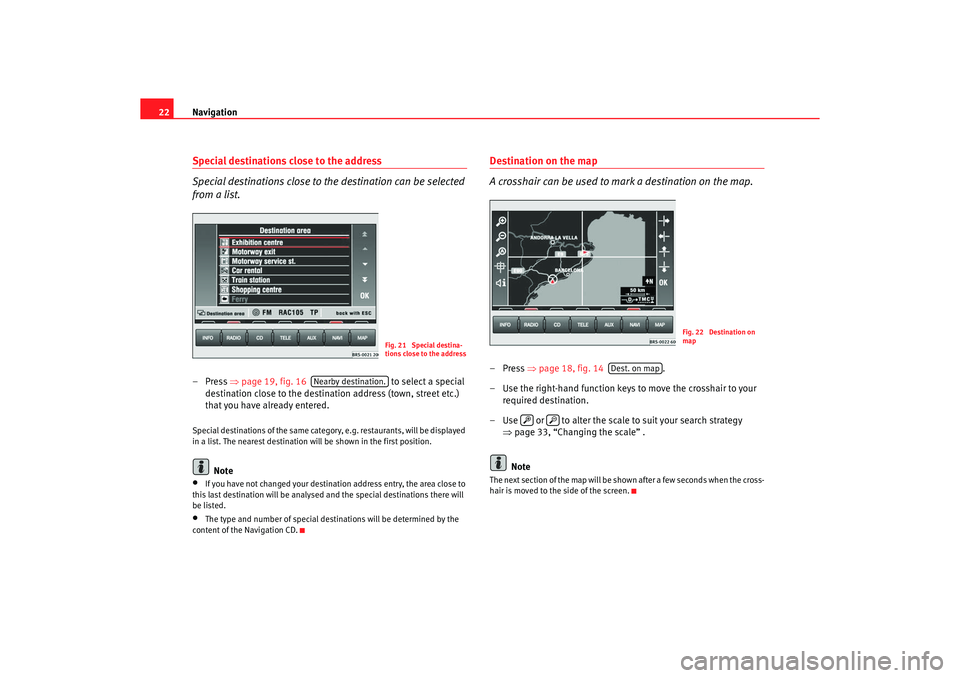
Special destinations close to the destination can be selected
from a list.– Press ⇒
page 19, fig. 16 to select a special
destination close to the destination address (town, street etc.)
that you have already entered.Special destinations of the same category, e.g. restaur ants, will be displayed
in a list. The nearest destination will be shown in the firs t position.
Note
•
If you have not changed your destination address entry, the area close to
this last destination will be analysed and the spec ial destinations there will
be listed.
•
The type and number of special destinations will be det ermined by the
content of the Navigation CD.
Destination on the map
A crosshair can be used to mark a destination on the map.–Press ⇒
page 18, fig. 14 .
– Use the right-hand function keys to move the crossh air to your
required destination.
– Use or to alter the scale to suit your search strate gy
⇒ page 33, “Changing the scale” .
NoteThe next section of the map will be shown after a few sec onds when the cross-
hair is moved to the side of the screen.
Fig. 21 Special destina-
tions close to the address
Nearby destination.
Fig. 22 Destination on
map
Dest. on map
radionaving Seite 22 Mittwoch, 30. März 2005 12 :26 12
Page 29 of 50
Navigation
28
– Press in the navigation main menu ⇒
page 17,
fig. 13.A short route might be quicker for your purpose in larg er towns or cities where
there are a lot of traffic jams. Route options can be altered w hilst the route
guidance function is active. The changed parameters w ill be used as a basis
for the calculation of the remaining journey.
Function keys in the route option menu•
Fast or Short: Determines whether a fast or short route should be c alcu-
lated.
•
Dynam. : Dynamic route guidance responds to traffic reports broadc ast by
TMC stations. This function will automatically guide yo u round traffic jams or
blocked roads.
, or – Determines whether motorways, ferri es or toll
roads should be used. These options will, however, be used for calculation if
there is no other logical route to the d estination (e.g. an island is to be used
without using a ferry).
– Stores the selected settings for future route guidance usage.
Dynamic route guidance
An announcement that there are traffic jams on your route w ill be made if a
traffic jam is registered. “You will also be warned directly be fore the”“traffic
jam itself”.
Once the dynamic route guidance function has been activ ated you will be
informed that the “route is being recalculated due to tr affic problems” if any
have been registered.
Traffic problems are indicated by a symbol on the map:
Traffic jam
⇒
page 27, fig. 32
Slow-moving traffic
Road closed
The navigation system will calculate the quickest poss ible route when the
dynamic route guidance option is active. The sys tem might well guide you
through a traffic jam if the diversion would be longer.Note
•
The dynamic route guidance option will only function if you are receiving
at least one TMC radio station.
•
The MFD2 radio navigation system will automatically loo k for a new TMC
station if you leave the re ception area of the one you are using. The station
you are listening to, however, does not have to be a TMC s tation.
•
The dynamic route guidance option wi
ll always use motorways, ferries
and toll roads.
•
The navigation CD-ROM should be compatible with th e TMC data.
•
The quality of the dynamic route gu
idance depends on the information
contained in the traffic announcements. The radio stations broadcasting this
information are responsible for the content.
Route opt.
RutaMotorway
Ferry
Toll
By default
AA
AB
AC
radionaving Seite 28 Mittwoch, 30. März 2005 12 :26 12
Page 30 of 50
Navigation29
Settings
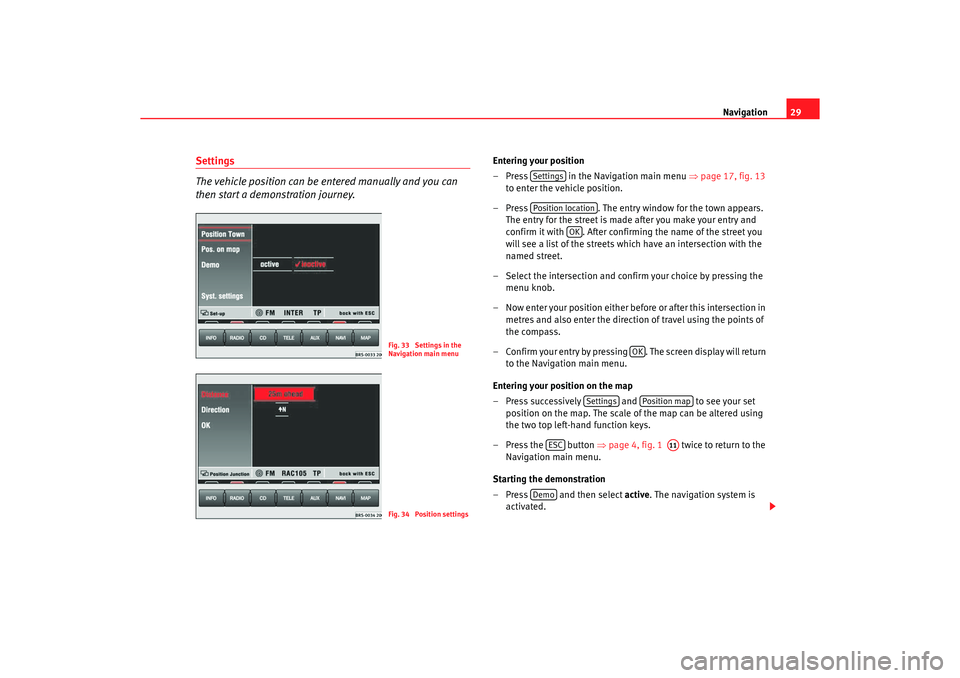
The vehicle position can be entered manually and you can
then start a demonstration journey.
Entering your position
– Press in the Navigation main menu ⇒
page 17, fig. 13
to enter the vehicle position.
– Press . The entry window for the town appears.
The entry for the street is made after you make your en try and
confirm it with . After confirming the name of the street y ou
will see a list of the streets which have an intersection w ith the
named street.
– Select the intersection and confirm your choice by press ing the
menu knob.
– Now enter your position either before or after this intersec tion in
metres and also enter the directio n of travel using the points of
the compass.
– Confirm your entry by pressing . The screen disp lay will return
to the Navigation main menu.
Entering your position on the map
– Press successively and to see your set
position on the map. The scale of the map can be altered us ing
the two top left-hand function keys.
– Press the button ⇒
page 4, fig. 1 twice to return to the
Navigation main menu.
Starting the demonstration
– Press and then select active. The navigation system is
activated.
Fig. 33 Settings in the
Navigation main menuFig. 34 Position settings
SettingsPosition location
OK
OK
Settings
Position map
ESC
A11
Demo
radionaving Seite 29 Mittwoch, 30. März 2005 12 :26 12