2005 Seat Ibiza 5D wheel
[x] Cancel search: wheelPage 35 of 252
Airbag system33
Safety First
Operating instructions
Tips and Maintenance
Te c h n i c a l D a t a
In order to provide the desired extra protection in an accident, the airbags
have to deploy extremely rapidly (within
fractions of a second). A fine dust may develop when the airbag deploys. Th
is is normal and is no indication
that there was a fire in the vehicle.
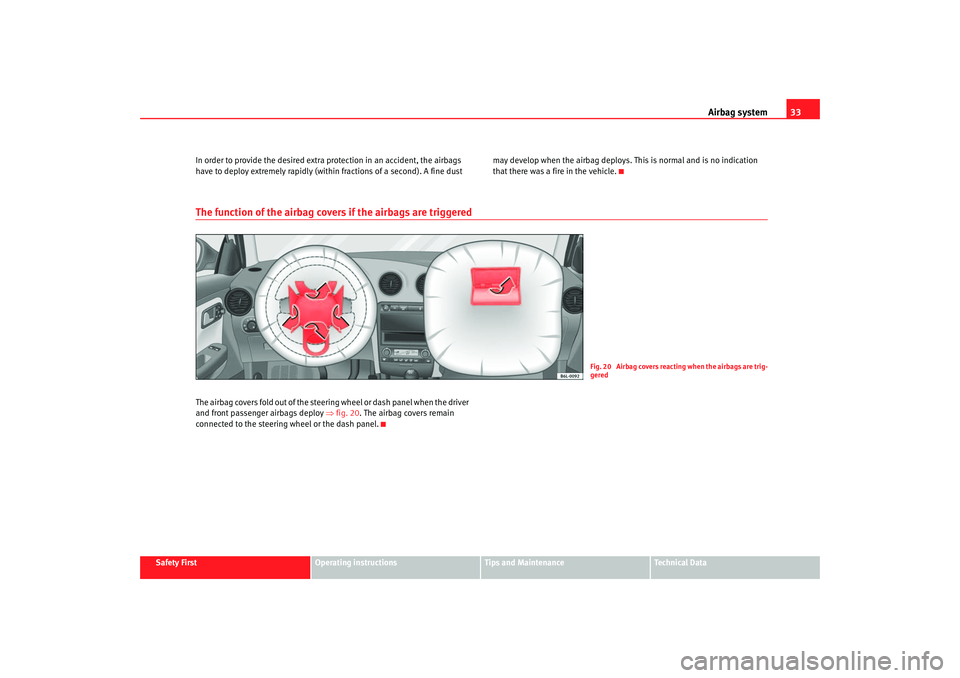
The function of the airbag covers if the airbags are triggeredThe airbag covers fold out of the steering wheel or dash panel when the driver
and front passenger airbags deploy ⇒fig. 20 . The airbag covers remain
connected to the steering wheel or the dash panel.
Fig. 20 Airbag covers reacting when the airbags are trig-
gered
ibiza_ingles Seite 33 Mittwoch, 5. Oktober 2005 5:17 17
Page 36 of 252
Airbag system
34Safety notes on front airbag system
If you use airbags correctly, they can considerably reduce the
risk of injury in many kinds of accident.
WARNING
•
It is important for the driver and front passenger to maintain a distance
of at least 25 cm from the steering wheel or dash panel. If the minimum
distance is not observed then the airbags do not correctly protect the
vehicle occupants; risk of fatal injuries! In addition, the front seats and
head restraints must always be positioned correctly for the height of the
occupant.
•
If you are not wearing a seat belt or if you lean forward or to the side or
assume an incorrect sitting position, the risk of injury is increased
substantially. This increased risk of injury will be further increased if you
are struck by an inflating airbag.
•
Never let a child travel on the front seat without an appropriate restraint
system. If the airbag is triggered in an accident, children can sustain
serious or fatal injuries from the airbag as it inflates ⇒page 43, “Child
safety”.
•
Occupants sitting in the front of the vehicle must never carry any
objects or pets in the deployment s pace between them and the airbags, or
allow children or other passenger s to travel in this position.
•
The airbags provide protection for one accident only, if they have been
deployed they must be replaced.
•
It is also important not to attach any objects such as cup holders or
telephone mountings to the surfaces covering the airbag units.
•
Do not attempt to modify components of the airbag system in any
way.
Side airbagsDescription of side airbags
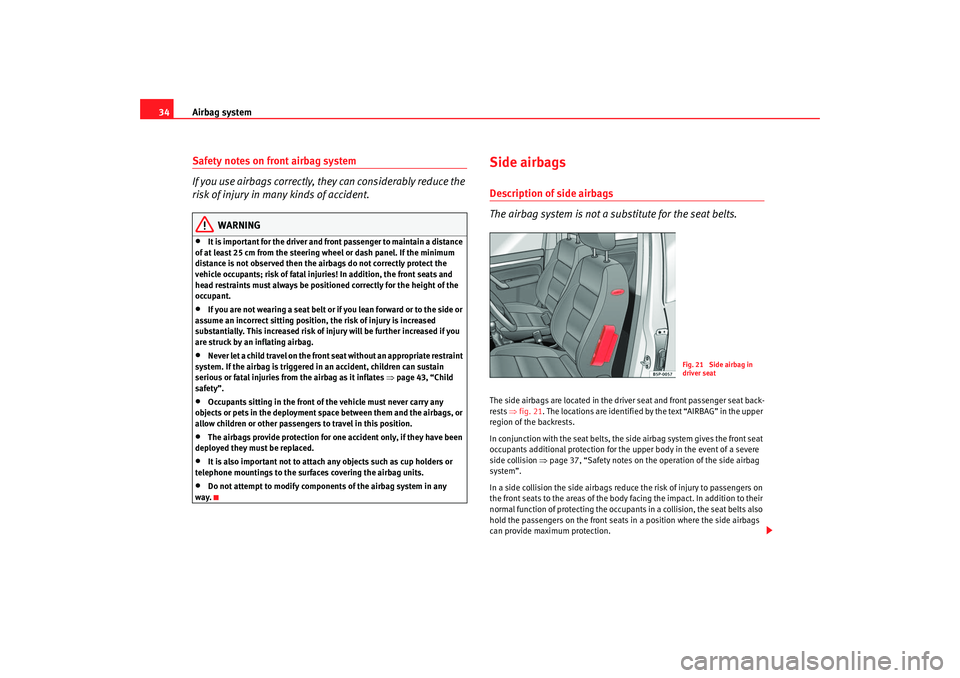
The airbag system is not a substitute for the seat belts.The side airbags are located in the driver seat and front passenger seat back-
rests ⇒fig. 21 . The locations are identified by the text “AIRBAG” in the upper
region of the backrests.
In conjunction with the seat belts, the side airbag system gives the front seat
occupants additional protection for the upper body in the event of a severe
side collision ⇒page 37, “Safety notes on the operation of the side airbag
system”.
In a side collision the side airbags reduce the risk of injury to passengers on
the front seats to the areas of the body facing the impact. In addition to their
normal function of protecting the occupants in a collision, the seat belts also
hold the passengers on the front seats in a position where the side airbags
can provide maximum protection.
Fig. 21 Side airbag in
driver seat
ibiza_ingles Seite 34 Mittwoch, 5. Oktober 2005 5:17 17
Page 67 of 252

Cockpit65
Safety First
Operating instructions
Tips and Maintenance
Te c h n i c a l D a t a
Anti-lock brake system (ABS)
A warning lamp system monitors the ABS.The warning lamp
should light up for a few seconds when the ignition is
switched on. It goes out again after th e system has run through an automatic
test sequence.
There is a fault in the ABS if:
•
The warning lamp
does not light up when the ignition is switched on.
•
The warning lamp does not go out again after a few seconds.
•
The warning lamp lights up when the vehicle is moving.
The vehicle can still be braked in the normal way (except that the ABS control
function will not function). Please take the vehicle to a qualified workshop as
soon as possible. For further information on the ABS see the ⇒page 139.
If a fault occurs in the ABS, the ESP* warning lamp will also light up.
Brake system fault
If the ABS warning lamp
lights up together with the brake warning lamp
, this indicates not only a fault in the ABS function, but also a possible fault
in the brake system ⇒ .
WARNING
•
Before opening the bonnet, read and observe the warnings on
⇒ page 169, “Working in the engine compartment”.
•
If the brake warning lamp
should light up together with the ABS
warning lamp
, stop the vehicle immediately and check the brake fluid
level in the reservoir ⇒page 182, “Brake fluid”. If the fluid level has
dropped below the “MIN” mark you must not drive on. Risk of accident.
Obtain technical assistance.
•
If the brake fluid level is correct, the fault in the brake system may have
been caused by a failure of the ABS system. This could cause the rear wheels to lock quickly when you brake. This could cause the rear to break
away. Risk of skidding. Drive carefully to the nearest qualified workshop
and have the fault corrected.
Brake system* / handbrake
The warning lamp lights up if the handbrake is applied, if the
brake fluid level falls too low or if there is a fault in the brake
system.This warning lamp
lights up if
•
If the handbrake is on
•
If the brake fluid level is too low
⇒page 182
•
If there is a fault in the brake system
This warning lamp can light up together with the anti-lock brake system
warning lamp.
WARNING
•
If the brake warning lamp does not go out, or if it lights up when
driving, the brake fluid level ⇒page 182, “Brake fluid” in the reservoir is
too low. Risk of accident. Stop the vehicle and do not drive on. Obtain tech-
nical assistance.
•
If the brake warning lamp
lights up together with the ABS warning
lamp
, the control function of the ABS could be out of action. This could
cause the rear wheels to lock quickly when you brake. This could cause the
rear to break away. Risk of skidding. Drive carefully to the nearest qualified
workshop and have the fault corrected.
WARNING (continued)
ibiza_ingles Seite 65 Mittwoch, 5. Oktober 2005 5:17 17
Page 68 of 252

Cockpit
66Emission control system*
This warning lamp monitors the exhaust system.
Warning lamp
flashes:
When there is misfiring that can damage the catalytic converter. Reduce
speed and drive carefully to the near est qualified workshop to have the
engine checked.
Warning lamp is lit:
If a fault has developed during driving which has reduced the quality of the
exhaust gas (e. g. lambda probe fault). Reduce speed and drive carefully to
the nearest qualified workshop to have the engine checked.
Traction control system (TCS)*
The traction control system prevents the driven wheels from
spinning when the vehicle is acceleratingThe warning lamp lights up when the ignition is switched on and should turn
out after about 2 seconds.
When the TCS is operating while drivi ng, the warning lamp flashes. If the
system is deactivated or if there is any fault in the same, the warning lamp will
remain lit.
It will also come on if a fault should occur in the ABS because the TCS oper-
ates in conjunction with the ABS. For further information see ⇒page 139,
“Brakes”
Electronic stabilisation programme (ESP)*
This warning lamp monitors the electronic stabilisation
program.
This program includes the ABS, EDL and TCS.
The warning lamp
has the following functions:
•
It will light for about 2 seconds when the ignition is switched on while a
test of the function is carried out.
•
It flashes when the ESP is activated when driving.
•
It will light up continuously if there is a malfunction in the ESP.
•
It will light up continuously if the ESP is switched off.
•
It will also come on if a fault should occur in the ABS because the ESP
operates in conjunction with the ABS.
If the ESP warning lamp
lights up and stays on af ter the engine is started,
this may mean that the control system has temporarily switched off the ESP.
In this case the ESP can be reactivated by switching the ignition off and then
on again. If the warning lamp goes out, this means the system is fully
functional.
Electronic immobiliser*
Inside the key there is a chip that deac tivates the electronic immobiliser auto-
matically when the key is inserted into the ignition. The immobiliser will be
activated again automatically as soon as you pull the key out of the ignition
lock.
The engine can, however, be started if the appropriate coded SEAT genuine
key is used.
ibiza_ingles Seite 66 Mittwoch, 5. Oktober 2005 5:17 17
Page 70 of 252
Steering wheel controls*
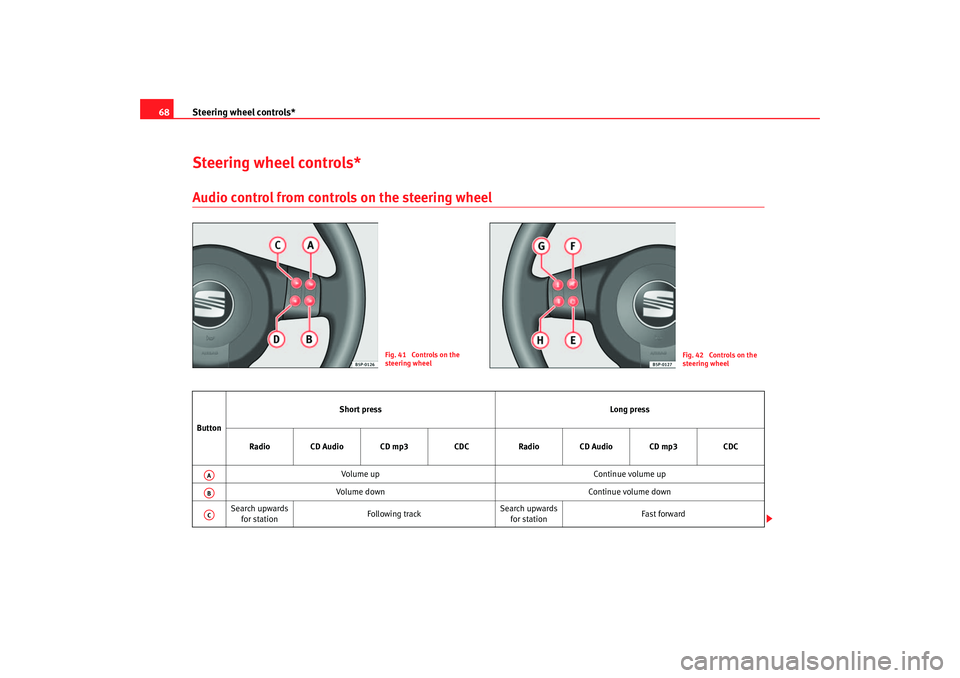
68Steering wheel controls*Audio control from controls on the steering wheel
Fig. 41 Controls on the
steering wheel
Fig. 42 Controls on the
steering wheel
Button Short press
Long press
Radio CD Audio CD mp3 CDCRadio CD Audio CD mp3 CDC
Volume up Continue volume up
Volume down Continue volume down
Search upwards for station Following track Search upwards
for station Fast forwardAAABAC
ibiza_ingles Seite 68 Mittwoch, 5. Oktober 2005 5:17 17
Page 71 of 252

Steering wheel controls*69
Safety First
Operating instructions
Tips and Maintenance
Te c h n i c a l D a t a
Search down-
wards for station Previous trackSearch down-
wards for station Rewind
Change source cycle No specified function
Silence No specified function
Next preset No function Change folder Change CD
No specified function
Previous preset No function Previous folder Previous CD
No specified function
ADAEAFAGAH
ibiza_ingles Seite 69 Mittwoch, 5. Oktober 2005 5:17 17
Page 91 of 252
Lights and visibility89
Safety First
Operating instructions
Tips and Maintenance
Te c h n i c a l D a t a
•
The rear fog light is so bright that it can dazzle drivers behind you. You
should use the rear fog light only when visibility is very poor.
•
If you are towing a trailer equipped with a rear fog light on a vehicle with
a factory-fitted towing bracket, the rear fog light on the car will automatically
be switched off.
•
The use of the lighting described here is subject to the relevant statutory
requirements.
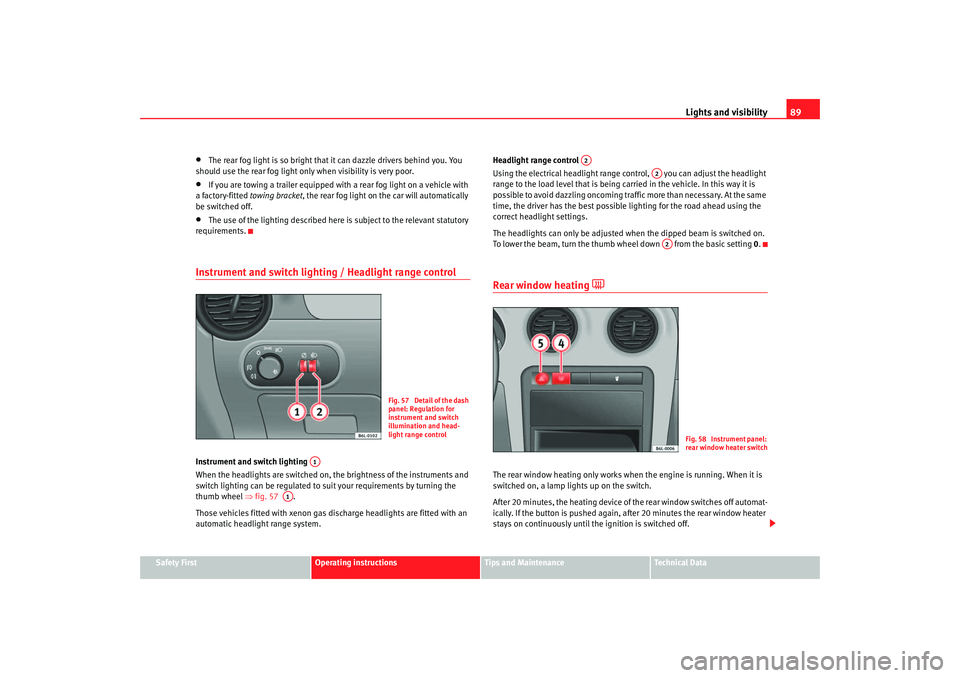
Instrument and switch lighting / Headlight range controlInstrument and switch lighting
When the headlights are switched on, the brightness of the instruments and
switch lighting can be regulated to suit your requirements by turning the
thumb wheel ⇒fig. 57 .
Those vehicles fitted with xenon gas discharge headlights are fitted with an
automatic headlight range system. Headlight range control
Using the electrical headlight range control, you can adjust the headlight
range to the load level that is being carried in the vehicle. In this way it is
possible to avoid dazzling oncoming traffic more than necessary. At the same
time, the driver has the best possible
lighting for the road ahead using the
correct headlight settings.
The headlights can only be adjusted when the dipped beam is switched on.
To lower the beam, turn the thumb wh eel down from the basic setting 0.
Rear window heating
The rear window heating only works when the engine is running. When it is
switched on, a lamp lights up on the switch.
After 20 minutes, the heating device of the rear window switches off automat-
ically. If the button is pushed again, after 20 minutes the rear window heater
stays on continuously until the ignition is switched off.
Fig. 57 Detail of the dash
panel: Regulation for
instrument and switch
illumination and head-
light range control
A1
A1
A2
A2A2
Fig. 58 Instrument panel:
rear window heater switch
ibiza_ingles Seite 89 Mittwoch, 5. Oktober 2005 5:17 17
Page 93 of 252
Lights and visibility91
Safety First
Operating instructions
Tips and Maintenance
Te c h n i c a l D a t a
•
Never park where the catalytic converter could come into contact with
inflammable materials under the vehicle, for example dry grass or spilt
petrol. This could start a fire!Note
•
The battery will run down if the hazard warning lights are left on for a long
time, even if the ignition is switched off.
•
The use of the hazard warning lights d escribed here is subject to the rele-
vant statutory requirements.
Turn signal and main beam headlight lever
The turn signal and main beam lever also operates the
parking lights and the headlight flasher.
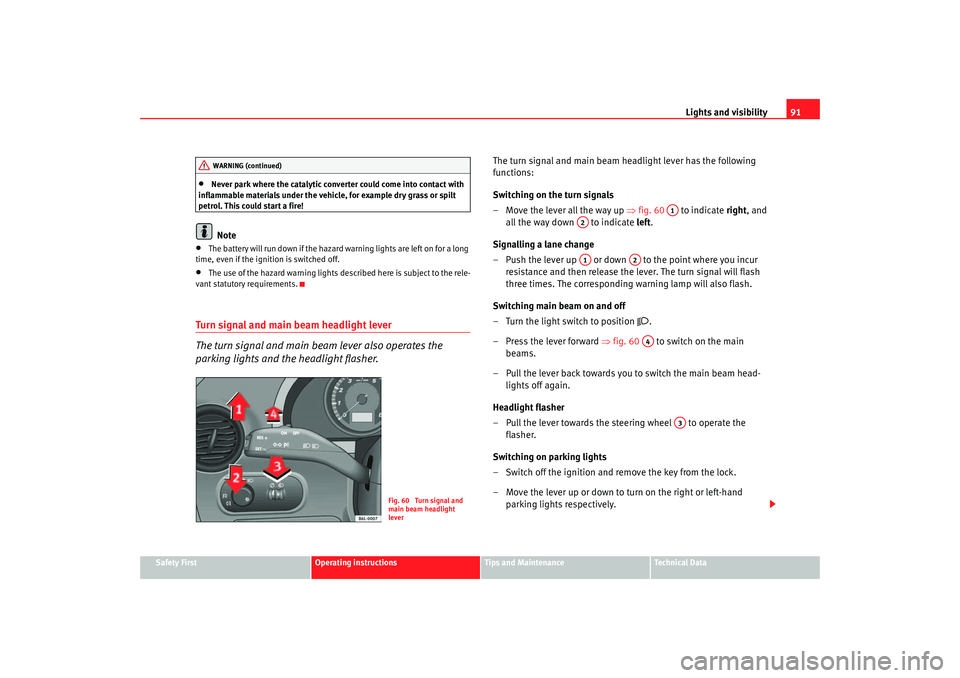
The turn signal and main beam headlight lever has the following
functions:
Switching on the turn signals
– Move the lever all the way up ⇒fig. 60 to indicate right, and
all the way down to indicate left.
Signalling a lane change
– Push the lever up or down to the point where you incur resistance and then release the lever. The turn signal will flash
three times. The corresponding warning lamp will also flash.
Switching main beam on and off
– Turn the light switch to position
.
– Press the lever forward ⇒fig. 60 to switch on the main
beams.
– Pull the lever back towards you to switch the main beam head- lights off again.
Headlight flasher
– Pull the lever towards the steering wheel to operate the flasher.
Switching on parking lights
– Switch off the ignition and remove the key from the lock.
– Move the lever up or down to turn on the right or left-hand parking lights respectively.
WARNING (continued)
Fig. 60 Turn signal and
main beam headlight
lever
A1
A2A1
A2A4
A3
ibiza_ingles Seite 91 Mittwoch, 5. Oktober 2005 5:17 17