Page 304 of 446

Doing Your Own Service Work
If you want to do some of your own service work, you
will want to use the proper service manual. It tells
you much more about how to service your vehicle than
this manual can. To order the proper service manual,
seeService Publications Ordering Information on
page 7-9.
Your vehicle has an airbag system. Before attempting to
do your own service work, seeServicing Your
Airbag-Equipped Vehicle on page 1-78.
You should keep a record with all parts receipts and list
the mileage and the date of any service work you
perform. SeeMaintenance Record on page 6-15.{CAUTION:
You can be injured and your vehicle could be
damaged if you try to do service work on a
vehicle without knowing enough about it.
Be sure you have sufficient knowledge,
experience, the proper replacement parts,
and tools before you attempt any vehicle
maintenance task.
Be sure to use the proper nuts, bolts, and
other fasteners. English and metric
fasteners can be easily confused. If you
use the wrong fasteners, parts can later
break or fall off. You could be hurt.
5-4
ProCarManuals.com
Page 313 of 446

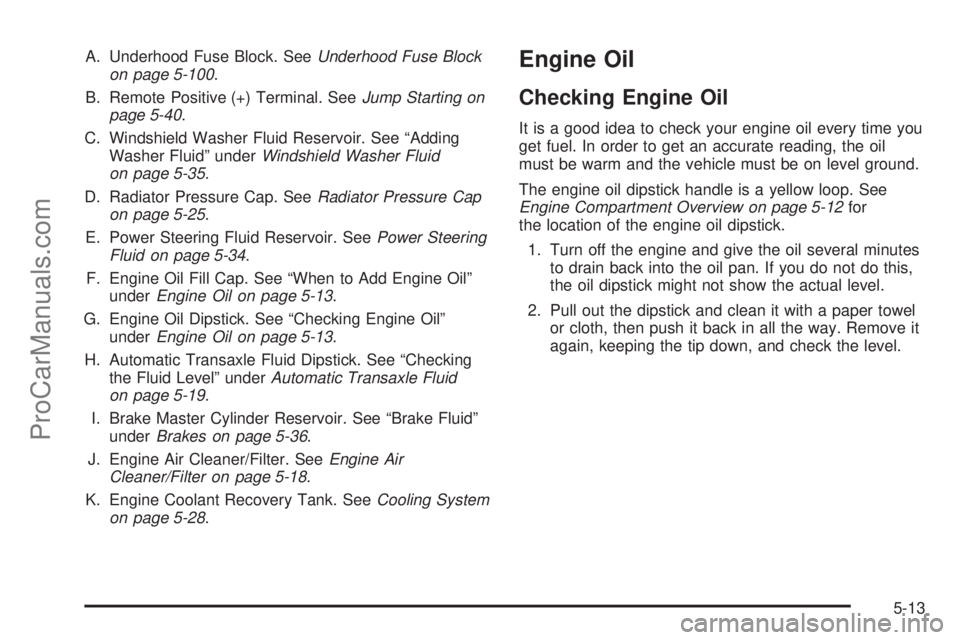
A. Underhood Fuse Block. SeeUnderhood Fuse Block
on page 5-100.
B. Remote Positive (+) Terminal. SeeJump Starting on
page 5-40.
C. Windshield Washer Fluid Reservoir. See “Adding
Washer Fluid” underWindshield Washer Fluid
on page 5-35.
D. Radiator Pressure Cap. SeeRadiator Pressure Cap
on page 5-25.
E. Power Steering Fluid Reservoir. SeePower Steering
Fluid on page 5-34.
F. Engine Oil Fill Cap. See “When to Add Engine Oil”
underEngine Oil on page 5-13.
G. Engine Oil Dipstick. See “Checking Engine Oil”
underEngine Oil on page 5-13.
H. Automatic Transaxle Fluid Dipstick. See “Checking
the Fluid Level” underAutomatic Transaxle Fluid
on page 5-19.
I. Brake Master Cylinder Reservoir. See “Brake Fluid”
underBrakes on page 5-36.
J. Engine Air Cleaner/Filter. SeeEngine Air
Cleaner/Filter on page 5-18.
K. Engine Coolant Recovery Tank. SeeCooling System
on page 5-28.Engine Oil
Checking Engine Oil
It is a good idea to check your engine oil every time you
get fuel. In order to get an accurate reading, the oil
must be warm and the vehicle must be on level ground.
The engine oil dipstick handle is a yellow loop. See
Engine Compartment Overview on page 5-12for
the location of the engine oil dipstick.
1. Turn off the engine and give the oil several minutes
to drain back into the oil pan. If you do not do this,
the oil dipstick might not show the actual level.
2. Pull out the dipstick and clean it with a paper towel
or cloth, then push it back in all the way. Remove it
again, keeping the tip down, and check the level.
5-13
ProCarManuals.com
Page 341 of 446

Notice:If you leave your radio or other accessories
on during the jump starting procedure, they could
be damaged. The repairs would not be covered
by your warranty. Always turn off your radio and
other accessories when jump starting your vehicle.
3. Turn off the ignition on both vehicles. Unplug
unnecessary accessories plugged into the cigarette
lighter or the accessory power outlet. Turn off
the radio and all lamps that are not needed. This
will avoid sparks and help save both batteries. And
it could save the radio!
4. Open the hoods and locate the batteries. Find the
positive (+) and negative (−) terminal locations on
each vehicle.
You will not need to access your battery for jump
starting. Your vehicle has a remote positive (+) jump
starting terminal for that purpose.The terminal is located
under a tethered cap at
the front of the underhood
fuse block. SeeEngine
Compartment Overview on
page 5-12for more
information on location.
Squeeze the tabs and swing the cap out of the way
to access the remote positive (+) terminal. You
should always use the remote positive (+) terminal
instead of the positive (+) terminal on your
battery.
{CAUTION:
An electric fan can start up even when the
engine is not running and can injure you. Keep
hands, clothing and tools away from any
underhood electric fan.
5-41
ProCarManuals.com
Page 367 of 446

To use your accessory in�ator system, do the following:
1. Turn the ignition to ACCESSORY or RUN.
2. Attach the appropriate nozzle adapter, if required,
to the end of the hose that has the pressure gage.
3. Attach that end of the hose to the object you wish
to in�ate.
4. Remove the protective cap covering the outlet.
5. Attach the other end of the hose to the outlet.
6. Press the accessory in�ator switch. The light in the
switch will come on to show the system is working.
If the accessory in�ator system does not turn on or the
light does not come on, the fuse may be blown or
installed incorrectly. SeeFuses and Circuit Breakers on
page 5-98or see your retailer for service.
Your accessory in�ator will automatically shut off after
about 10 minutes. The light in the switch will blink. After
about one minute you can use the system again.
Press the switch and the indicator light will come on.Notice:If you run the accessory in�ator longer
than 30 minutes at a time, you could damage
the in�ator. The repairs would not be covered by
your warranty. Run the in�ator for short periods of
time only.
After running the accessory in�ator for 30 minutes, wait
at least 10 minutes before restarting the accessory
in�ator.
To turn off the in�ator, do the following:
1. Press the switch and detach the hose, �rst from the
in�ated object, then from the outlet.
2. Put the protective cap back on.
3. Place the in�ator kit tools in the pouch, and store in
the rear compartment on the passenger’s side.
To put the cover back on, line up the tabs at the bottom
of the cover and put it in place. Push down the tab to
secure the cover.
5-67
ProCarManuals.com
Page 397 of 446

Electrical System
Add-On Electrical Equipment
Notice:Don’t add anything electrical to your
vehicle unless you check with your dealer �rst.
Some electrical equipment can damage your vehicle
and the damage wouldn’t be covered by your
warranty. Some add-on electrical equipment can
keep other components from working as they
should.
Your vehicle has an airbag system. Before attempting to
add anything electrical to your vehicle, seeServicing
Your Airbag-Equipped Vehicle on page 1-78.
Headlamp Wiring
The headlamp wiring is protected by four internal fuses
in the underhood fuse block. An electrical overload
will cause the lamps to go on and off, or in some cases
to remain off. If this happens, have your headlamp
wiring checked right away.
Windshield Wiper Fuses
The windshield wiper motor is protected by an internal
fuse in the underhood fuse block. If the motor overheats
due to heavy snow, etc., the wiper will stop until the
motor cools. If the overload is caused by some electrical
problem, be sure to get it �xed.
The rear washer pump is controlled by a relay located
in the engine compartment, behind the windshield
washer �uid reservoir. The rear wiper motor is protected
by a fuse located in the instrument panel fuse block.
Power Windows and Other
Power Options
Circuit breakers in the instrument panel fuse panel
protect the power windows and other power accessories.
When the current load is too heavy, the circuit breaker
opens and closes, protecting the circuit until the
problem is �xed.
5-97
ProCarManuals.com
Page 398 of 446

Fuses and Circuit Breakers
The wiring circuits in your vehicle are protected from
short circuits by a combination of fuses, circuit breakers,
and fusible thermal links.
Look at the silver-colored band inside the fuse. If the
band is broken or melted, replace the fuse. Be sure you
replace a bad fuse with a new one of the identical
size and rating.
If you ever have a problem on the road and do not have
a spare fuse, you can borrow one that has the same
amperage or use one of the spare fuses in the
underhood fuse block. Just pick some feature of your
vehicle that you can get along without – like the radio or
cigarette lighter – and use its fuse, if it is the right
amperage. Replace it as soon as you can.
There are two fuse blocks in your vehicle, the instrument
panel fuse block and the underhood fuse block.
Instrument Panel Fuse Block
The instrument panel fuse block is located under the
instrument panel on the passenger’s side of the vehicle.
Your vehicle may not have all of the fuses listed.
5-98
ProCarManuals.com
Page 399 of 446
Fuses Usage
1 Trunk, Door Locks
2 Electronic Level Control
3 Rear Wiper
4 Radio Ampli�er
5 Interior Lamps
6 OnStar
®
7 Keyless Entry Module
8Cluster, Heating, Ventilation,
Air Conditioning
9 Cruise Switch
10 Steering Wheel Illumination
11 Power Mirror
12 Stoplamp, Turn Lamps
13 Heated Seats
14 Blank
15 Electronic Level Control
16 Heated Mirror
17Center High-Mounted Stoplamp,
Back-up Lamps
18 Blank
Fuses Usage
19 Canister Ventilation
20 Park Lamps
21 Power Sliding Door
22 Blank
23 Blank
24 Left Power Sliding Door
25 Right Power Sliding Door
Relays Usage
26 Blank
27 Blank
28 Park Lamps
29 Retained Accessory Power
30 Rear Defog
PLR Fuse Puller
Circuit
BreakersUsage
31 Power Seats
32 Power Window
5-99
ProCarManuals.com
Page 400 of 446
Underhood Fuse Block
The underhood fuse block is located in the engine compartment. For more information on location seeEngine
Compartment Overview on page 5-12.
Your vehicle may not have all the fuses listed.
5-100
ProCarManuals.com