Page 23 of 250

Downloaded from www.Manualslib.com manuals search engine
5
NU761_2_G1-FRA.qxd 10/11/05 15:53 Page 1.13
1.13
If you decide to keep the
doors locked when you are
driving, remember that it
may be more difficult for
those assisting you to gain access
to the passenger compartment in
the event of an emergency.
Never leave your vehicle
with the RENAULT card
inside.
LOCKING/UNLOCKING THE DOORS (continued)
Control for locking and
unlocking from the inside
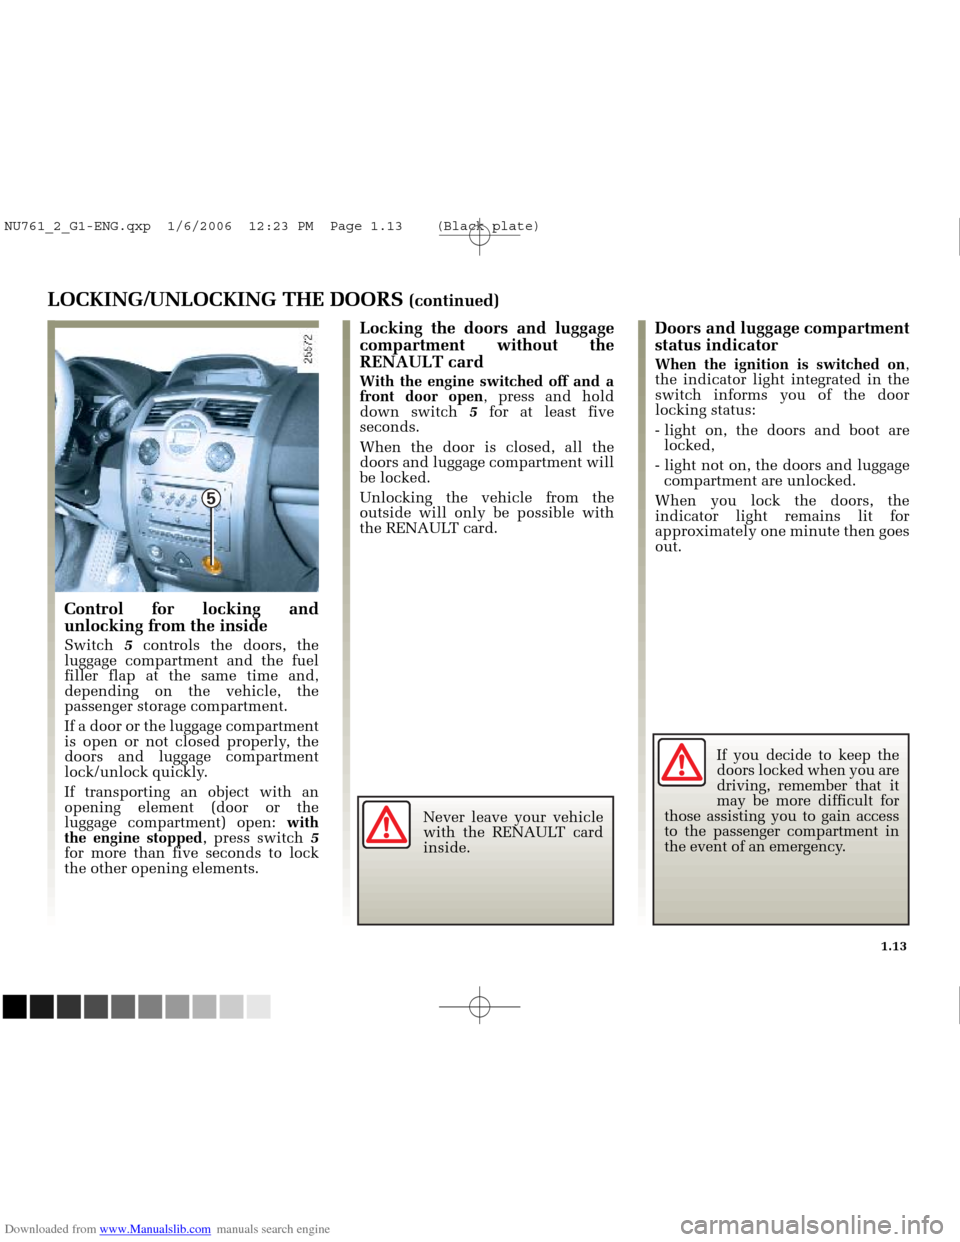
Switch 5controls the doors, the
luggage compartment and the fuel
filler flap at the same time and,
depending on the vehicle, the
passenger storage compartment.
If a door or the luggage compartment
is open or not closed properly, the
doors and luggage compartment
lock/unlock quickly.
If transporting an object with an
opening element (door or the
luggage compartment) open: with
the engine stopped , press switch 5
for more than five seconds to lock
the other opening elements.
Locking the doors and luggage
compartment without the
RENAULT card
With the engine switched off and a
front door open , press and hold
down switch 5for at least five
seconds.
When the door is closed, all the
doors and luggage compartment will
be locked.
Unlocking the vehicle from the
outside will only be possible with
the RENAULT card.
Doors and luggage compartment
status indicator
When the ignition is switched on ,
the indicator light integrated in the
switch informs you of the door
locking status:
- light on, the doors and boot are locked,
- light not on, the doors and luggage compartment are unlocked.
When you lock the doors, the
indicator light remains lit for
approximately one minute then goes
out.
NU761_2_G1-ENG.qxp 1/6/2006 12:23 PM Page 1.13 (Black plate)
Page 24 of 250

Downloaded from www.Manualslib.com manuals search engine
1
NU761_2_G1-FRA.qxd 10/11/05 15:53 Page 1.14
1.14
If you decide to keep the
doors locked when you
are driving, remember
that it may be more
difficult for those assisting you to
gain access to your vehicle in the
event of an emergency.
RENAULT ANTI-INTRUDER DEVICE (RAID)
You must first decide if you want to
activate this function.
To activate
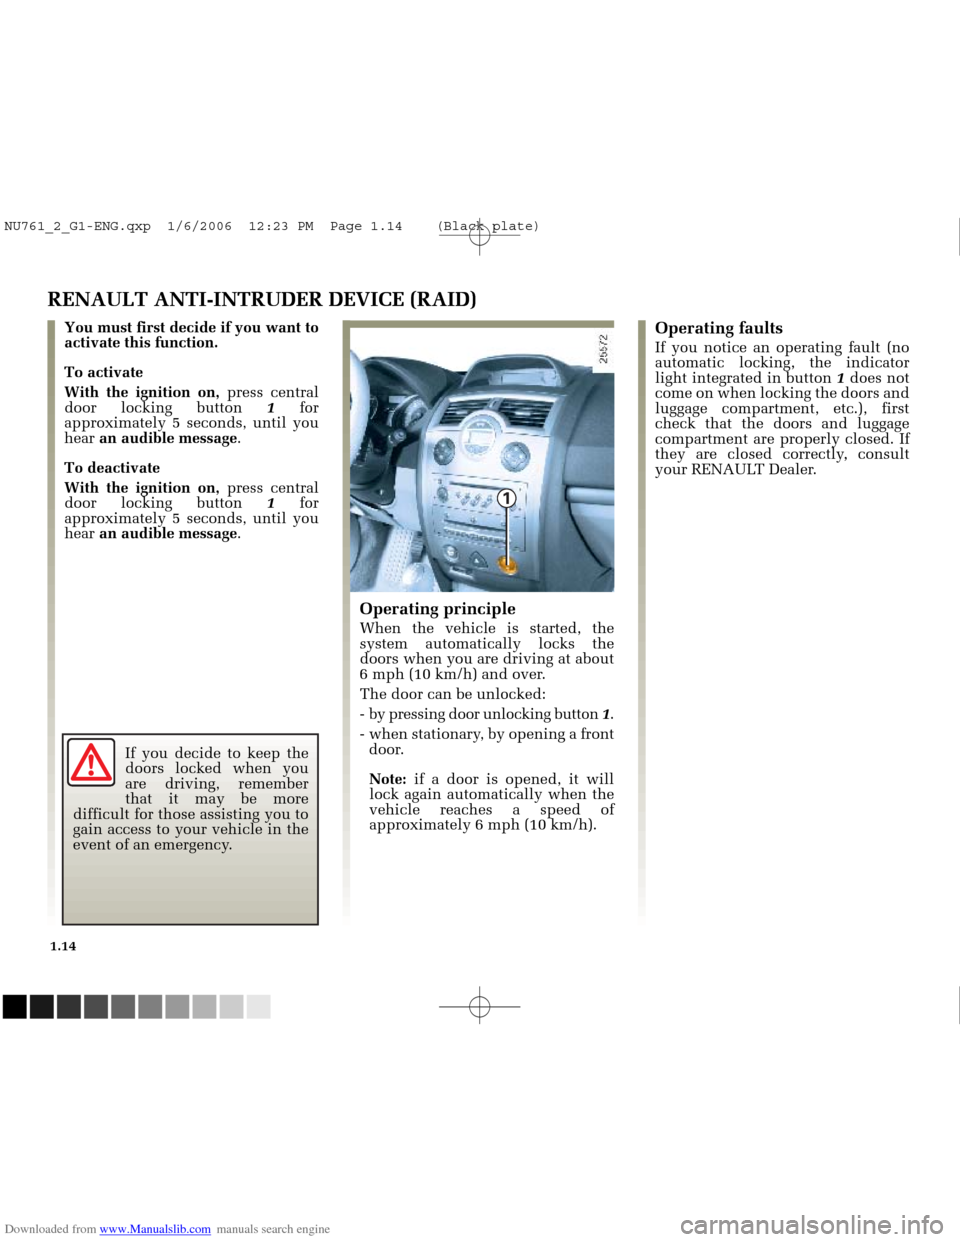
With the ignition on, press central
door locking button 1for
approximately 5 seconds, until you
hear an audible message .
To deactivate
With the ignition on, press central
door locking button 1for
approximately 5 seconds, until you
hear an audible message .
Operating principle
When the vehicle is started, the
system automatically locks the
doors when you are driving at about
6 mph (10 km/h) and over.
The door can be unlocked:
- by pressing door unlocking button 1.
- when stationary, by opening a front door.
Note: if a door is opened, it will
lock again automatically when the
vehicle reaches a speed of
approximately 6 mph (10 km/h).
Operating faults
If you notice an operating fault (no
automatic locking, the indicator
light integrated in button 1does not
come on when locking the doors and
luggage compartment, etc.), first
check that the doors and luggage
compartment are properly closed. If
they are closed correctly, consult
your RENAULT Dealer.
NU761_2_G1-ENG.qxp 1/6/2006 12:23 PM Page 1.14 (Black plate)
Page 25 of 250
Downloaded from www.Manualslib.com manuals search engine
1
1
NU761_2_G1-FRA.qxd 10/11/05 15:53 Page 1.15
1.15
Any work or modification
to the engine immobiliser
(electronic units, wiring,
etc.) may be dangerous. It
must be carried out by a qualified
RENAULT technician.
ENGINE IMMOBILISER
This prevents the vehicle being
driven by anyone not in possession
of the vehicle’s RENAULT card.
The vehicle is automatically
protected a few seconds after the
engine is switched off.
Operating principle
When the engine is started, warning
light 1remains on for a few seconds
and then goes out (refer to the
information on starting the engine in
Section 2).
If the code is not recognised, the
card reader flashes rapidly and the
vehicle cannot be started.
Indicator lights
Vehicle protection indicator light
After the ignition has been switched
off, indicator light 1will flash and
the vehicle is protected.
NU761_2_G1-ENG.qxp 1/6/2006 12:23 PM Page 1.15 (Black plate)
Page 26 of 250
Downloaded from www.Manualslib.com manuals search engine
2
1
NU761_2_G1-FRA.qxd 10/11/05 15:53 Page 1.16
1.16
ENGINE IMMOBILISER (continued)
If the RENAULT card is faulty (card
reader flashing rapidly), if possible
use the second RENAULT card
(supplied with the vehicle).
In this situation, it is essential to
contact a RENAULT Dealer who is
the only one qualified to repair the
engine immobiliser system.
If there is interference and/or the
hands-free RENAULT card is not
recognised, insert it into the card
reader 2.
Operating fault warning light
After attempting to start the engine,
if the warning light continues to
flash or remains on continuously,
this indicates that there is a system
operating fault.
NU761_2_G1-ENG.qxp 1/6/2006 12:23 PM Page 1.16 (Black plate)
Page 30 of 250
Downloaded from www.Manualslib.com manuals search engine
5
6
NU761_2_G1-FRA.qxd 10/11/05 15:53 Page 1.20
1.20
FRONT SEATS (continued)Heated seats
With the ignition switched on, move
switch 6of the required seat. The
indicator light in the switch lights up.
The system, which has a thermostat,
decides whether or not the heating
is needed.
Access to the seat bases(three-door versions)
Lift handle 5and slide the seat
forwards.
To return the seat to its initial
position (stored position) on the
driver’s side, slide the seat
backwards until it locks into place.
NU761_2_G1-ENG.qxp 1/6/2006 12:23 PM Page 1.20 (Black plate)
Page 31 of 250

Downloaded from www.Manualslib.com manuals search engine
1
2
NU761_2_G1-FRA.qxd 10/11/05 15:53 Page 1.21
1.21
Incorrectly adjusted seat
belts may cause injuries in
the event of an accident.
Even pregnant women
should wear a seat belt. In this
case, ensure that the lap belt is
not exerting too much pressure
on the abdomen without allowing
any slack.
SEAT BELTS
Always wear your seat belt when
travelling in your vehicle. You must
also comply with the legislation of
the particular country you are in.
Before driving off:
- firstly ensure that your driving
position is correctly adjusted,
- then adjust your seat belt to
provide maximum protection.Adjusting your driving position
Sit well back in your seat (having
removed your coat or jacket). This
is essential to ensure your back is
positioned correctly.
Adjust the distance between the seat and the pedals. Your seat
should be as far back as possible
while still allowing you to fully
depress the clutch pedal. The
seatback should be adjusted so
that your arms are slightly bent
when you hold the steering wheel.
Adjust the position of your head restraint. For safety reasons, the
top of your head should be in line
with the top of the head restraint.
Adjust the height of the seat. This
adjustment allows you to select
the seat position which offers you
the best possible view.
Adjust the position of the steering wheel.
Adjusting the seat belts
Sit with your back firmly against the
seatback.
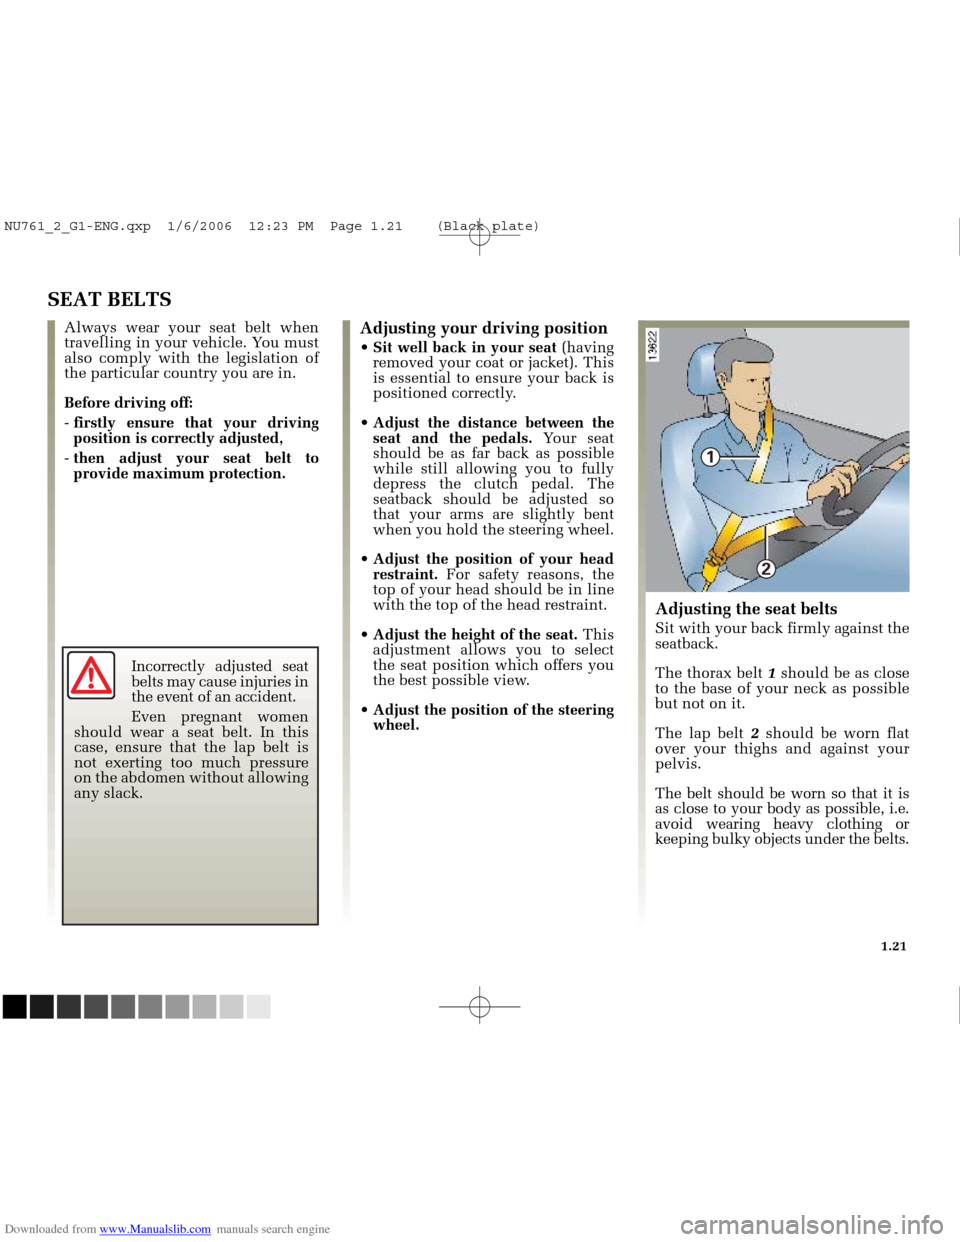
The thorax belt 1should be as close
to the base of your neck as possible
but not on it.
The lap belt 2should be worn flat
over your thighs and against your
pelvis.
The belt should be worn so that it is
as close to your body as possible, i.e.
avoid wearing heavy clothing or
keeping bulky objects under the belts.
NU761_2_G1-ENG.qxp 1/6/2006 12:23 PM Page 1.21 (Black plate)
Page 32 of 250

Downloaded from www.Manualslib.com manuals search engine
6
4
6
1
3
5
NU761_2_G1-FRA.qxd 10/11/05 15:53 Page 1.22
1.22
SEAT BELTS (continued)
Adjusting the height of the seat
belt
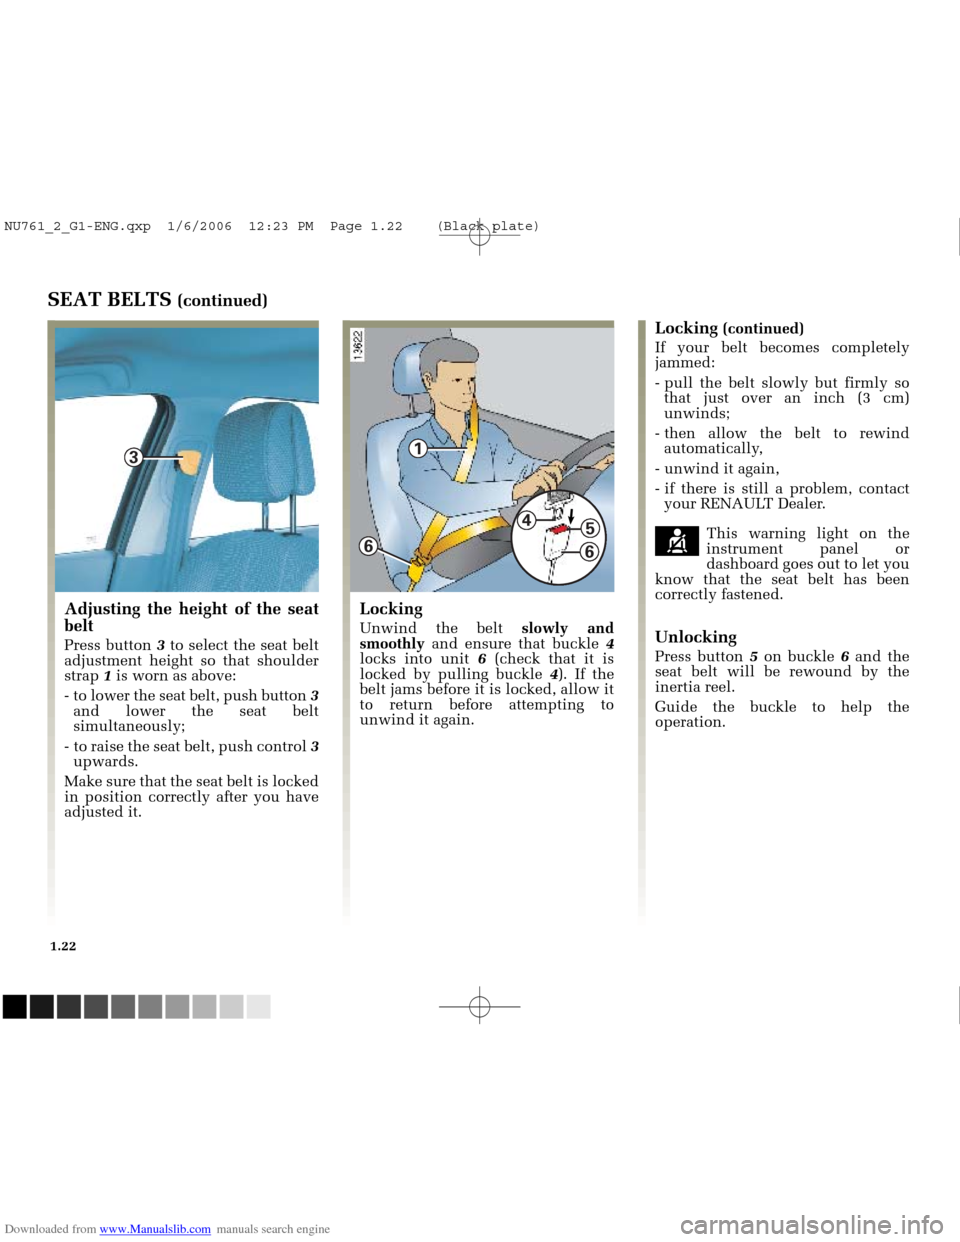
Press button 3to select the seat belt
adjustment height so that shoulder
strap 1is worn as above:
- to lower the seat belt, push button 3
and lower the seat belt
simultaneously;
- to raise the seat belt, push control 3
upwards.
Make sure that the seat belt is locked
in position correctly after you have
adjusted it.
Locking
Unwind the belt slowly and
smoothly and ensure that buckle 4
locks into unit 6(check that it is
locked by pulling buckle 4). If the
belt jams before it is locked, allow it
to return before attempting to
unwind it again.
Locking (continued)
If your belt becomes completely
jammed:
- pull the belt slowly but firmly so that just over an inch (3 cm)
unwinds;
- then allow the belt to rewind automatically,
- unwind it again,
- if there is still a problem, contact your RENAULT Dealer.
çThis warning light on the
instrument panel or
dashboard goes out to let you
know that the seat belt has been
correctly fastened.
Unlocking
Press button 5on buckle 6and the
seat belt will be rewound by the
inertia reel.
Guide the buckle to help the
operation.
NU761_2_G1-ENG.qxp 1/6/2006 12:23 PM Page 1.22 (Black plate)
Page 36 of 250

Downloaded from www.Manualslib.com manuals search engine
A
NU761_2_G1-FRA.qxd 10/11/05 15:53 Page 1.26
1.26
METHODS OF RESTRAINT IN ADDITION TO THE FRONT SEAT BELTS (continued)
Load limiter
Above a certain severity of impact,
this mechanism is used to limit the
force of the belt against the body so
that it is at an acceptable level.
Driver and passenger airbags
Fitted to the driver and passenger
side.
The word “Airbag” on the steering
wheel and the dashboard (airbag
zone A) and an airbag marking in the
lower section of the windscreen
indicate the presence of this
equipment.
Each airbag system consists of:
- an airbag and gas generator fitted on the steering wheel for the driver
and in the dashboard for the front
passenger;
- an intelligent computer for both systems, which includes an impact
sensor and a monitor controlling
the electrical trigger system for the
gas generator;
- a single
åwarning light on the
instrument panel;
- an advanced frontal sensor completes this system. The airbag system uses the
principles of pyrotechnics. This
explains why, when the airbag
inflates, it will generate heat,
produce smoke (this does not mean
that a fire is about to start) and
make a noise upon detonation. In a
situation where an airbag is
required, it will inflate immediately
and this may cause some minor,
superficial grazing to the skin or
other problems.
NU761_2_G1-ENG.qxp 1/6/2006 12:23 PM Page 1.26 (Black plate)