2005 PONTIAC GTO key
[x] Cancel search: keyPage 214 of 318

2. If the fan is working and the temperature gage
needle has not returned to its normal position
within a few minutes, stop the engine and remove
the ignition key.
Look for leaks at the radiator hoses and
connections, heater hoses and connections,
radiator, and water pump. Be careful when checking
these areas as they will probably still be hot. If
you find a major leak or other problems that may
have caused the engine to overheat, do not run the
engine until these problems have been corrected.
If you do not find anything wrong, you should check
the engine coolant level. SeeEngine Coolant on
page 5-23. You should also check the air intake
area below the front bumper to ensure that it is clear
of leaves and road grime.3. Turn off your air conditioning and turn on your
heater to full hot at the highest fan speed and
open the windows as necessary.
If you no longer have the overheat warning, you can
drive. Just to be safe, drive slower for about 10 minutes.
If the warning does not come back on, you can drive
normally.
If the warning continues and you have not stopped, pull
over, stop, and park your vehicle right away.
If there is still no sign of steam, you can idle the engine
for three minutes while you are parked. If you still
have the warning, turn off the engine and get everyone
out of the vehicle until it cools down.
You may decide not to lift the hood but to get service
help right away.
5-28
Page 283 of 318

Maintenance Footnotes
(a)Visually inspect brake lines and hoses for proper
hook-up, binding, leaks, cracks, chafing, etc. Inspect
disc brake pads for wear and rotors for surface
condition. Inspect other brake parts, including calipers,
parking brake, etc.
(b)Visually inspect front and rear suspension and
steering system for damaged, loose, or missing parts or
signs of wear. Inspect power steering lines and hoses
for proper hook-up, binding, leaks, cracks, chafing, etc.
(c)Visually inspect hoses and have them replaced if
they are cracked, swollen, or deteriorated. Inspect
all pipes, fittings and clamps; replace with genuine
GM parts as needed. To help ensure proper operation,
a pressure test of the cooling system and pressure
cap and cleaning the outside of the radiator and
air conditioning condenser is recommended at least
once a year.
(d)Visually inspect wiper blades for wear or cracking.
Replace blade inserts that appear worn or damaged
or that streak or miss areas of the windshield.(e)Make sure the safety belt reminder light and all your
belts, buckles, latch plates, retractors, and anchorages
are working properly. Look for any other loose or
damaged safety belt system parts. If you see anything
that might keep a safety belt system from doing its
job, have it repaired. Have any torn or frayed safety belts
replaced. Also look for any opened or broken airbag
coverings, and have them repaired or replaced.
The airbag system does not need regular maintenance.
(f)Lubricate all key lock cylinders, door hinges and
latches, hood hinges and latches, and trunk lid hinges
and latches. More frequent lubrication may be required
when exposed to a corrosive environment. Applying
silicone grease on weatherstrips with a clean cloth will
make them last longer, seal better, and not stick or
squeak.
6-7
Page 286 of 318

Automatic Transmission Shift Lock
Control System Check
{CAUTION:
When you are doing this inspection, the
vehicle could move suddenly. If the vehicle
moves, you or others could be injured.
1. Before you start, be sure you have enough room
around the vehicle. It should be parked on a level
surface.
2. Firmly apply the parking brake. SeeParking Brake
on page 2-23.
Be ready to apply the regular brake immediately if
the vehicle begins to move.
3. With the engine off, turn the ignition to ON, but do
not start the engine. Without applying the regular
brake, try to move the shift lever out of PARK (P)
with normal effort. If the shift lever moves out
of PARK (P), contact your GM Goodwrench
®dealer
for service.
Ignition Transmission Lock Check
While parked, and with the parking brake set, try to turn
the ignition to LOCK in each shift lever position.
•With an automatic transmission, the ignition should
turn to LOCK only when the shift lever is in
PARK (P). The key should come out only in LOCK.
•With a manual transmission, the key should
come out only in LOCK.
Contact your GM Goodwrench
®dealer if service is
required.
6-10
Page 289 of 318

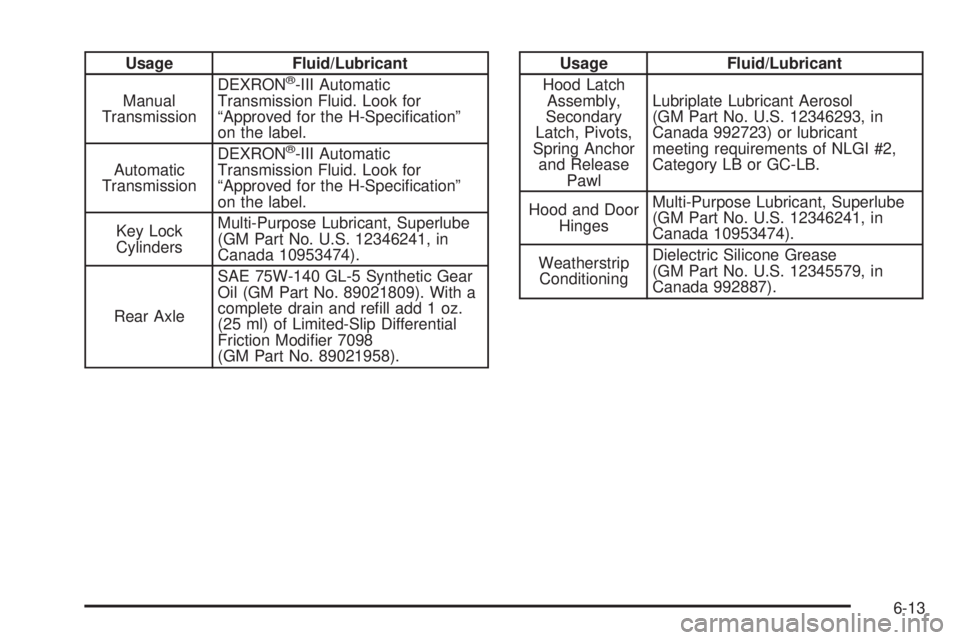
Usage Fluid/Lubricant
Manual
TransmissionDEXRON®-III Automatic
Transmission Fluid. Look for
“Approved for the H-Specification”
on the label.
Automatic
TransmissionDEXRON
®-III Automatic
Transmission Fluid. Look for
“Approved for the H-Specification”
on the label.
Key Lock
CylindersMulti-Purpose Lubricant, Superlube
(GM Part No. U.S. 12346241, in
Canada 10953474).
Rear AxleSAE 75W-140 GL-5 Synthetic Gear
Oil (GM Part No. 89021809). With a
complete drain and refill add 1 oz.
(25 ml) of Limited-Slip Differential
Friction Modifier 7098
(GM Part No. 89021958).
Usage Fluid/Lubricant
Hood Latch
Assembly,
Secondary
Latch, Pivots,
Spring Anchor
and Release
PawlLubriplate Lubricant Aerosol
(GM Part No. U.S. 12346293, in
Canada 992723) or lubricant
meeting requirements of NLGI #2,
Category LB or GC-LB.
Hood and Door
HingesMulti-Purpose Lubricant, Superlube
(GM Part No. U.S. 12346241, in
Canada 10953474).
Weatherstrip
ConditioningDielectric Silicone Grease
(GM Part No. U.S. 12345579, in
Canada 992887).
6-13
Page 312 of 318

Hood
Checking Things Under................................5-10
Release.....................................................5-11
Horn............................................................... 3-6
How to Use This Manual...................................... ii
How to Wear Safety Belts Properly...................1-11
Hydraulic Clutch.............................................5-22
I
Ignition Positions.............................................2-16
Immobilizer....................................................2-13
Immobilizer Operation......................................2-13
Infants and Young Children, Restraints...............1-28
Inflation -- Tire Pressure..................................5-59
Instrument Panel
Brightness..................................................3-15
Cluster.......................................................3-23
Overview..................................................... 3-4
J
Jump Starting.................................................5-40
K
Keyless Entry System....................................... 2-4
Keys............................................................... 2-2
L
Labelling, Tire Sidewall....................................5-54
Lamps
Battery Run-Down Protection.........................3-16
Courtesy....................................................3-15
Dome........................................................3-16
Exterior......................................................3-13
Fog ...........................................................3-15
Front Reading.............................................3-16
Trunk.........................................................3-16
LATCH System
Child Restraints...........................................1-37
Securing a Child Restraint Designed for the
LATCH System........................................1-39
Latches, Seatback............................................ 1-4
Light
Airbag Readiness........................................3-25
Anti-Lock Brake System Warning...................3-27
Brake System Warning.................................3-27
6
Page 315 of 318

Remote Keyless Entry System............................ 2-4
Remote Keyless Entry System, Operation............ 2-5
Removing the Flat Tire and Installing the
Spare Tire..................................................5-71
Removing the Spare Tire and Tools...................5-70
Replacement Bulbs.........................................5-51
Reporting Safety Defects
General Motors...........................................7-11
United States Government............................7-10
Restraint System Check
Checking the Restraint Systems....................1-50
Replacing Restraint System Parts
After a Crash..........................................1-51
Retained Accessory Power (RAP)......................2-17
Right Front Passenger Position, Safety Belts......1-19
Roadside
Assistance Program....................................... 7-6
Rocking Your Vehicle to Get it Out....................4-28
Running the Engine While Parked.....................2-27
S
Safety Belt
Pretensioners..............................................1-24
Reminder Light............................................3-24
Safety Belts
Care of......................................................5-79
Driver Position............................................1-12Safety Belts (cont.)
How to Wear Safety Belts Properly................1-11
Questions and Answers About Safety Belts.....1-10
Rear Safety Belt Comfort Guides for
Children and Small Adults.........................1-22
Rear Seat Passengers.................................1-19
Right Front Passenger Position......................1-19
Safety Belt Use During Pregnancy.................1-19
Safety Belts Are for Everyone......................... 1-6
Shoulder Belt Height Adjuster........................1-18
Safety Warnings and Symbols.............................. iii
Scheduled Maintenance..................................... 6-4
Seatback Latches............................................. 1-4
Seats
Head Restraints............................................ 1-4
Manual Lumbar............................................. 1-2
Power Seats................................................. 1-2
Reclining Seatbacks...................................... 1-3
Seatback Latches.......................................... 1-4
Securing a Child Restraint
Designed for the LATCH System...................1-39
Rear Seat Position......................................1-39
Right Front Seat Position..............................1-41
Security Light.................................................3-31
Service........................................................... 5-3
Adding Equipment to the Outside of Your
Vehicle..................................................... 5-5
Doing Your Own Work................................... 5-4
9