Page 129 of 334
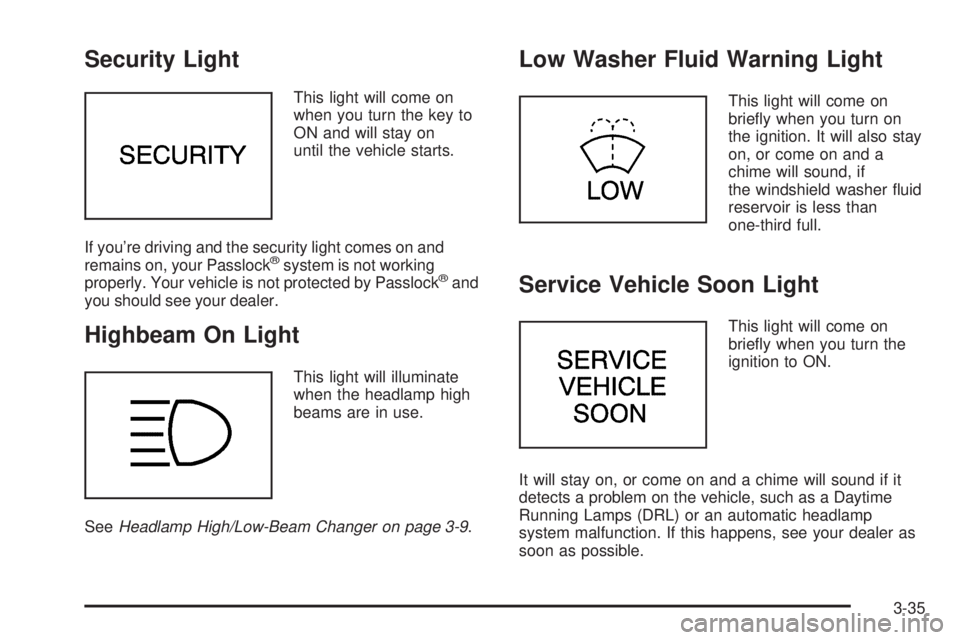
Security Light
This light will come on
when you turn the key to
ON and will stay on
until the vehicle starts.
If you’re driving and the security light comes on and
remains on, your Passlock
®system is not working
properly. Your vehicle is not protected by Passlock®and
you should see your dealer.
Highbeam On Light
This light will illuminate
when the headlamp high
beams are in use.
SeeHeadlamp High/Low-Beam Changer on page 3-9.
Low Washer Fluid Warning Light
This light will come on
briefly when you turn on
the ignition. It will also stay
on, or come on and a
chime will sound, if
the windshield washer fluid
reservoir is less than
one-third full.
Service Vehicle Soon Light
This light will come on
briefly when you turn the
ignition to ON.
It will stay on, or come on and a chime will sound if it
detects a problem on the vehicle, such as a Daytime
Running Lamps (DRL) or an automatic headlamp
system malfunction. If this happens, see your dealer as
soon as possible.
3-35
Page 180 of 334

Driving at Night
Night driving is more dangerous than day driving.
One reason is that some drivers are likely to be
impaired — by alcohol or drugs, with night vision
problems, or by fatigue.Here are some tips on night driving.
•Drive defensively.
•Do not drink and drive.
•Adjust your inside rearview mirror to reduce the
glare from headlamps behind you.
•Since you cannot see as well, you may need to
slow down and keep more space between you
and other vehicles.
•Slow down, especially on higher speed roads. Your
headlamps can light up only so much road ahead.
•In remote areas, watch for animals.
•If you are tired, pull off the road in a safe place
and rest.
No one can see as well at night as in the daytime. But
as we get older these differences increase. A
50-year-old driver may require at least twice as much
light to see the same thing at night as a 20-year-old.
What you do in the daytime can also affect your
night vision. For example, if you spend the day in bright
sunshine you are wise to wear sunglasses. Your
eyes will have less trouble adjusting to night. But if you
are driving, do not wear sunglasses at night. They
may cut down on glare from headlamps, but they also
make a lot of things invisible.
4-16
Page 181 of 334

You can be temporarily blinded by approaching
headlamps. It can take a second or two, or even
several seconds, for your eyes to re-adjust to the dark.
When you are faced with severe glare, as from a
driver who does not lower the high beams, or a vehicle
with misaimed headlamps, slow down a little. Avoid
staring directly into the approaching headlamps.
Keep your windshield and all the glass on your vehicle
clean — inside and out. Glare at night is made much
worse by dirt on the glass. Even the inside of the glass
can build up a film caused by dust. Dirty glass makes
lights dazzle and flash more than clean glass would,
making the pupils of your eyes contract repeatedly.
Remember that your headlamps light up far less of a
roadway when you are in a turn or curve. Keep your eyes
moving; that way, it is easier to pick out dimly lighted
objects. Just as your headlamps should be checked
regularly for proper aim, so should your eyes be
examined regularly. Some drivers suffer from night
blindness — the inability to see in dim light — and are
not even aware of it.Driving in Rain and on Wet Roads
Rain and wet roads can mean driving trouble. On a wet
road, you cannot stop, accelerate, or turn as well
because your tire-to-road traction is not as good as on
dry roads. And, if your tires do not have much tread
left, you will get even less traction. It is always wise to
go slower and be cautious if rain starts to fall while
you are driving. The surface may get wet suddenly when
your reflexes are tuned for driving on dry pavement.
4-17
Page 192 of 334

•Put on extra clothing or wrap a blanket around you.
If you have no blankets or extra clothing, make
body insulators from newspapers, burlap bags, rags,
floor mats — anything you can wrap around
yourself or tuck under your clothing to keep warm.
You can run the engine to keep warm, but be careful.
{CAUTION:
Snow can trap exhaust gases under your
vehicle. This can cause deadly CO (carbon
monoxide) gas to get inside. CO could
overcome you and kill you. You cannot see it
or smell it, so you might not know it is in your
vehicle. Clear away snow from around the
base of your vehicle, especially any that is
blocking your exhaust pipe. And check around
again from time to time to be sure snow does
not collect there.
Open a window just a little on the side of the
vehicle that is away from the wind. This will
help keep CO out.
Run your engine only as long as you must. This saves
fuel. When you run the engine, make it go a little
faster than just idle. That is, push the accelerator
slightly. This uses less fuel for the heat that you get and
it keeps the battery charged. You will need a
well-charged battery to restart the vehicle, and possibly
for signaling later on with your headlamps. Let the
heater run for a while.
4-28
Page 209 of 334

Service............................................................5-3
Doing Your Own Service Work.........................5-4
Adding Equipment to the Outside of Your
Vehicle......................................................5-5
Fuel................................................................5-5
Gasoline Octane............................................5-5
Gasoline Specifications....................................5-5
California Fuel...............................................5-5
Additives.......................................................5-6
Fuels in Foreign Countries...............................5-7
Filling Your Tank............................................5-7
Filling a Portable Fuel Container.......................5-9
Checking Things Under the Hood....................5-10
Hood Release..............................................5-10
Engine Compartment Overview.......................5-12
Engine Oil...................................................5-15
Engine Oil Life System..................................5-18
Engine Air Cleaner/Filter................................5-20
Automatic Transaxle Fluid..............................5-21
Engine Coolant.............................................5-22
Engine Overheating.......................................5-24
Cooling System............................................5-26
Power Steering Fluid.....................................5-31
Windshield Washer Fluid................................5-32
Brakes........................................................5-33
Battery........................................................5-36
Jump Starting...............................................5-37Bulb Replacement..........................................5-42
Halogen Bulbs..............................................5-42
Headlamps..................................................5-42
Front Turn Signal and Parking Lamps..............5-43
Center High-Mounted Stoplamp (CHMSL).........5-44
Taillamps, Turn Signal, and Stoplamps............5-44
Replacement Bulbs.......................................5-45
Windshield Wiper Blade Replacement..............5-45
Tires..............................................................5-46
Tire Sidewall Labelling...................................5-47
Tire Terminology and Definitions.....................5-49
Inflation - Tire Pressure.................................5-52
Tire Inspection and Rotation...........................5-53
When It Is Time for New Tires.......................5-54
Buying New Tires.........................................5-55
Uniform Tire Quality Grading..........................5-56
Wheel Alignment and Tire Balance..................5-57
Wheel Replacement......................................5-57
Tire Chains..................................................5-59
If a Tire Goes Flat........................................5-60
Changing a Flat Tire.....................................5-61
Removing the Spare Tire and Tools................5-62
Removing the Flat Tire and Installing the
Spare Tire................................................5-64
Storing a Flat or Spare Tire and Tools............5-69
Compact Spare Tire......................................5-70
Section 5 Service and Appearance Care
5-1
Page 250 of 334
Bulb Replacement
For the proper type of replacement bulbs, see
Replacement Bulbs on page 5-45.
For any bulb changing procedure not listed in this
section, contact your dealer.
Halogen Bulbs
{CAUTION:
Halogen bulbs have pressurized gas inside and
can burst if you drop or scratch the bulb. You or
others could be injured. Be sure to read and
follow the instructions on the bulb package.
Headlamps
To replace a headlamp bulb, do the following:
1. Lift up on the two retaining clips which secure the
headlamp assembly.
5-42
Page 251 of 334
2. Lift and pull the headlamp assembly forward, out of
the mounting bracket.
3. Turn the bulb assembly retainer counterclockwise
one-sixth of a turn and pull out the bulb assembly.
4. Unclip the bulb assembly from the wiring harness.
5. Replace the bulb.
6. Reverse Steps 1 through 4 to reinstall the bulb
assembly and headlamp assembly.
Front Turn Signal and Parking
Lamps
To replace a front turn signal or parking lamp bulb, do
the following:
1. Remove the headlamp assembly as described
previously. SeeHeadlamps on page 5-42for
more information.
2. Turn the bulb socket counterclockwise and pull out
the bulb.
3. Unclip the bulb assembly from the wiring harness.
4. Replace the bulb.
When replacing the bulb, be sure to properly align
the bulb with the locating feature in the assembly.
5. Reverse Steps 1 through 3 to reinstall the lamp
assembly.
5-43
Page 253 of 334
Replacement Bulbs
Exterior Lamp Bulb Number
Back-Up Lamps 3156
Center High-Mounted Stoplamps 912
Headlamps 9007
Parking/Turn Signal Lamps 3157NA or 3157A
Sidemarker Lamps 194NA
Stop/Taillamps 3157
Turn Signal Lamps 3156
For replacement bulbs not listed here, contact your
dealer.
Windshield Wiper Blade
Replacement
Windshield wiper blades should be inspected at least
twice a year for wear or cracking. See “Wiper Blade
Check” inScheduled Maintenance on page 6-4for more
information.
Replacement blades come in different types and are
removed in different ways. Here’s how to remove
the wiper blade:
1. Pull the windshield wiper arm away from the
windshield.2. Push the release lever and slide the wiper assembly
toward the driver’s side of the vehicle.
3. Install a new blade by reversing Steps 1 and 2.
For the proper type and size, seeCapacities and
Specifications on page 5-85.
5-45