2005 NISSAN X-TRAIL center console
[x] Cancel search: center consolePage 3881 of 4555
INSTRUMENT PANEL ASSEMBLY
IP-15
C
D
E
F
G
H
J
K
L
MA
B
IP
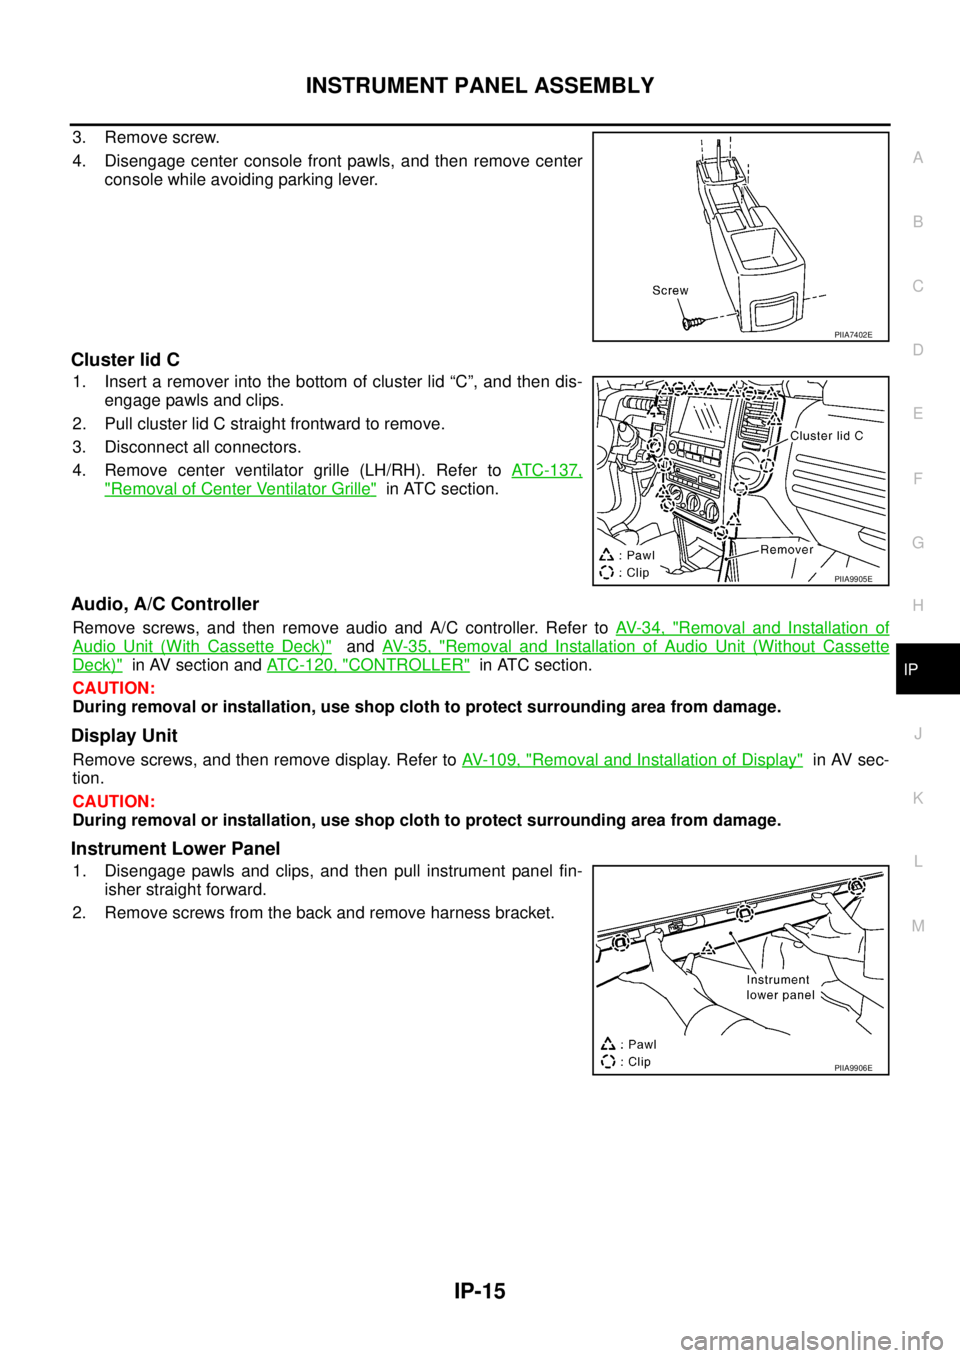
3. Remove screw.
4. Disengage center console front pawls, and then remove center
console while avoiding parking lever.
Cluster lid C
1. Insert a remover into the bottom of cluster lid “C”, and then dis-
engage pawls and clips.
2. Pull cluster lid C straight frontward to remove.
3. Disconnect all connectors.
4. Remove center ventilator grille (LH/RH). Refer to ATC-137,
"Removal of Center Ventilator Grille" in ATC section.
Audio, A/C Controller
Remove screws, and then remove audio and A/C controller. Refer to AV- 3 4 , "Removal and Installation of
Audio Unit (With Cassette Deck)" and AV- 3 5 , "Removal and Installation of Audio Unit (Without Cassette
Deck)" in AV section and ATC-120, "CONTROLLER" in ATC section.
CAUTION:
During removal or installation, use shop cloth to protect surrounding area from damage.
Display Unit
Remove screws, and then remove display. Refer to AV- 1 0 9 , "Removal and Installation of Display" in AV sec-
tion.
CAUTION:
During removal or installation, use shop cloth to protect surrounding area from damage.
Instrument Lower Panel
1. Disengage pawls and clips, and then pull instrument panel fin-
isher straight forward.
2. Remove screws from the back and remove harness bracket.
PIIA7402E
PIIA9905E
PIIA9906E
Page 3885 of 4555
INSTRUMENT PANEL ASSEMBLY
IP-19
C
D
E
F
G
H
J
K
L
MA
B
IP
Disassembly and AssemblyEIS008BU
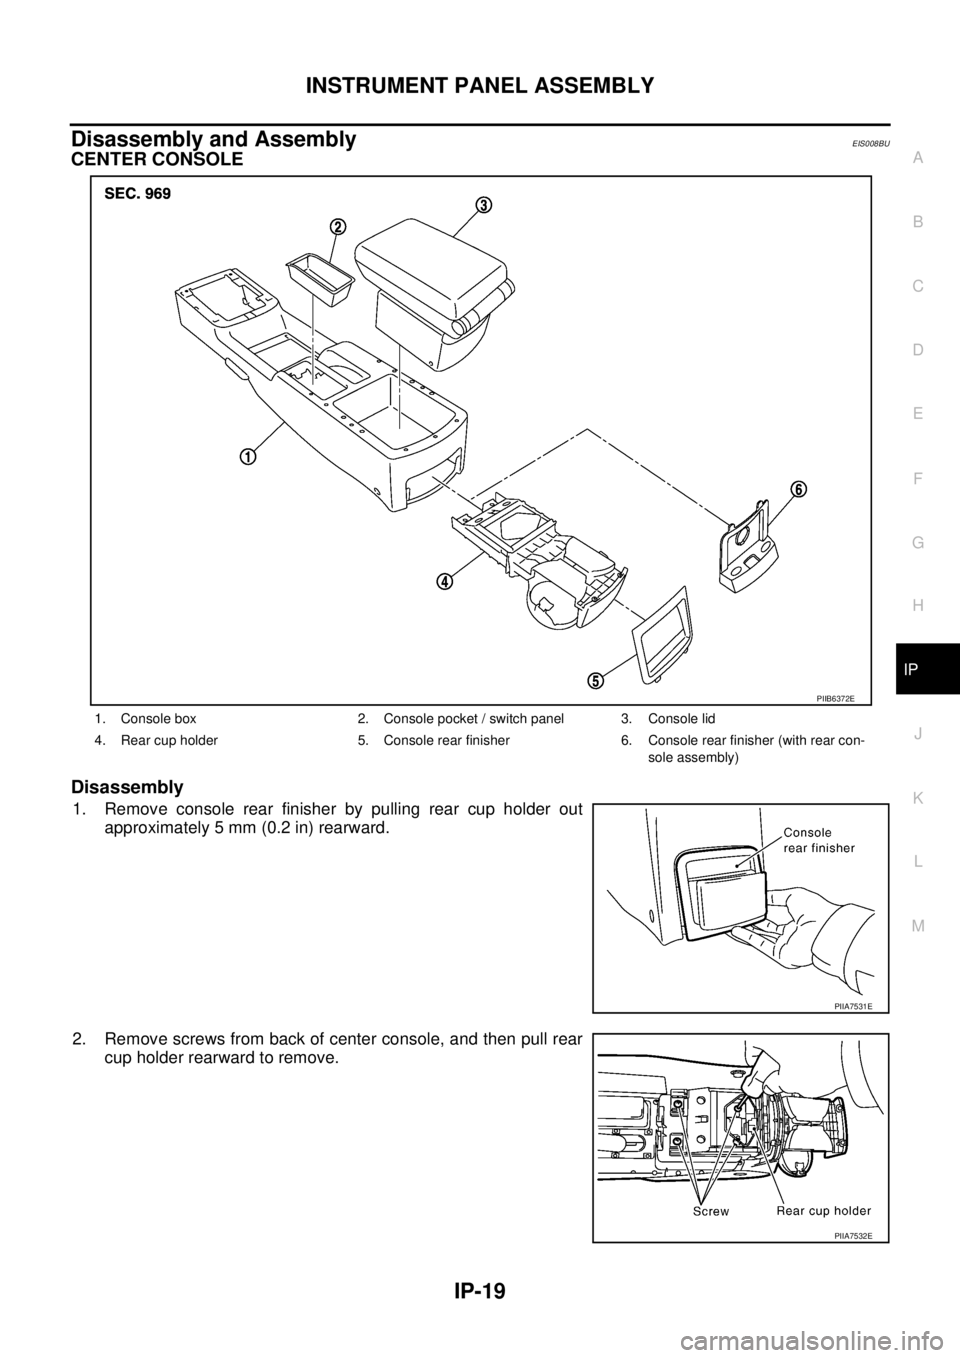
CENTER CONSOLE
Disassembly
1. Remove console rear finisher by pulling rear cup holder out
approximately 5 mm (0.2 in) rearward.
2. Remove screws from back of center console, and then pull rear
cup holder rearward to remove.
1. Console box 2. Console pocket / switch panel 3. Console lid
4. Rear cup holder 5. Console rear finisher 6. Console rear finisher (with rear con-
sole assembly)
PIIB6372E
PIIA7531E
PIIA7532E
Page 3886 of 4555
IP-20
INSTRUMENT PANEL ASSEMBLY
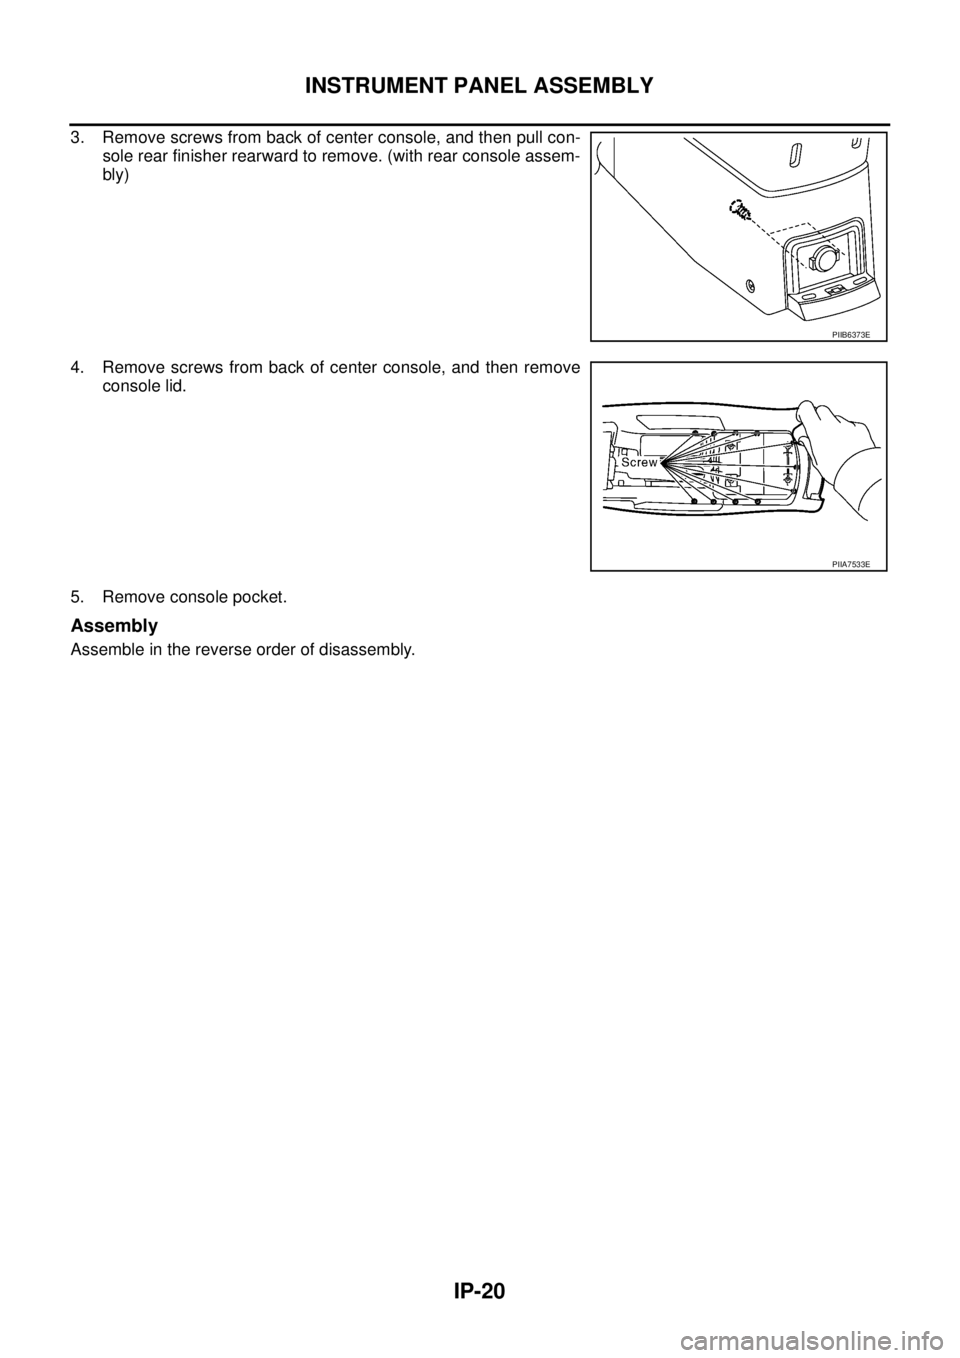
3. Remove screws from back of center console, and then pull con-
sole rear finisher rearward to remove. (with rear console assem-
bly)
4. Remove screws from back of center console, and then remove
console lid.
5. Remove console pocket.
Assembly
Assemble in the reverse order of disassembly.
PIIB6373E
PIIA7533E
Page 3889 of 4555
SE-1
SEAT
I BODY
CONTENTS
C
D
E
F
G
H
J
K
L
M
SECTION SE
A
B
SE
SEAT
PRECAUTIONS .......................................................... 2
Precautions for Supplemental Restraint System
(SRS) “AIR BAG” and “SEAT BELT PRE-TEN-
SIONER” .................................................................. 2
Service Notice .......................................................... 2
Precautions .............................................................. 2
PREPARATION ........................................................... 3
Commercial Service Tools ........................................ 3
SQUEAK AND RATTLE TROUBLE DIAGNOSES ..... 4
Work Flow ................................................................ 4
CUSTOMER INTERVIEW ..................................... 4
DUPLICATE THE NOISE AND TEST DRIVE ....... 5
CHECK RELATED SERVICE BULLETINS ........... 5
LOCATE THE NOISE AND IDENTIFY THE
ROOT CAUSE ...................................................... 5
REPAIR THE CAUSE ........................................... 5
CONFIRM THE REPAIR ....................................... 6
Generic Squeak and Rattle Troubleshooting ........... 6
INSTRUMENT PANEL .......................................... 6
CENTER CONSOLE ............................................. 6
DOORS ................................................................. 6
TRUNK .................................................................. 7
SUNROOF/HEADLINING ..................................... 7
SEATS ................................................................... 7
UNDERHOOD ....................................................... 7
Diagnostic Worksheet .............................................. 8
POWER SEAT .......................................................... 10
Schematic .............................................................. 10
Wiring Diagram—SEAT— /For LHD Models ........... 11
Wiring Diagram—SEAT— /For RHD Models ......... 14
HEATED SEAT ......................................................... 17
Schematic .............................................................. 17Wiring Diagram—H/SEAT— /For LHD Models ....... 18
Wiring Diagram—H/SEAT—/For RHD Models ....... 21
FRONT SEAT ............................................................ 24
Component Parts Drawing ..................................... 24
MANUAL SEAT ................................................... 24
POWER SEAT ..................................................... 25
Removal and Installation ........................................ 26
REMOVAL ........................................................... 26
INSTALLATION ................................................... 26
Disassembly and Assembly of Seatback ................ 26
SEATBACK TRIM (SIDE AIR BAG EQUIPPED
AND GENUINE LEATHER SEAT) ....................... 26
SEATBACK TRIM [WITHOUT SIDE AIR BAG
(EXCEPT GENUINE LEATHER SEAT)] .............. 28
Disassembly and Assembly of Seat Cushion Trim ... 29
MANUAL SEAT ................................................... 29
Disassembly and Assembly of Seat Cushion Trim ... 30
POWER SEAT ..................................................... 30
REAR SEAT .............................................................. 32
Component Parts Drawing ..................................... 32
STANDARD SEAT ............................................... 32
SEAT WITH ARMREST ....................................... 33
Removal and Installation ........................................ 34
SEAT CUSHION .................................................. 34
SEATBACK .......................................................... 34
REAR SEAT STRIKER (SIDE) ............................ 35
REAR SEAT CENTER BRACKET ....................... 35
REAR SEAT STRIKER (FLOOR) ........................ 35
Disassembly and Assembly .................................... 35
REAR SEATBACK LOCK KNOB ......................... 35
ARMREST ........................................................... 35
ARMREST TABLE ............................................... 36
Page 3894 of 4555
SE-6
SQUEAK AND RATTLE TROUBLE DIAGNOSES
FELT CLOTHTAPE
Used to insulate where movement does not occur. Ideal for instrument panel applications.
68370-4B000: 15 × 25 mm (0.59 × 0.98 in) pad/68239-13E00: 5 mm (0.20 in) wide tape roll
The following materials, not available through NISSAN Parts Department, can also be used to repair
squeaks and rattles.
UHMW(TEFLON) TAPE
Insulates where slight movement is present. Ideal for instrument panel applications.
SILICONE GREASE
Used in of UHMW tape that will be visible or not fit.
Note: Will only last a few months.
SILICONE SPRAY
Use when grease cannot be applied.
DUCT TAPE
Use to eliminate movement.
CONFIRM THE REPAIR
Confirm that the cause of a noise is repaired by test driving the vehicle. Operate the vehicle under the same
conditions as when the noise originally occurred. Refer to the notes on the Diagnostic Worksheet.
Generic Squeak and Rattle TroubleshootingEIS008O2
Refer to Table of Contents for specific component removal and installation information.
INSTRUMENT PANEL
Most incidents are caused by contact and movement between:
1. Cluster lid A and instrument panel
2. Acrylic lens and combination meter housing
3. Instrument panel to front pillar garnish
4. Instrument panel to windshield
5. Instrument panel mounting pins
6. Wiring harnesses behind the combination meter
7. A/C defroster duct and duct joint
These incidents can usually be located by tapping or moving the components to duplicate the noise or by
pressing on the components while driving to stop the noise. Most of these incidents can be repaired by apply-
ing felt cloth tape or silicon spray (in hard to reach areas). Urethane pads can be used to insulate wiring har-
ness.
CAUTION:
Do not use silicone spray to isolate a squeak or rattle. If you saturate the area with silicone, you will
not be able to recheck the repair.
CENTER CONSOLE
Components to pay attention to include:
1. Shifter assembly cover to finisher
2. A/C control unit and cluster lid C
3. Wiring harnesses behind audio and A/C control unit
The instrument panel repair and isolation procedures also apply to the center console.
DOORS
Pay attention to the:
1. Finisher and inner panel making a slapping noise
2. Inside handle escutcheon to door finisher
3. Wiring harnesses tapping
4. Door striker out of alignment causing a popping noise on starts and stops
Tapping or moving the components or pressing on them while driving to duplicate the conditions can isolate
many of these incidents. You can usually insulate the areas with felt cloth tape or insulator foam blocks to
repair the noise.
Page 4214 of 4555

WW-2 Wiring Diagram —POWER SOCKET— ................. 31
Removal and Installation of Front Power Socket
(Driver Box) ............................................................ 32
REMOVAL ........................................................... 32
INSTALLATION .................................................... 32
Removal and Installation of Front Power Socket (Center Console) ..................................................... 32
REMOVAL ............................................................ 32
INSTALLATION .................................................... 32
Removal and Installation of Rear Power Socket ..... 32
REMOVAL ............................................................ 32
INSTALLATION .................................................... 32
Page 4244 of 4555
WW-32
POWER SOCKET
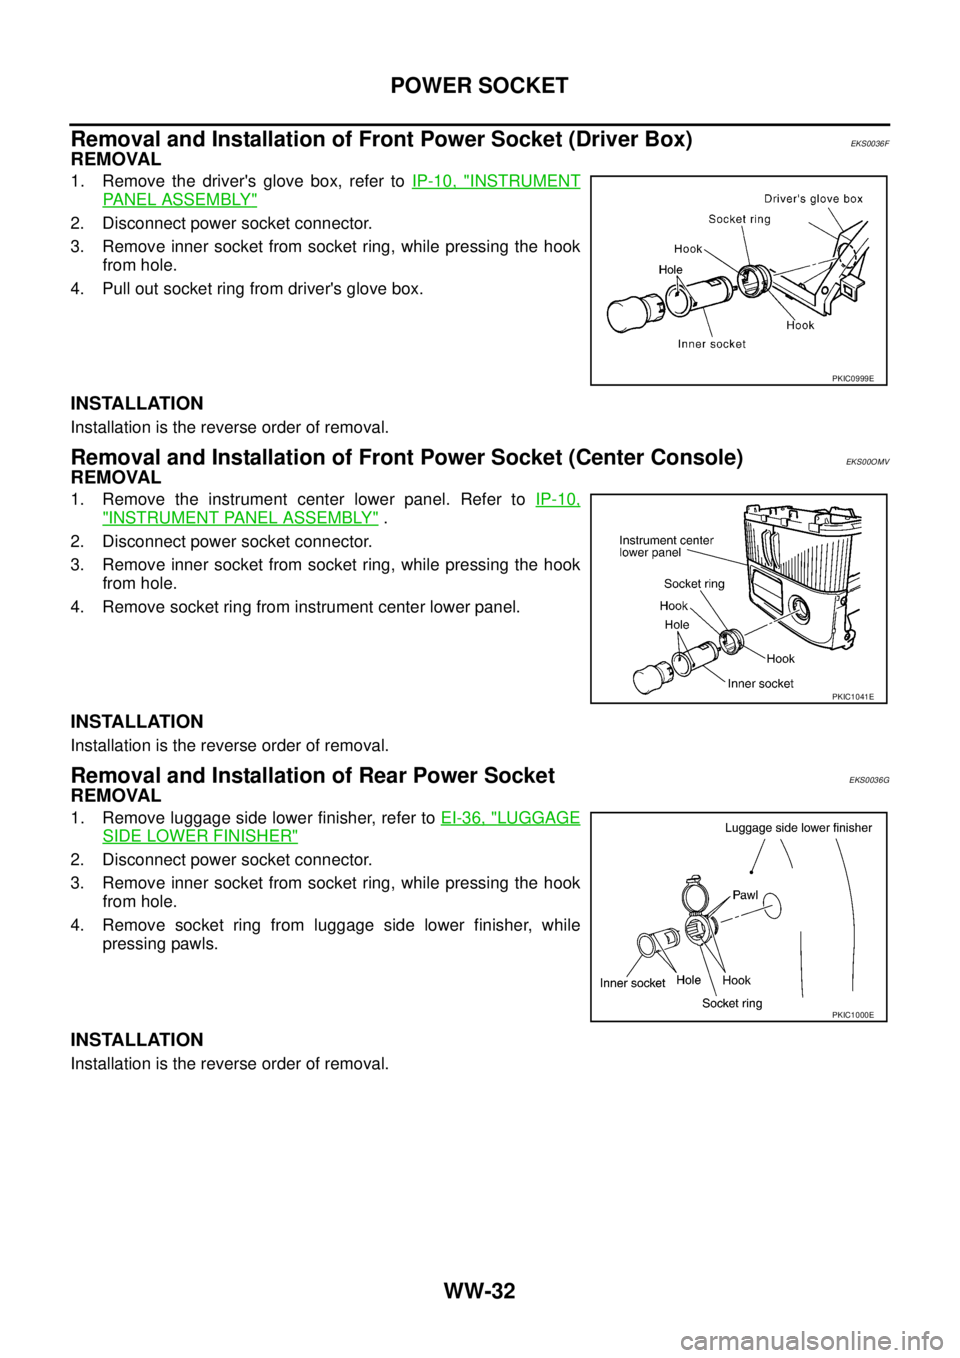
Removal and Installation of Front Power Socket (Driver Box)EKS0036F
REMOVAL
1. Remove the driver's glove box, refer to IP-10, "INSTRUMENT
PANEL ASSEMBLY"
2. Disconnect power socket connector.
3. Remove inner socket from socket ring, while pressing the hook
from hole.
4. Pull out socket ring from driver's glove box.
INSTALLATION
Installation is the reverse order of removal.
Removal and Installation of Front Power Socket (Center Console)EKS00OMV
REMOVAL
1. Remove the instrument center lower panel. Refer to IP-10,
"INSTRUMENT PANEL ASSEMBLY" .
2. Disconnect power socket connector.
3. Remove inner socket from socket ring, while pressing the hook
from hole.
4. Remove socket ring from instrument center lower panel.
INSTALLATION
Installation is the reverse order of removal.
Removal and Installation of Rear Power SocketEKS0036G
REMOVAL
1. Remove luggage side lower finisher, refer to EI-36, "LUGGAGE
SIDE LOWER FINISHER"
2. Disconnect power socket connector.
3. Remove inner socket from socket ring, while pressing the hook
from hole.
4. Remove socket ring from luggage side lower finisher, while
pressing pawls.
INSTALLATION
Installation is the reverse order of removal.
PKIC0999E
PKIC1041E
PKIC1000E