2005 NISSAN ALTIMA 3,5 SE warning
[x] Cancel search: warningPage 109 of 304
WARNING
There are some small distances immedi-
ately before the closed position which
cannot be detected. Make sure that all
passengers have their hands, etc., inside
the vehicle before closing the window.
AUTOMATIC SUNROOF
The sunroof will only operate when the ignition
key is in the ON position. The automatic sunroof
is operational for about 45 seconds, even if the
ignition key is turned to the ACC or OFF position.
If the driver’s door or the front passenger’s door
is opened during this period of about 45 sec-
onds, power to the sunroof is canceled.
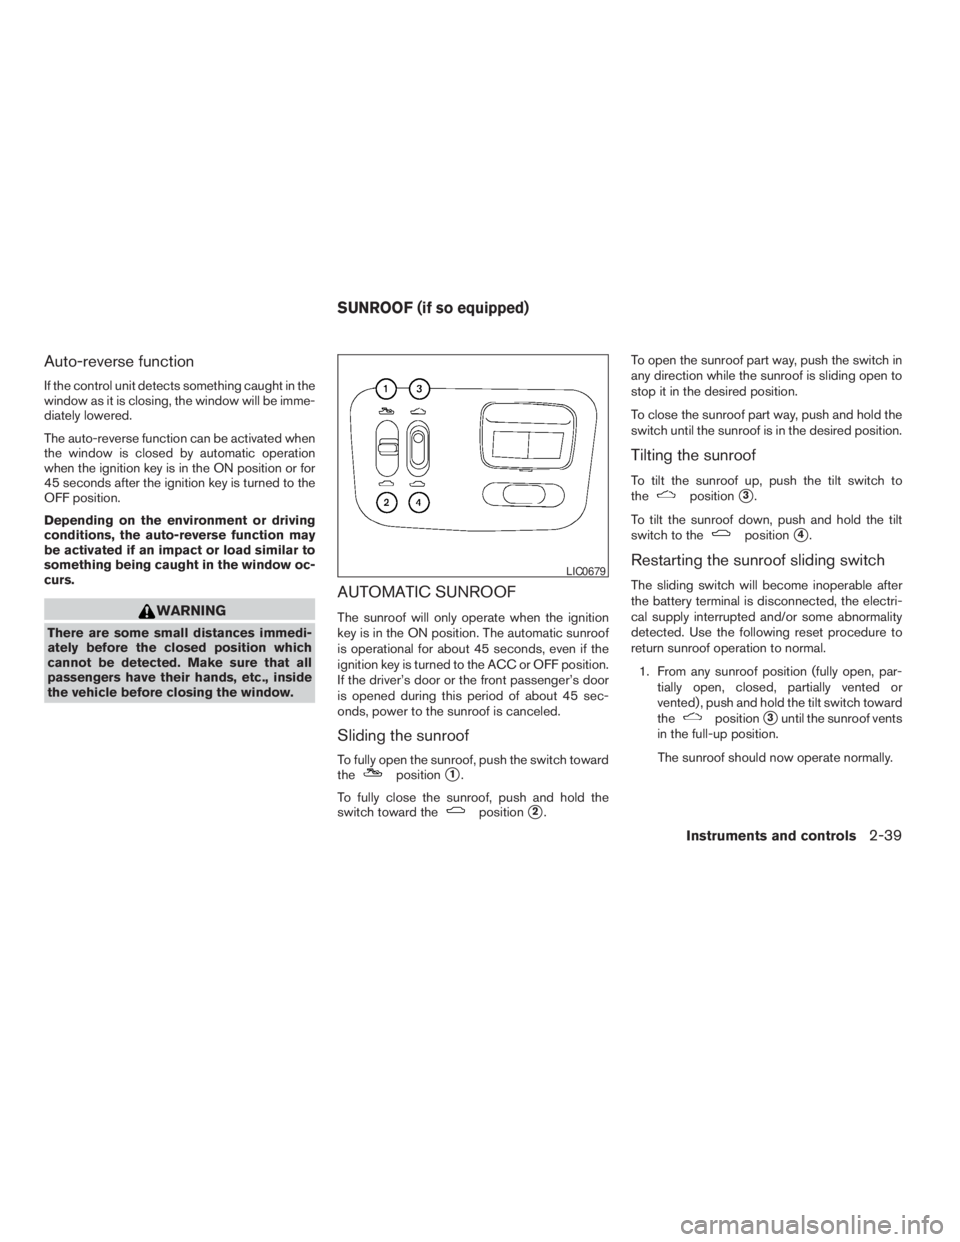
Sliding the sunroof
To fully open the sunroof, push the switch toward
thepositions1.
To fully close the sunroof, push and hold the
switch toward the
positions2.To open the sunroof part way, push the switch in
any direction while the sunroof is sliding open to
stop it in the desired position.
To close the sunroof part way, push and hold the
switch until the sunroof is in the desired position.
Tilting the sunroof
To tilt the sunroof up, push the tilt switch to
thepositions3.
To tilt the sunroof down, push and hold the tilt
switch to the
positions4.
Restarting the sunroof sliding switch
The sliding switch will become inoperable after
the battery terminal is disconnected, the electri-
cal supply interrupted and/or some abnormality
detected. Use the following reset procedure to
return sunroof operation to normal.
1. From any sunroof position (fully open, par-
tially open, closed, partially vented or
vented) , push and hold the tilt switch toward
the
positions3until the sunroof vents
in the full-up position.
The sunroof should now operate normally.
Instruments and controls2-39
ZREVIEW COPYÐ2005 Altima(l30)
Owners ManualÐUSA_English(nna)
01/04/05Ðarosenma
X
Page 112 of 304
WARNING
cDo not use the HomeLinkTUniversal
Transceiver with any garage door
opener that lacks safety stop and re-
verse features as required by federal
safety standards. (These standards be-
came effective for opener models
manufactured after April 1, 1982) . A ga-
rage door opener which cannot detect
an object in the path of a closing garage
door and then automatically stop and
reverse, does not meet current federal
safety standards. Using a garage door
opener without these features in-
creases the risk of serious injury or
death.
cDuring the programming procedure
your garage door or security gate will
open and close (if the transmitter is
within range) . Make sure that people or
objects are clear of the garage door,
gate, etc. that you are programming.
cYour vehicle’s engine should be turned
off while programming the HomeLinkT
Universal Transceiver.
TRUNK LIGHT HOMELINKTUNIVERSAL
TRANSCEIVER (if so equipped)
2-42Instruments and controls
ZREVIEW COPYÐ2005 Altima(l30)
Owners ManualÐUSA_English(nna)
01/04/05Ðarosenma
X
Page 124 of 304
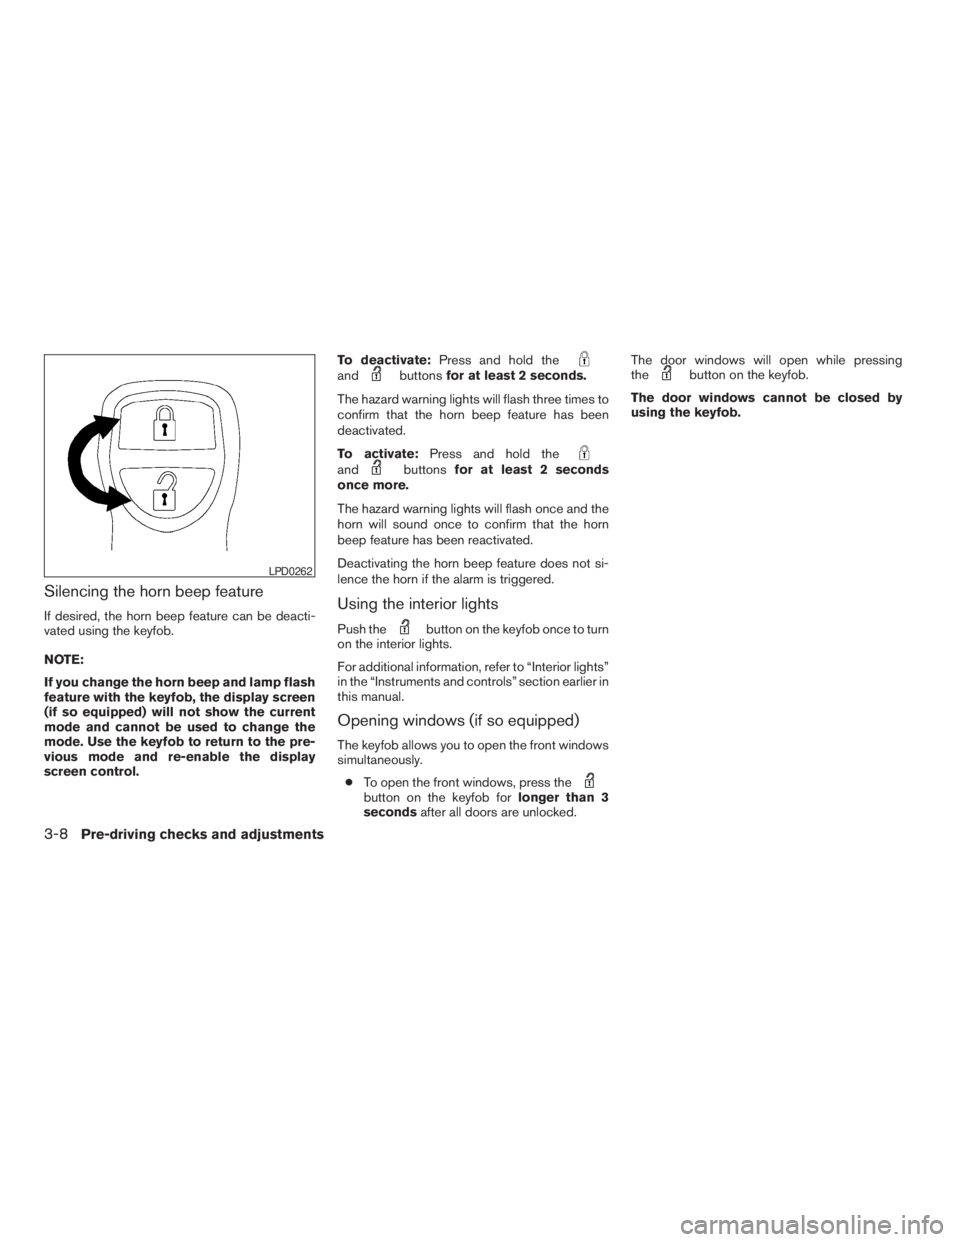
andbuttonsfor at least 2 seconds.
The hazard warning lights will flash three times to
confirm that the horn beep feature has been
deactivated.
To activate:Press and hold the
andbuttonsfor at least 2 seconds
once more.
The hazard warning lights will flash once and the
horn will sound once to confirm that the horn
beep feature has been reactivated.
Deactivating the horn beep feature does not si-
lence the horn if the alarm is triggered.
Using the interior lights
Push thebutton on the keyfob once to turn
on the interior lights.
For additional information, refer to “Interior lights”
in the “Instruments and controls” section earlier in
this manual.
Opening windows (if so equipped)
The keyfob allows you to open the front windows
simultaneously.
cTo open the front windows, press the
button on the keyfob forlonger than 3
secondsafter all doors are unlocked.The door windows will open while pressing
the
button on the keyfob.
The door windows cannot be closed by
using the keyfob.
Page 135 of 304

brightness control button (P. 4-10)
2. PREV (previous) button (P. 4-3)
3. Joystick and ENTER push button (P. 4-3)
4. SETTING button (P. 4-6)
5. TRIP drive computer button (P. 4-4)
6. DEST button*
7. ROUTE button*
8. MAP button*
9. GUIDE VOICE button*
10.
zoom out button*
11.
zoom in button*
*For Navigation system control buttons, refer to
the separate Navigation System Owner’s
Manual.
HOW TO USE JOYSTICK AND
“ENTER” BUTTON
Choose an item on the display using the joystick
and push the“ENTER”button for operation.
HOW TO USE “PREV” BUTTON
This button has two functions.
cGo back to the previous display (cancel) .
If you touch“PREV”button during setup, the
setup will be canceled and/or the display will
return to the previous screen.
cFinish setup.
If you touch this button after the setup is com-
pleted, the setup will start over, and the display
will return to the climate control or audio mode
and Navigation screen.
SETTING UP THE START-UP
SCREEN
When you turn the ignition key to ACC or ON, the
SYSTEM START-UP warning is displayed on the
screen. Read the warning and select the “I
AGREE” (English) or “ENTER” (Français) key
then push the“ENTER”button.
If you do not push the“ENTER”button, the
Navigation system will not proceed to the next
step display.If you do not touch the button or screen key for
more than 1 minute on the TRIP, SETTING or
START-UP screen, the screen will change to
TRIP screen automatically.
To proceed to the next step, refer to the separate
Navigation System Owner’s Manual.
Display screen, heater, air conditioner and audio systems4-3
ZREVIEW COPYÐ2005 Altima(l30)
Owners ManualÐUSA_English(nna)
01/04/05Ðarosenma
X
Page 159 of 304
or)or
SEEK/TRACK (or) to adjust to the
desired levels. The display will return to the regu-
lar radio display after 10 seconds, or you may
press the AUDIO button again to return to the
regular radio display.
Clock operation
Pressing the MENU or CLOCK button displays
the clock with the radio on or off. Press the MENU
or CLOCK button again to turn off the clock
display.
Clock set
1. Press and hold the MENU or CLOCK button
until it beeps (longer than 2 seconds) .2. The hours will start flashing. Press
TUNE/FF-REV (
or)or
SEEK/TRACK (or) to adjust
the hours.
3. Press the MENU or CLOCK button to
switch to the minute adjustment.
4. Press TUNE/FF-REV (
or)or
SEEK/TRACK (or) to adjust
the minutes.
5. Press the MENU or CLOCK button again to
exit the clock set mode.
The display will return to the regular clock display
after 10 seconds, or you may press the MENU or
CLOCK button again to return to the regular
clock display.
FM-AM radio operation
FM-AM band select
Push the AM or the FM button to change from AM
to FM reception.
The FM stereo indicator, ST, illuminates during
FM stereo reception. When the stereo broadcast
signal is weak, the radio automatically changes
from stereo to monaural reception.
WARNING
The radio should not be tuned while driv-
ing so full attention may be given to ve-
hicle operation.
Use the
andbuttons for manual
tuning. To move quickly through the channels,
hold the tuning buttons down.
or) . SEEK
tuning begins from low to high frequencies or
high to low frequencies, depending on which
button is pressed, and stops at the next broad-
casting station. If using the up button, once the
highest broadcasting station is reached, the ra-
dio continues in the SEEK mode at the lowest
broadcasting station. If using the down button,
once the lowest broadcasting station is reached,
the radio continues in the SEEK mode at the
highest broadcasting station.
SCAN tuning
Push the SCAN button. SCAN illuminates in the
display window. SCAN tuning begins from low to
high frequencies. SCAN tuning stops for 5 sec-
onds at each broadcasting station that has suffi-
cient signal strength. When scanning, SCAN
Display screen, heater, air conditioner and audio systems4-27
ZREVIEW COPYÐ2005 Altima(l30)
Owners ManualÐUSA_English(nna)
01/04/05Ðarosenma
X
Page 163 of 304

or)or
SEEK/TRACK (or) to adjust to the
desired levels. The display will return to the regu-
lar radio display after 10 seconds, or you may
press the AUDIO button again to return to the
regular radio display.
Clock operation
Pressing the CLOCK button displays the clock
with the radio on or off. Press the CLOCK button
again to turn off the clock display.
Clock set
1. Press and hold the CLOCK button until it
beeps (>1.5 seconds) .
2. The hours will start flashing. Press
TUNE/FF-REV (
or)or
SEEK/TRACK (or) to adjust
the hours.3. Press the CLOCK button to switch to the
minute adjustment.
4. Press TUNE/FF-REV (
or)or
SEEK/TRACK (or) to adjust
the minutes.
5. Press the CLOCK button again to exit the
clock set mode.
The display will return to the regular clock display
after 7 seconds, or you may press the CLOCK
button again to return to the regular clock display.
FM/AM/SAT radio operation
FM/AM/SAT band select:
Pushing the FM, AM or SAT radio select button
will change the band to either FM, AM or SAT
(satellite-if so equipped) radio stations.
When the FM, AM or SAT radio select button is
pushed while the ignition switch is in the ACC or
ON, the radio will come on at the station last
played.
The last station played will also come on when
the Power/Volume control knob is depressed to
ON.
No satellite radio reception is available and “NO
SAT” is displayed when the SAT button is
pressed unless optional satellite receiver andantenna are installed and an XMTor SIRIUS™
satellite radio service subscription is active.
If a compact disc is playing when the FM, AM or
SAT radio select button is pushed, the compact
disc will automatically be turned off and the last
radio station played will come on.
The FM stereo indicator ST will glow during FM
stereo reception. When the stereo broadcast
signal is weak, the radio will automatically change
from stereo to monaural reception.WARNING
The radio should not be tuned while driv-
ing so full attention may be given to ve-
hicle operation.
Use the
andbuttons for manual
tuning. To move quickly through the channels,
hold the tuning buttons down.
or) . SEEK
tuning begins from low to high frequencies or
high to low frequencies, depending on which
button is pressed, and stops at the next broad-
casting station. If using the up button, once the
highest broadcasting station is reached, the ra-
dio continues in the SEEK mode at the lowest
Display screen, heater, air conditioner and audio systems4-31
ZREVIEW COPYÐ2005 Altima(l30)
Owners ManualÐUSA_English(nna)
01/04/05Ðarosenma
X
Page 170 of 304
WARNING
The radio should not be tuned while driv-
ing so full attention may be given to ve-
hicle operation.
To manually tune the radio, push the TUNE button
(
or) or turn the tuning knob to right
or left.
To move quickly through the channels, hold either
the
orbutton down for more than
1.5 seconds.
or)
for less than 1.5 seconds to tune from high to low
or low to high frequencies and stop at the next
broadcasting station.SCAN tuning
Push the SCAN button. SCAN illuminates in the
display window. SCAN tuning begins from low to
high frequencies. SCAN tuning stops for 5 sec-
onds at each broadcasting station that has suffi-
cient signal strength. When scanning, SCAN
blinks in the display. Pushing the SCAN button
again during this 5 second period stops SCAN
tuning and the radio remains tuned to that station.
Station memory operations:
18 stations can be set for the FM, AM and SAT
(Satellite-if so equipped) radio to the A, B and C
preset button in any combination of FM, AM or
SAT stations.
1. Choose preset channel A, B or C using the
preset select button.
2. Select the desired FM, AM or SAT station
band.
3. Tune to the desired station using manual,
SEEK or SCAN tuning. Push and hold any of
the desired station memory buttons (1 – 6)
until a beep sound is heard.
4. The channel indicator will then come on and
the sound will resume. Memorizing is now
complete.
5. Other buttons can be set in the same man-
ner.If the battery cable is disconnected, or if the fuse
blows, the radio memory will be canceled. In that
case, reset the desired stations.
Radio data system (RDS):
RDS stands for Radio Data System, and is a data
information service transmitted by some radio
stations on the FM band (not AM band) and/or
SAT radio encoded within a regular radio broad-
cast. Currently, most RDS stations are in large
cities, but many stations are now considering
broadcasting RDS data.
RDS can display:
cStation call sign, such as “WHFR 98.3”.
cStation name, such as “The Groove”.
cMusic or programming type such as “Clas-
sical”, “Country”, or “Rock”.
cTraffic reports about delays or construction.
If the station broadcasts RDS information, the
RDS icon is displayed.
Program type (PTY):
PTY can be used to search for a certain program
type. Certain areas have a limited number of
stations that transmit RDS. Many stations trans-
mit call letters and frequencies only.
4-38Display screen, heater, air conditioner and audio systems
ZREVIEW COPYÐ2005 Altima(l30)
Owners ManualÐUSA_English(nna)
01/04/05Ðarosenma
X
Page 180 of 304
WARNING
Never remove or turn the key to the LOCK
position while driving. The steering wheel
will lock. This may cause the driver to lose
control of the vehicle and could result in
serious vehicle damage or personal injury.