2005 NISSAN ALTIMA 3,5 SE lock
[x] Cancel search: lockPage 123 of 304
button on the keyfob is pushed,
all doors will lock automatically within 1 minute
unless one of the following operations is per-
formed:
cAny door is opened.
cA key is inserted into the ignition switch and
the key is turned from OFF to ON.
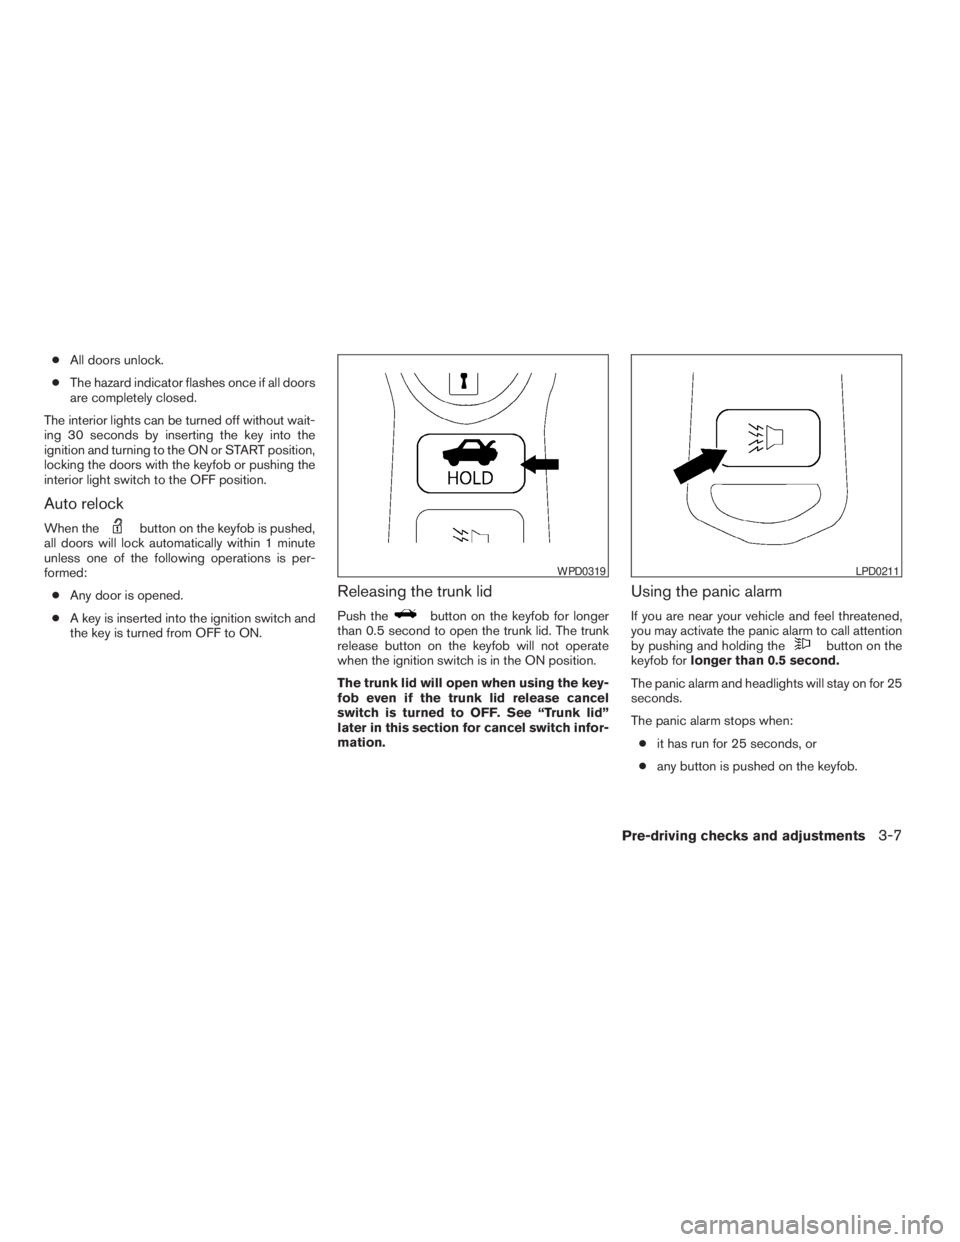
Releasing the trunk lid
Push thebutton on the keyfob for longer
than 0.5 second to open the trunk lid. The trunk
release button on the keyfob will not operate
when the ignition switch is in the ON position.
The trunk lid will open when using the key-
fob even if the trunk lid release cancel
switch is turned to OFF. See “Trunk lid”
later in this section for cancel switch infor-
mation.
Using the panic alarm
If you are near your vehicle and feel threatened,
you may activate the panic alarm to call attention
by pushing and holding the
button on the
keyfob forlonger than 0.5 second.
The panic alarm and headlights will stay on for 25
seconds.
The panic alarm stops when:
cit has run for 25 seconds, or
cany button is pushed on the keyfob.
LPD0211
Page 124 of 304
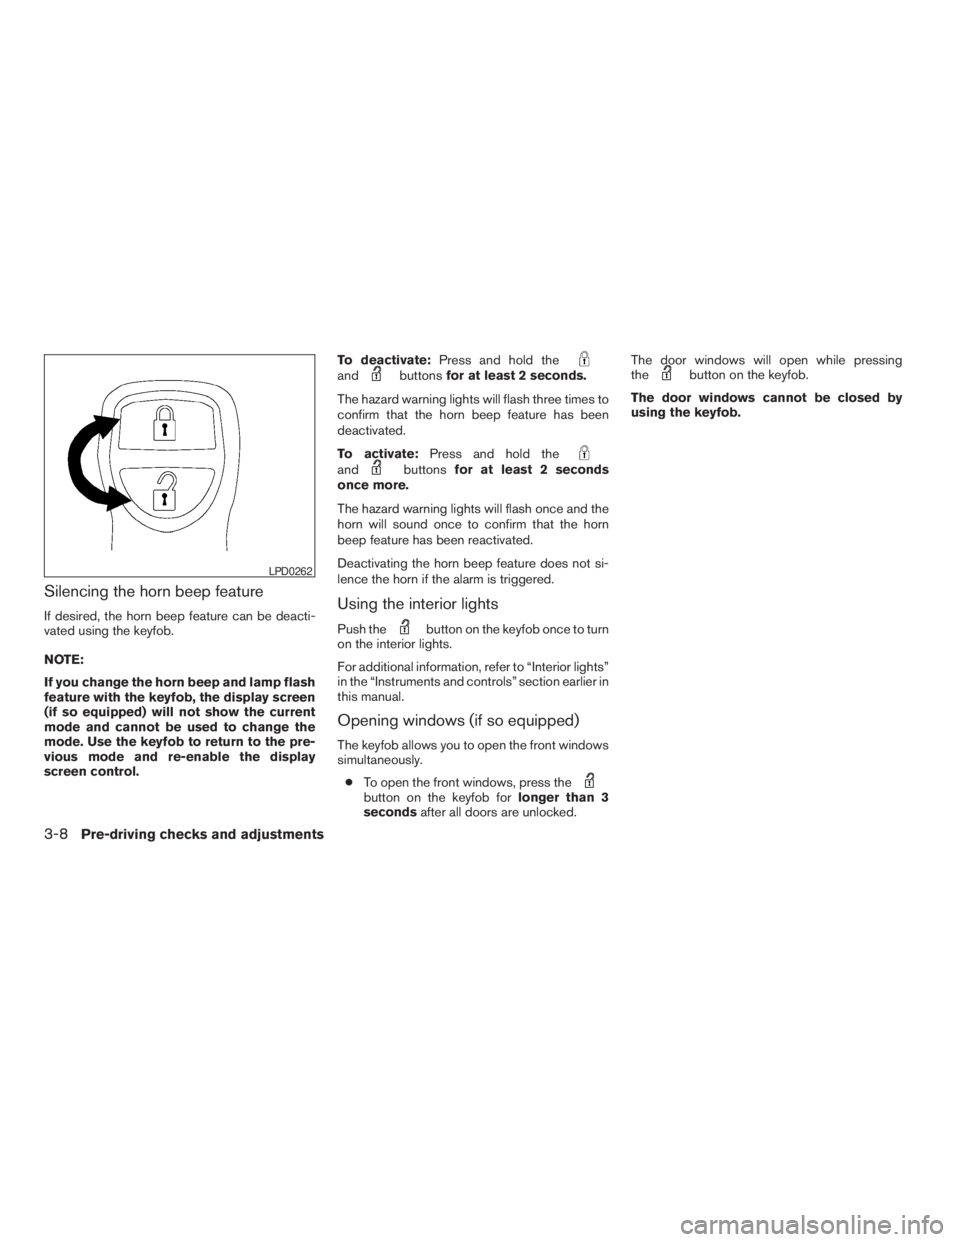
andbuttonsfor at least 2 seconds.
The hazard warning lights will flash three times to
confirm that the horn beep feature has been
deactivated.
To activate:Press and hold the
andbuttonsfor at least 2 seconds
once more.
The hazard warning lights will flash once and the
horn will sound once to confirm that the horn
beep feature has been reactivated.
Deactivating the horn beep feature does not si-
lence the horn if the alarm is triggered.
Using the interior lights
Push thebutton on the keyfob once to turn
on the interior lights.
For additional information, refer to “Interior lights”
in the “Instruments and controls” section earlier in
this manual.
Opening windows (if so equipped)
The keyfob allows you to open the front windows
simultaneously.
cTo open the front windows, press the
button on the keyfob forlonger than 3
secondsafter all doors are unlocked.The door windows will open while pressing
the
button on the keyfob.
The door windows cannot be closed by
using the keyfob.
Page 129 of 304
CAUTION
cIf fuel is spilled on the vehicle body,
flush it away with water to avoid paint
damage.cTighten until the fuel filler cap clicks.
Failure to tighten the fuel filler cap
properly may cause the
mal-
function indicator lamp (MIL) to illumi-
nate. If the
lamp illuminates be-
cause the fuel filler cap is loose or
missing, tighten or install the cap and
continue to drive the vehicle.
The
lamp should turn off after a
few driving trips. If the
lamp
does not turn off after a few driving
trips, have the vehicle inspected by a
NISSAN dealer.
cFor additional information, see the
“Malfunction indicator lamp (MIL)” in
the “Instruments and Controls” section
earlier in this manual.
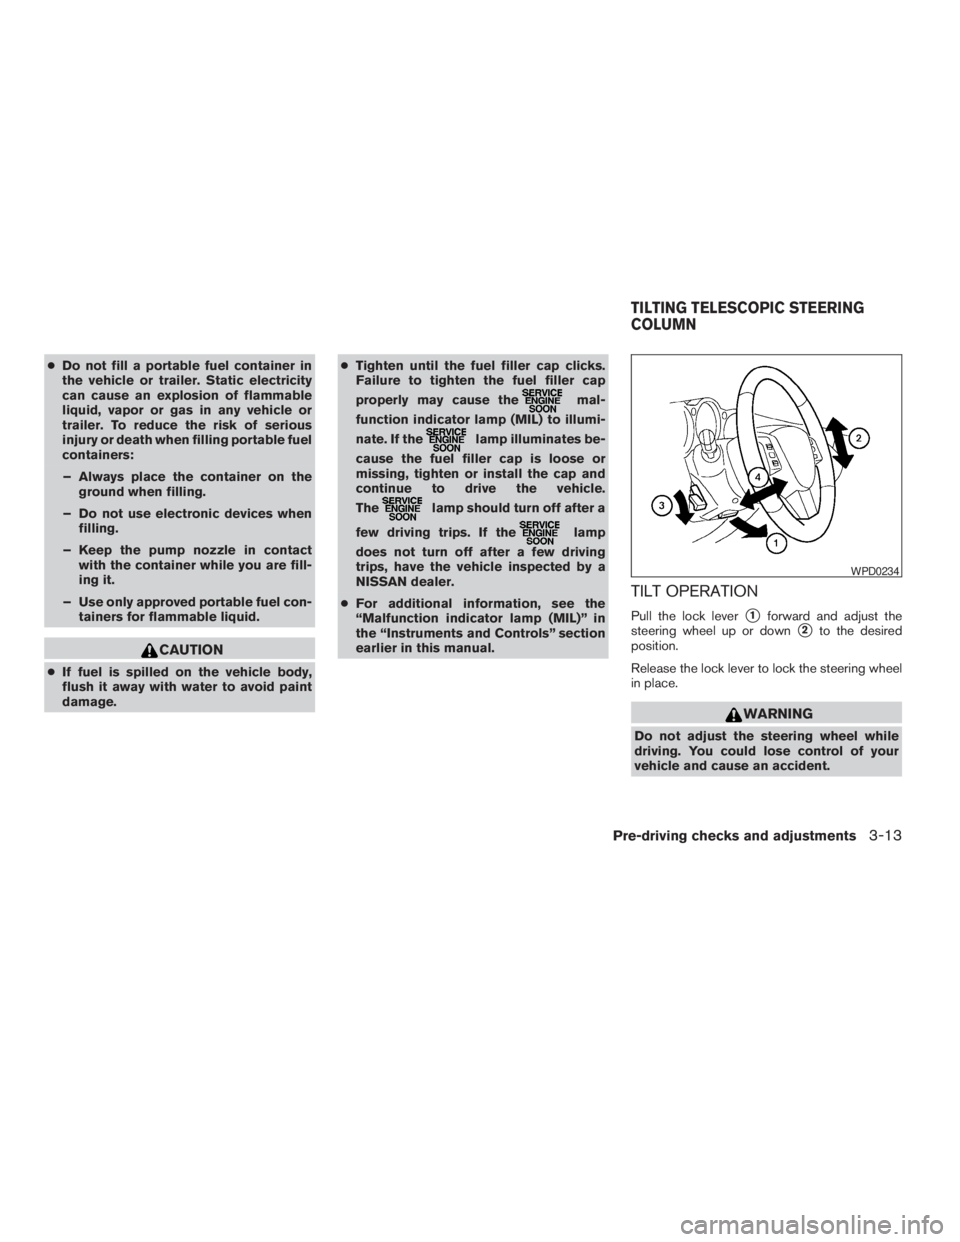
TILT OPERATION
Pull the lock levers1forward and adjust the
steering wheel up or down
s2to the desired
position.
Release the lock lever to lock the steering wheel
in place.
Pre-driving checks and adjustments3-13
ZREVIEW COPYÐ2005 Altima(l30)
Owners ManualÐUSA_English(nna)
01/04/05Ðarosenma
X
Page 159 of 304
or)or
SEEK/TRACK (or) to adjust to the
desired levels. The display will return to the regu-
lar radio display after 10 seconds, or you may
press the AUDIO button again to return to the
regular radio display.
Clock operation
Pressing the MENU or CLOCK button displays
the clock with the radio on or off. Press the MENU
or CLOCK button again to turn off the clock
display.
Clock set
1. Press and hold the MENU or CLOCK button
until it beeps (longer than 2 seconds) .2. The hours will start flashing. Press
TUNE/FF-REV (
or)or
SEEK/TRACK (or) to adjust
the hours.
3. Press the MENU or CLOCK button to
switch to the minute adjustment.
4. Press TUNE/FF-REV (
or)or
SEEK/TRACK (or) to adjust
the minutes.
5. Press the MENU or CLOCK button again to
exit the clock set mode.
The display will return to the regular clock display
after 10 seconds, or you may press the MENU or
CLOCK button again to return to the regular
clock display.
FM-AM radio operation
FM-AM band select
Push the AM or the FM button to change from AM
to FM reception.
The FM stereo indicator, ST, illuminates during
FM stereo reception. When the stereo broadcast
signal is weak, the radio automatically changes
from stereo to monaural reception.
WARNING
The radio should not be tuned while driv-
ing so full attention may be given to ve-
hicle operation.
Use the
andbuttons for manual
tuning. To move quickly through the channels,
hold the tuning buttons down.
or) . SEEK
tuning begins from low to high frequencies or
high to low frequencies, depending on which
button is pressed, and stops at the next broad-
casting station. If using the up button, once the
highest broadcasting station is reached, the ra-
dio continues in the SEEK mode at the lowest
broadcasting station. If using the down button,
once the lowest broadcasting station is reached,
the radio continues in the SEEK mode at the
highest broadcasting station.
SCAN tuning
Push the SCAN button. SCAN illuminates in the
display window. SCAN tuning begins from low to
high frequencies. SCAN tuning stops for 5 sec-
onds at each broadcasting station that has suffi-
cient signal strength. When scanning, SCAN
Display screen, heater, air conditioner and audio systems4-27
ZREVIEW COPYÐ2005 Altima(l30)
Owners ManualÐUSA_English(nna)
01/04/05Ðarosenma
X
Page 163 of 304

or)or
SEEK/TRACK (or) to adjust to the
desired levels. The display will return to the regu-
lar radio display after 10 seconds, or you may
press the AUDIO button again to return to the
regular radio display.
Clock operation
Pressing the CLOCK button displays the clock
with the radio on or off. Press the CLOCK button
again to turn off the clock display.
Clock set
1. Press and hold the CLOCK button until it
beeps (>1.5 seconds) .
2. The hours will start flashing. Press
TUNE/FF-REV (
or)or
SEEK/TRACK (or) to adjust
the hours.3. Press the CLOCK button to switch to the
minute adjustment.
4. Press TUNE/FF-REV (
or)or
SEEK/TRACK (or) to adjust
the minutes.
5. Press the CLOCK button again to exit the
clock set mode.
The display will return to the regular clock display
after 7 seconds, or you may press the CLOCK
button again to return to the regular clock display.
FM/AM/SAT radio operation
FM/AM/SAT band select:
Pushing the FM, AM or SAT radio select button
will change the band to either FM, AM or SAT
(satellite-if so equipped) radio stations.
When the FM, AM or SAT radio select button is
pushed while the ignition switch is in the ACC or
ON, the radio will come on at the station last
played.
The last station played will also come on when
the Power/Volume control knob is depressed to
ON.
No satellite radio reception is available and “NO
SAT” is displayed when the SAT button is
pressed unless optional satellite receiver andantenna are installed and an XMTor SIRIUS™
satellite radio service subscription is active.
If a compact disc is playing when the FM, AM or
SAT radio select button is pushed, the compact
disc will automatically be turned off and the last
radio station played will come on.
The FM stereo indicator ST will glow during FM
stereo reception. When the stereo broadcast
signal is weak, the radio will automatically change
from stereo to monaural reception.WARNING
The radio should not be tuned while driv-
ing so full attention may be given to ve-
hicle operation.
Use the
andbuttons for manual
tuning. To move quickly through the channels,
hold the tuning buttons down.
or) . SEEK
tuning begins from low to high frequencies or
high to low frequencies, depending on which
button is pressed, and stops at the next broad-
casting station. If using the up button, once the
highest broadcasting station is reached, the ra-
dio continues in the SEEK mode at the lowest
Display screen, heater, air conditioner and audio systems4-31
ZREVIEW COPYÐ2005 Altima(l30)
Owners ManualÐUSA_English(nna)
01/04/05Ðarosenma
X
Page 180 of 304
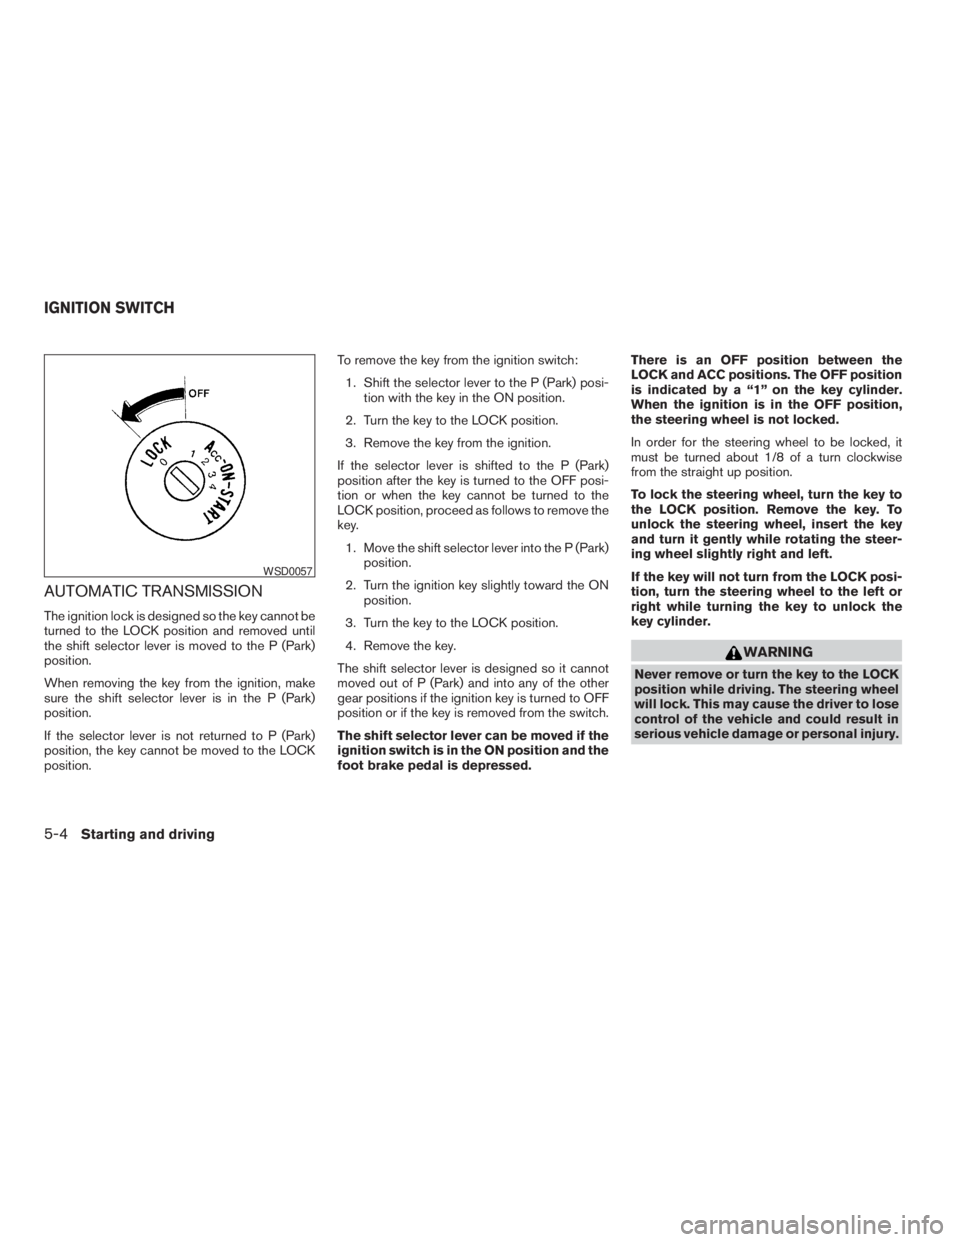
WARNING
Never remove or turn the key to the LOCK
position while driving. The steering wheel
will lock. This may cause the driver to lose
control of the vehicle and could result in
serious vehicle damage or personal injury.
Page 181 of 304
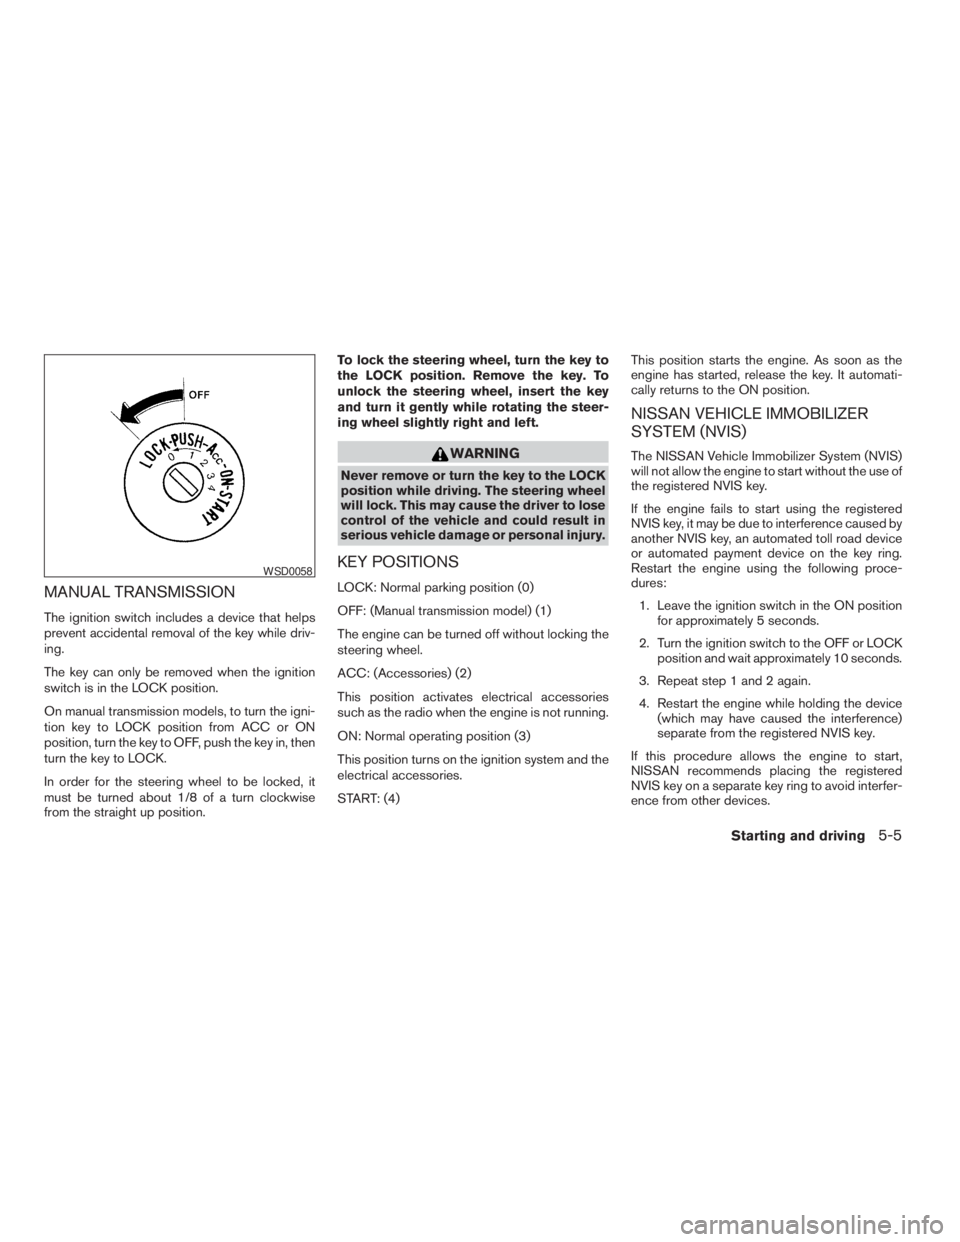
WARNING
Never remove or turn the key to the LOCK
position while driving. The steering wheel
will lock. This may cause the driver to lose
control of the vehicle and could result in
serious vehicle damage or personal injury.
KEY POSITIONS
LOCK: Normal parking position (0)
OFF: (Manual transmission model) (1)
The engine can be turned off without locking the
steering wheel.
ACC: (Accessories) (2)
This position activates electrical accessories
such as the radio when the engine is not running.
ON: Normal operating position (3)
This position turns on the ignition system and the
electrical accessories.
START: (4)This position starts the engine. As soon as the
engine has started, release the key. It automati-
cally returns to the ON position.
NISSAN VEHICLE IMMOBILIZER
SYSTEM (NVIS)
The NISSAN Vehicle Immobilizer System (NVIS)
will not allow the engine to start without the use of
the registered NVIS key.
If the engine fails to start using the registered
NVIS key, it may be due to interference caused by
another NVIS key, an automated toll road device
or automated payment device on the key ring.
Restart the engine using the following proce-
dures:
1. Leave the ignition switch in the ON position
for approximately 5 seconds.
2. Turn the ignition switch to the OFF or LOCK
position and wait approximately 10 seconds.
3. Repeat step 1 and 2 again.
4. Restart the engine while holding the device
(which may have caused the interference)
separate from the registered NVIS key.
If this procedure allows the engine to start,
NISSAN recommends placing the registered
NVIS key on a separate key ring to avoid interfer-
ence from other devices.
Page 198 of 304

indicator
light may come on. Do not drive on
these types of roads.
cIf wheels or tires other than the recom-
mended ones are used, the traction
control system may not operate prop-
erly and the
indicator light may
come on.
cThe traction control system is not a sub-
stitute for winter tires or tire chains on a
snow covered road.
FREEING A FROZEN DOOR LOCK
To prevent a door lock from freezing, apply de-
icer through the key hole. If the lock becomes
frozen, heat the key before inserting it into the key
hole.
ANTI-FREEZE
In the winter when it is anticipated that the tem-
perature will drop below 32°F (0°C) , check the
anti-freeze to assure proper winter protection.
For details, see ‘‘Engine cooling system’’ in the
‘‘Maintenance and do-it-yourself’’ section of this
manual.
BATTERY
If the battery is not fully charged during extremely
cold weather conditions, the battery fluid may
freeze and damage the battery. To maintain maxi-
mum efficiency, the battery should be checked
regularly. For details, see ‘‘Battery’’ in the ‘‘Main-
tenance and do-it-yourself’’ section of this
manual.
DRAINING OF COOLANT WATER
If the vehicle is to be left outside without anti-
freeze, drain the cooling system, including the
engine block. Refill before operating the vehicle.For details, see ‘‘Changing engine coolant’’ in the
‘‘Maintenance and do-it-yourself’’ section of this
manual.
TIRE EQUIPMENT
1. SUMMER tires have a tread designed to
provide superior performance on dry pave-
ment. However, the performance of these
tires will be substantially reduced in snowy
and icy conditions. If you operate your ve-
hicle on snowy or icy roads, NISSAN recom-
mends the use of MUD & SNOW or ALL
SEASON TIRES on all four wheels. Please
consult a NISSAN dealer for the tire type,
size, speed rating and availability informa-
tion.
2. For additional traction on icy roads, studded
tires may be used. However, some U.S.
states and Canadian provinces prohibit their
use. Check local, state and provincial laws
before installing studded tires.
Skid and traction capabilities of studded
snow tires on wet or dry surfaces may be
poorer than that of non-studded snow tires.
3. Tire chains may be used.
COLD WEATHER DRIVING
5-22Starting and driving
ZREVIEW COPYÐ2005 Altima(l30)
Owners ManualÐUSA_English(nna)
01/04/05Ðarosenma
X