Page 349 of 788
Page 350 of 788

MOULDINGS
EXTERIOR51-12
INSTALLATION SERVICE POINTS
>>A<< DRIP MOULDING CLIP C/DRIP
MOULDING CLIP B/DRIP MOULDING
CLIP A INSTALLATION
1. The drip moulding clips A, B and C differ
according to where they are used, so check the
identification colour before installation.
2. After installing the clip to the front pillar outer in
alignment with its section A, cut from section B.
>>B<< REAR DRIP MOULDING
CLIP/FRONT DRIP MOULDING CLIP
C/FRONT DRIP MOULDING CLIP
B/FRONT DRIP MOULDING CLIP A
INSTALLATION
The front drip moulding clips A, B, C and rear drip
moulding clip differ according to where they are
used, so check the identification colour before
installation.
>>C<< ROOF DRIP MOULDING
INSTALLATION
Install the clips to the roof drip moulding before
installing the moulding to the vehicle body. Applicable location Identification colour
Drip moulding clip A Yellow
Drip moulding clip B Blue
Drip moulding clip C Milky white
AC304374
Front pillar outer
Section B
Section A
AB
Applicable location Identification colour
Front drip moulding clip A Orange
Front drip moulding clip B Purple
Front drip moulding clip C Blue
Rear drip moulding clip Grey
Page 351 of 788
Page 352 of 788
Page 353 of 788
SIDE AIR DAM
EXTERIOR51-15
SIDE AIR DAM
ADHESIVEM1511000500437
SIDE AIR DAM
REMOVAL AND INSTALLATIONM1511005500238
Item Specification
Side air dam Double-sided tape
4 mm width and 1.2 mm thickness
AC303877
Clip
Clip Section A – A
AD
1
A A
Adhesive tape position
Double-sided tape:
Generic products [ 4 mm width and 1.2 mm thickness ]11
Removal step
<> >>A<<1. Side air dam
Page 355 of 788
GARNISHES
EXTERIOR51-17
GARNISHES
REMOVAL AND INSTALLATIONM1511004100107
AC303863
Clip
Delta outer garnishSection A – A
AB
Delta outer
garnish
A A
AC303860
A A
Clip Trunk lid panel
Licence plate
garnish Section A – A
AB
Licence plate garnish
Page 361 of 788
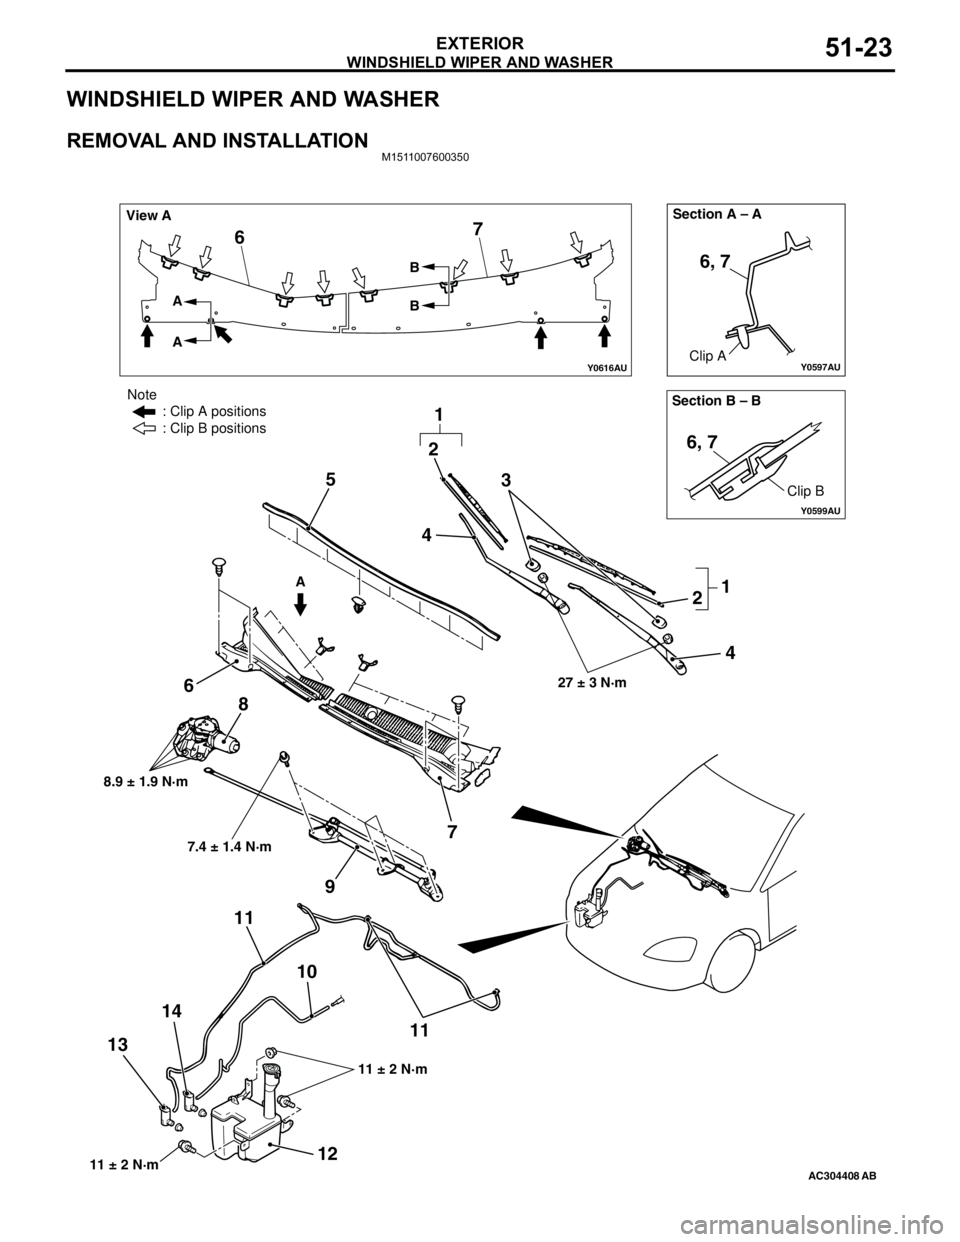
WINDSHIELD WIPER AND WASHER
EXTERIOR51-23
WINDSHIELD WIPER AND WASHER
REMOVAL AND INSTALLATIONM1511007600350
Y0597AU
Y0616AU
Y0599AU
AC304408AB
Section B – B Section A – A
View A
A A
AB
B
Clip A
Clip B
6, 7
6, 7
67
3
2 5
6
7 8
9
10 11
11
12 1314
27 ± 3 N·m
8.9 ± 1.9 N·m
11 ± 2 N·m
Note
: Clip A positions
: Clip B positions
11 ± 2 N·m
7.4 ± 1.4 N·m
2
1
1 4
4
Page 370 of 788
HEADLAMP WASHER
EXTERIOR51-32
HEADLAMP WASHER
TROUBLESHOOTINGM1511000700356
The headlamp washer is controlled by the Smart
Wiring System (SWS). For troubleshooting, refer to
GROUP 54B, Troubleshooting P.54B-17 or GROUP
54C, Troubleshooting P.54C-4.
HEADLAMP WASHER
REMOVAL AND INSTALLATIONM1511009700063
AC304608AB
10N
2
4
56
8
7
1
9
11
9
1
10N
4.9 ± 0.7 N·m 4.9 ± 0.7 N·m
3
Removal steps
•Washer fluid draining
1. Headlamp washer hose connection
2. Under cover side panel (R.H)
3. Splash shield mounting clip (R.H)4. Headlamp washer motor
connection
5. Headlamp washer joint
6. Headlamp washer hose Removal steps (Continued)