2005 MITSUBISHI LANCER 001
[x] Cancel search: 001Page 91 of 788

Page 94 of 788

IGNITION SYSTEM
ENGINE ELECTRICAL16-30
IGNITION SYSTEM
GENERAL INFORMATIONM1163000100294
This system is equipped with two ignition coils (A and
B) with built-in power transistors for the No. 1 and
No. 4 cylinders and the No. 2 and No. 3 cylinders
respectively.
Interruption of the primary current flowing in the
primary side of ignition coil A generates a high
voltage in the secondary side of ignition coil A. The
high voltage thus generated is applied to the spark
plugs of No. 1 and No. 4 cylinders to generate
sparks. At the time that the sparks are generated at
both spark plugs, if one cylinder is at the
compression stroke, the other cylinder is at the
exhaust stroke, so that ignition of the compressed
air/fuel mixture occurs only for the cylinder which is
at the compression stroke.
In the same way, when the primary current flowing in
ignition coil B is interrupted, the high voltage thus
generated is applied to the spark plugs of No. 2 and
No. 3 cylinders.The engine-ECU
turns the two power transistors inside the ignition
coils alternately on and off. This causes the primary
currents in the ignition coils to be alternately
interrupted and allowed to flow to fire the cylinders in
the order 1-3-4-2.
The engine-ECU
determines which ignition coil should be controlled
by means of the signals from the camshaft position
sensor which is incorporated in the camshaft and
from the crank angle sensor which is incorporated in
the crankshaft. It also detects the crankshaft position
in order to provide ignition at the most appropriate
timing in response to the engine operation
conditions. It also detects the crankshaft position in
order to provide ignition at the most appropriate
timing in response to the engine operation
conditions.
When the engine is cold or operated at high
altitudes, the ignition timing is slightly advanced to
provide optimum performance.
When the automatic transmission shifts gears, the
ignition timing is also retarded in order to reduce
output torque, thereby alleviating shifting shocks.
SYSTEM DIAGRAM
AK101074
Air flow sensor
<4G6> MAP sensor <4G1>
Intake air temperatur
sensor
Engine coolant
temperature sensor
Camshaft position
sensor
Crank angle sensor
Barometric pressure
sonsor <4G6>
Detonatoin sensor
Ignition switch-STEngine-A/T-
ECU Engine-ECU
Cylinder No.
23 4
AG
1 Spark plugIgnition coil AIgnition
switch
Battery
Page 95 of 788

IGNITION SYSTEM
ENGINE ELECTRICAL16-31
IGNITION COIL SPECIFICATION
SPARK PLUG SPECIFICATIONS
SERVICE SPECIFICATIONS
M1163000300180
IGNITION COIL
SPARK PLUG
RESISTIVE CORD
SPECIAL TOOL
M1163000600288
Item Specification
Type Molded 2-coil
Items 4G1 4G66
NGK BKR6E-11 IGR6A11
DENSO K20PR-U11
−
CHAMPION RC8YC4
−
Item Standard value
Secondary coil resistance kΩ8.5 − 11 . 5
ItemsStandard value Limit
Spark plug gap mm 4G1 1.0 − 1.1
−
4G6 1.0 − 1.1 1.3
Item Standard value Limit
Resistance kΩ
−Maximum 19
Tool Number Name Use
MD998773 Detonation sensor
wrenchDetonation sensor
removal and installation
Page 96 of 788

IGNITION SYSTEM
ENGINE ELECTRICAL16-32
ON-VEHICLE SERVICE
IGNITION COIL (WITH BUILT-IN POWER
TRANSISTOR) CHECK
M1163001200324
Check by the following procedure, and replace if
there is a malfunction.
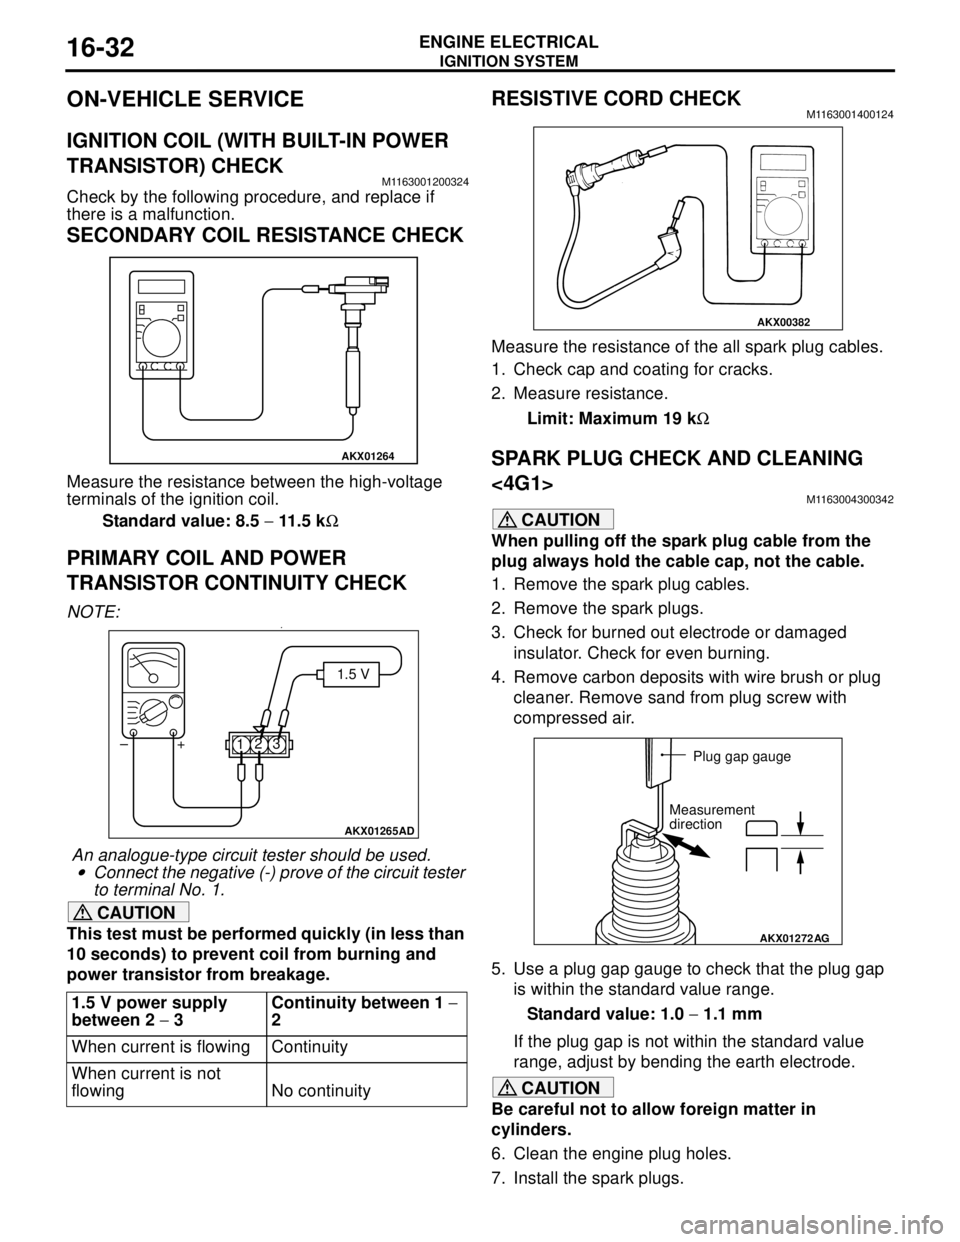
SECONDARY COIL RESISTANCE CHECK
Measure the resistance between the high-voltage
terminals of the ignition coil.
Standard value: 8.5 − 11.5 kΩ
PRIMARY COIL AND POWER
TRANSISTOR CONTINUITY CHECK
NOTE: .•
An analogue-type circuit tester should be used.
•Connect the negative (-) prove of the circuit tester
to terminal No. 1.
CAUTION
This test must be performed quickly (in less than
10 seconds) to prevent coil from burning and
power transistor from breakage.
RESISTIVE CORD CHECKM1163001400124
Measure the resistance of the all spark plug cables.
1. Check cap and coating for cracks.
2. Measure resistance.
Limit: Maximum 19 kΩ
SPARK PLUG CHECK AND CLEANING
<4G1>
M1163004300342
CAUTION
When pulling off the spark plug cable from the
plug always hold the cable cap, not the cable.
1. Remove the spark plug cables.
2. Remove the spark plugs.
3. Check for burned out electrode or damaged
insulator. Check for even burning.
4. Remove carbon deposits with wire brush or plug
cleaner. Remove sand from plug screw with
compressed air.
5. Use a plug gap gauge to check that the plug gap
is within the standard value range.
Standard value: 1.0 − 1.1 mm
If the plug gap is not within the standard value
range, adjust by bending the earth electrode.
CAUTION
Be careful not to allow foreign matter in
cylinders.
6. Clean the engine plug holes.
7. Install the spark plugs. 1.5 V power supply
between 2 − 3Continuity between 1 −
2
When current is flowing Continuity
When current is not
flowing No continuity
AKX01264
AKX01265AD
1.5 V
123 +
–
AKX00382
AKX01272
AG
Plug gap gauge
Measurement
direction
Page 97 of 788

IGNITION SYSTEM
ENGINE ELECTRICAL16-33
SPARK PLUG CHECK AND CLEANING
<4G6>
M1163004300353
CAUTION
When pulling off the spark plug cable from the
plug always hold the cable cap, not the cable.
1. Remove the spark plug cables.
2. Remove the spark plugs.
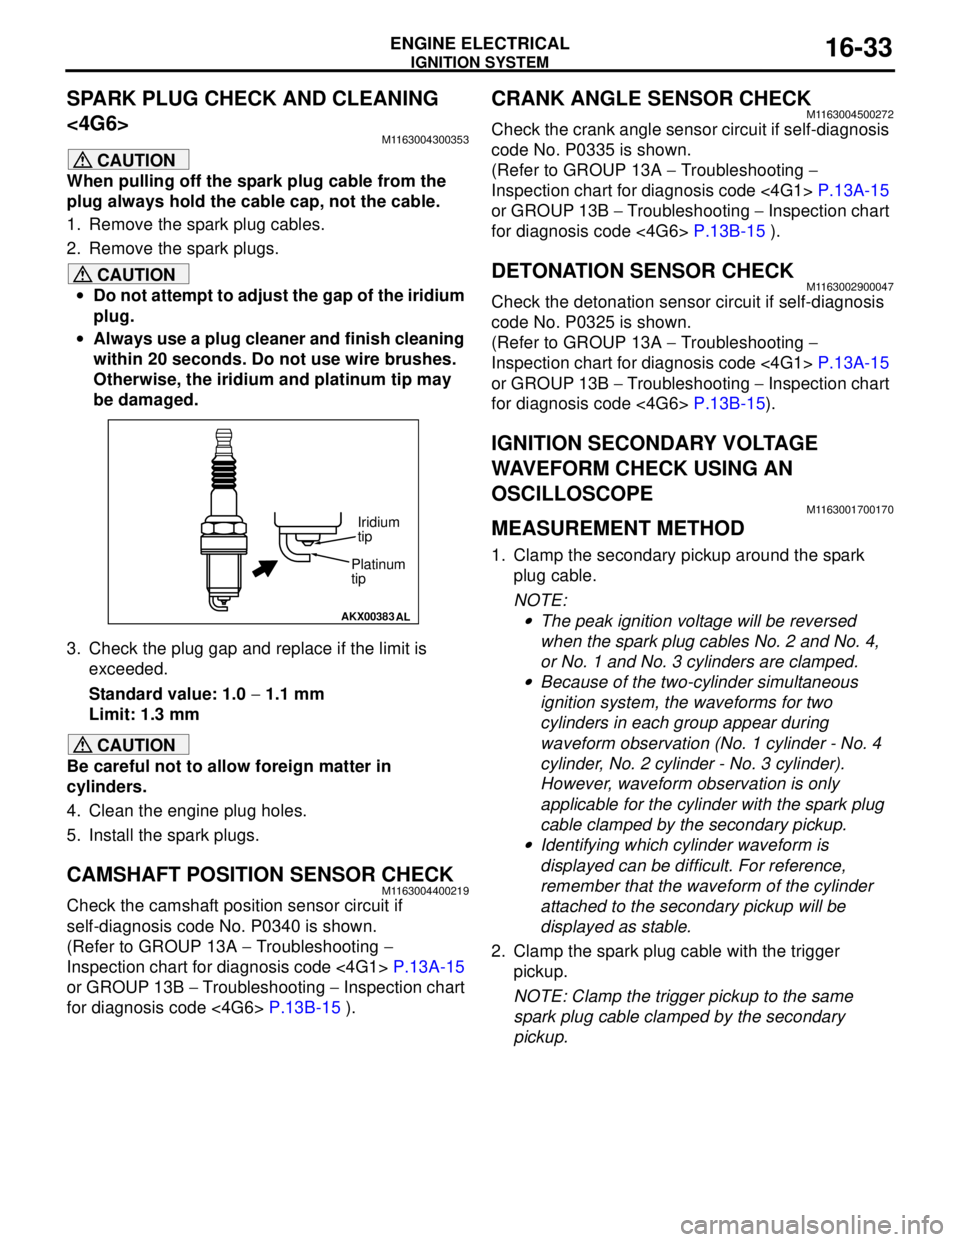
CAUTION
•Do not attempt to adjust the gap of the iridium
plug.
•Always use a plug cleaner and finish cleaning
within 20 seconds. Do not use wire brushes.
Otherwise, the iridium and platinum tip may
be damaged.
3. Check the plug gap and replace if the limit is
exceeded.
Standard value: 1.0 − 1.1 mm
Limit: 1.3 mm
CAUTION
Be careful not to allow foreign matter in
cylinders.
4. Clean the engine plug holes.
5. Install the spark plugs.
CAMSHAFT POSITION SENSOR CHECKM1163004400219
Check the camshaft position sensor circuit if
self-diagnosis code No. P0340 is shown.
(Refer to GROUP 13A − Troubleshooting −
Inspection chart for diagnosis code <4G1> P.13A-15
or GROUP 13B − Troubleshooting − Inspection chart
for diagnosis code <4G6> P.13B-15 ).
CRANK ANGLE SENSOR CHECKM1163004500272
Check the crank angle sensor circuit if self-diagnosis
code No. P0335 is shown.
(Refer to GROUP 13A − Troubleshooting −
Inspection chart for diagnosis code <4G1> P.13A-15
or GROUP 13B − Troubleshooting − Inspection chart
for diagnosis code <4G6> P.13B-15 ).
DETONATION SENSOR CHECKM1163002900047
Check the detonation sensor circuit if self-diagnosis
code No. P0325 is shown.
(Refer to GROUP 13A − Troubleshooting −
Inspection chart for diagnosis code <4G1> P.13A-15
or GROUP 13B − Troubleshooting − Inspection chart
for diagnosis code <4G6> P.13B-15).
IGNITION SECONDARY VOLTAGE
WAVEFORM CHECK USING AN
OSCILLOSCOPE
M1163001700170
MEASUREMENT METHOD
1. Clamp the secondary pickup around the spark
plug cable.
NOTE: .
•The peak ignition voltage will be reversed
when the spark plug cables No. 2 and No. 4,
or No. 1 and No. 3 cylinders are clamped.
•Because of the two-cylinder simultaneous
ignition system, the waveforms for two
cylinders in each group appear during
waveform observation (No. 1 cylinder - No. 4
cylinder, No. 2 cylinder - No. 3 cylinder).
However, waveform observation is only
applicable for the cylinder with the spark plug
cable clamped by the secondary pickup.
•Identifying which cylinder waveform is
displayed can be difficult. For reference,
remember that the waveform of the cylinder
attached to the secondary pickup will be
displayed as stable.
2. Clamp the spark plug cable with the trigger
pickup.
NOTE: Clamp the trigger pickup to the same
spark plug cable clamped by the secondary
pickup.
AKX00383
AL
Platinum
tipIridium
tip
Page 101 of 788

IGNITION SYSTEM
ENGINE ELECTRICAL16-37
IGNITION COIL RELAY CHECKM1163006500018
AC301727
2 1
3 4
AC304311AB
Battery
Ignition coil relay
Battery
voltageTerminal No.to
be connected to
testerContinuity test
results
Not applied 1 − 4 Open circuit
Connect
terminal
No.2 and
battery (+)
terminal.
Connect
terminal
No.3 and
battery (−)
terminal.1 − 4 Less than 2 ohms
Page 110 of 788

ENGINE CONTROL
ENGINE AND EMISSION CONTROL17-2
ENGINE CONTROL
GENERAL INFORMATIONM1171000100277
A cable-type accelerator mechanical
suspended-type pedal has been adopted.
SERVICE SPECIFICATIONSM1171000300088
ON-VEHICLE SERVICE
ACCEL CABLE CHECK AND
ADJUSTMENT
M1171000900314
1. Turn A/C and lights OFF. Inspect and adjust at no
load.
2. Warm engine until stabilized at idle.
3. Confirm idle speed is at standard value.
Standard value:
750 ± 50 r/min <4G1>
750 ± 100 r/min <4G6>
4. Stop engine. [ignition switch: LOCK (OFF)
position].
5. Confirm there are no sharp bends in the
accelerator cable.
6. Check the inner cable for correct slack.
Standard value: 1.0 − 2.0 mm
7. If there is too much slack or no slack, adjust play
by the following procedures.
(1) Loosen the adjusting bolts to release the
cable.
(2) Move the plate until the inner cable play is at
the standard value, and then tighten the
adjusting bolts.
(3) After adjusting, check that the throttle lever is
touching the stopper. Item Standard value
Accel cable play mm 1.0 − 2.0
Engine idle speed r/min 4G1 750 ± 50
4G6 750 ± 100
AC207966
Adjusting bolts
Plate
Accel cable
AC
<4G1>
AC301055
Adjusting bolts
Plate
Accel cable
AC
<4G6>
Page 111 of 788

ENGINE CONTROL
ENGINE AND EMISSION CONTROL17-3
ACCELERATOR CABLE AND PEDAL
REMOVAL AND INSTALLATIONM1171001200341
Post-installation Operation
Adjusting the Accelerator Cable (Refer to P.17-2).
Y1059AU
Y1060AU
AC304070
N
4
5
78 1011
N12
13
AB
1
23
5.0 ± 1.0 N·m
6
12 ± 2 N·m9
7
1 2 3
5.0 ± 1.0 N·m
N
4 5 7
8 10
11
N12 13
6
12 ± 2 N·m
9
7
Accelerator cable assembly
removal steps
1. Inner cable connection (Accelerator
pedal side)
2. Inner cable connection (Throttle body
side)
3. Accelerator cable assemblyAccelerator pedal assembly
removal steps
1. Inner cable connection (Accelerator
pedal side)
4. Accelerator pedal assembly
5. Accelerator control equip nut
6. Accelerator pedal arm and
accelerator pedal pad assembly