Page 142 of 788

FRONT AXLE HUB ASSEMBLY
FRONT AXLE26-10
<> DRIVE SHAFT REMOVAL
1. Use the following special tools to push out the
drive shaft from the hub and knuckle.
•Axle shaft puller (MB990241)
•Puller shaft (MB990242)
•Puller bar (MB990244)
•Puller body (MB991354)
•End yoke holder (MB990767)
2. Withdraw the drive shaft from the hub by pulling
the bottom of the hub and knuckle towards you.
3. Hang the drive shaft on the vehicle body with a
rope.
INSTALLATION SERVICE POINT
>>A<< STABILIZER
RUBBER/SELF-LOCKING NUT
(STABILIZER BAR CONNECTION)
INSTALLATION
Install the stabilizer rubber and collar as shown in the
figure, and tighten the self-locking nut so that the
protruding length of the stabilizer bar mounting bolt
protruding part meets its standard value (A).
Standard value (A): 22 ± 1.5 mm
>>B<< WASHER/ DRIVE SHAFT NUT
INSTALLATION
CAUTION
Before securely tightening the drive shaft nuts,
make sure there is no load on the wheel
bearings. Otherwise the wheel bearings will be
damaged.
1. Be sure to install the drive shaft washer in the
specified direction.
2. Using special tool end yoke holder (MB990767),
tighten the drive shaft nut to the specified torque.
Tightening torque: 245 ± 29 N⋅m
AC100128
MB990241 MB990767
AD
AC303949
MB990244
(Three)
MB990767
MB990242 MB991354
AC
AC102551
AC
Drive shaft
AC210393AC
A
AC102465AD
MB990767 Washer
Page 143 of 788
Page 145 of 788

FRONT AXLE HUB ASSEMBLY
FRONT AXLE26-13
REASSEMBLY SERVICE POINTS
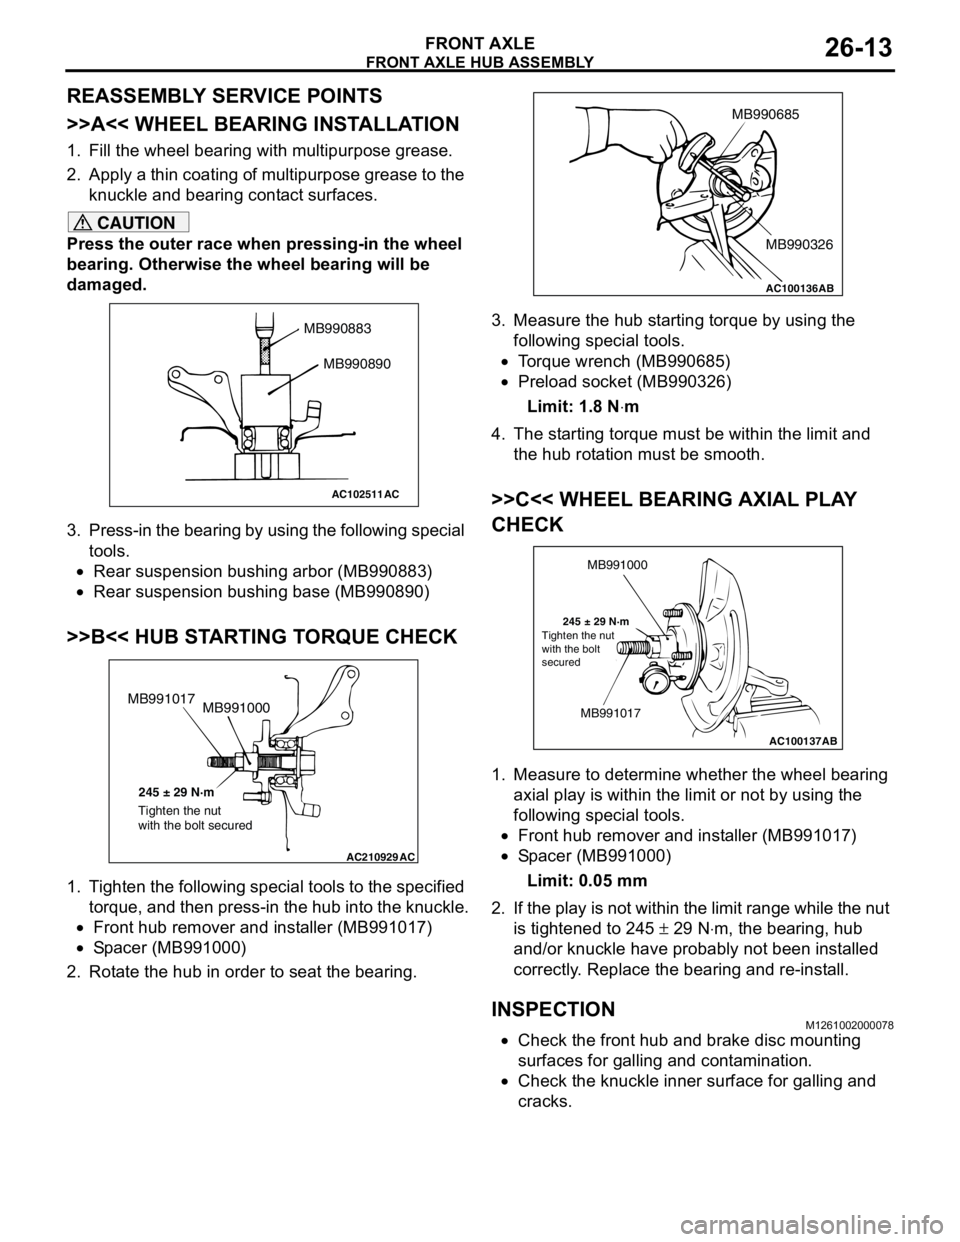
>>A<< WHEEL BEARING INSTALLATION
1. Fill the wheel bearing with multipurpose grease.
2. Apply a thin coating of multipurpose grease to the
knuckle and bearing contact surfaces.
CAUTION
Press the outer race when pressing-in the wheel
bearing. Otherwise the wheel bearing will be
damaged.
3. Press-in the bearing by using the following special
tools.
•Rear suspension bushing arbor (MB990883)
•Rear suspension bushing base (MB990890)
>>B<< HUB STARTING TORQUE CHECK
1. Tighten the following special tools to the specified
torque, and then press-in the hub into the knuckle.
•Front hub remover and installer (MB991017)
•Spacer (MB991000)
2. Rotate the hub in order to seat the bearing.3. Measure the hub starting torque by using the
following special tools.
•Torque wrench (MB990685)
•Preload socket (MB990326)
Limit: 1.8 N⋅m
4. The starting torque must be within the limit and
the hub rotation must be smooth.
>>C<< WHEEL BEARING AXIAL PLAY
CHECK
1. Measure to determine whether the wheel bearing
axial play is within the limit or not by using the
following special tools.
•Front hub remover and installer (MB991017)
•Spacer (MB991000)
Limit: 0.05 mm
2. If the play is not within the limit range while the nut
is tightened to 245 ± 29 N⋅m, the bearing, hub
and/or knuckle have probably not been installed
correctly. Replace the bearing and re-install.
INSPECTIONM1261002000078
•Check the front hub and brake disc mounting
surfaces for galling and contamination.
•Check the knuckle inner surface for galling and
cracks.
AC102511
MB990883
MB990890
AC
AC210929AC
MB991000 MB991017
245 ± 29 N·m
Tighten the nut
with the bolt secured
AC100136
MB990685
MB990326
AB
AC100137
MB991000
MB991017
245 ± 29 N·m
AB Tighten the nut
with the bolt
secured
Page 146 of 788
Page 147 of 788
Page 149 of 788
DRIVE SHAFT ASSEMBLY
FRONT AXLE26-17
INSTALLATION SERVICE POINTS
>>A<< DRIVE SHAFT INSTALLATION
CAUTION
When installing the drive shaft, be careful that
the spline part of the drive shaft does not
damage the oil seal.
>>B<< STABILIZER
RUBBER/SELF-LOCKING NUT
(STABILIZER BAR CONNECTION)
INSTALLATION
Install the stabilizer rubber and collar as shown in the
figure, and tighten the self-locking nut so that the
protruding length of the stabilizer bar mounting bolt
protruding part meets its standard value (A).
Standard value (A): 22 ± 1.5 mm
>>C<< WASHER/DRIVE SHAFT NUT
INSTALLATION
1. Be sure to install the drive shaft washer in the
specified direction.
CAUTION
Before securely tightening the drive shaft nuts,
make sure there is no load on the wheel
bearings. Otherwise the wheel bearing will be
damaged.
2. Using special tool end yoke holder (MB990767),
tighten the drive shaft nut to the specified torque.
Tightening torque: 245 ± 29 N⋅m
AC210393AC
A
AC102465AD
MB990767 Washer
Page 152 of 788

DRIVE SHAFT ASSEMBLY
FRONT AXLE26-20
REASSEMBLY SERVICE POINTS
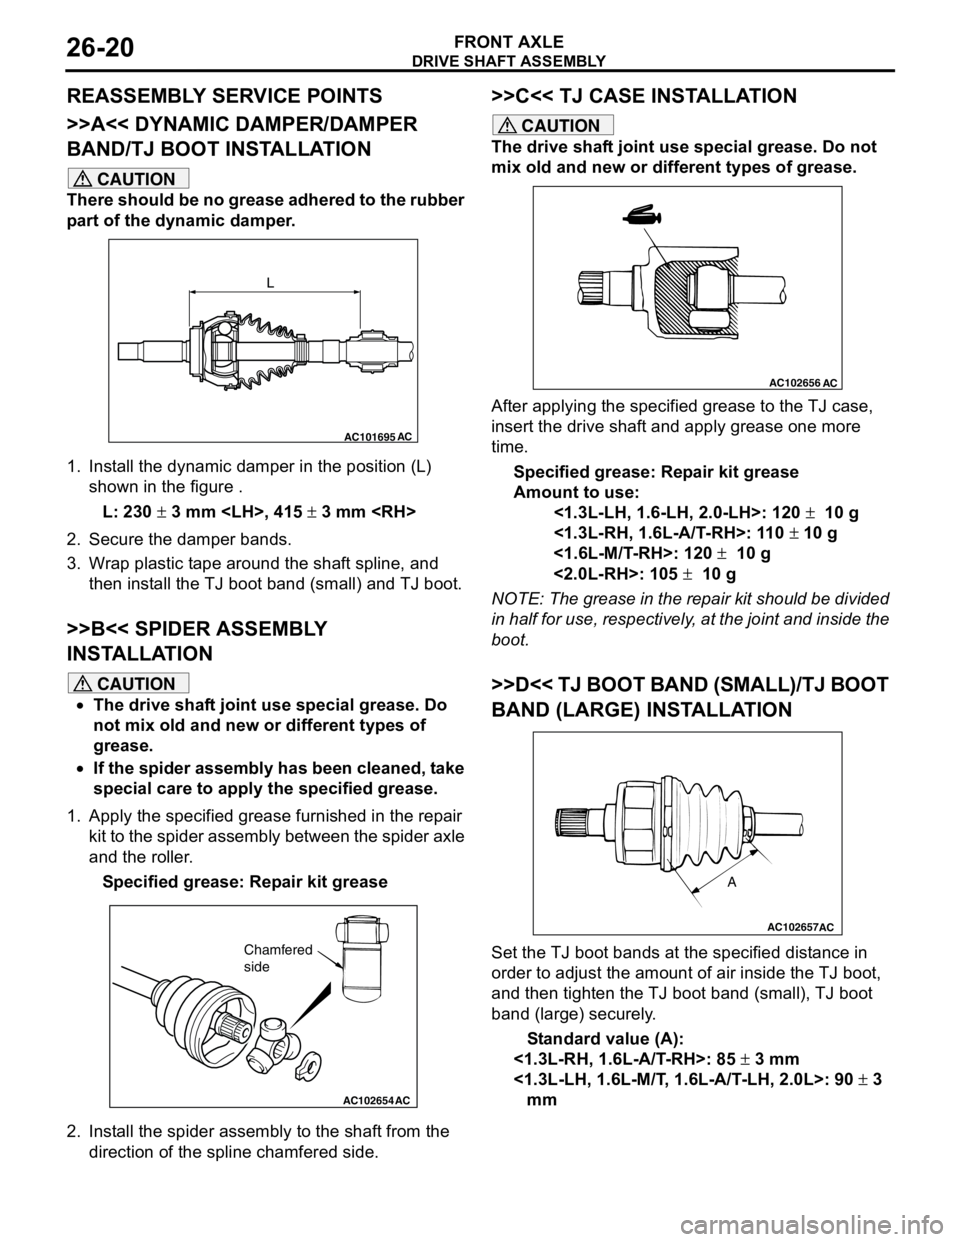
>>A<< DYNAMIC DAMPER/DAMPER
BAND/TJ BOOT INSTALLATION
CAUTION
There should be no grease adhered to the rubber
part of the dynamic damper.
1. Install the dynamic damper in the position (L)
shown in the figure .
L: 230 ± 3 mm , 415 ± 3 mm
2. Secure the damper bands.
3. Wrap plastic tape around the shaft spline, and
then install the TJ boot band (small) and TJ boot.
>>B<< SPIDER ASSEMBLY
INSTALLATION
CAUTION
•The drive shaft joint use special grease. Do
not mix old and new or different types of
grease.
•If the spider assembly has been cleaned, take
special care to apply the specified grease.
1. Apply the specified grease furnished in the repair
kit to the spider assembly between the spider axle
and the roller.
Specified grease: Repair kit grease
2. Install the spider assembly to the shaft from the
direction of the spline chamfered side.
>>C<< TJ CASE INSTALLATION
CAUTION
The drive shaft joint use special grease. Do not
mix old and new or different types of grease.
After applying the specified grease to the TJ case,
insert the drive shaft and apply grease one more
time.
Specified grease: Repair kit grease
Amount to use:
<1.3L-LH, 1.6-LH, 2.0-LH>: 120 ± 10 g
<1.3L-RH, 1.6L-A/T-RH>: 110 ± 10 g
<1.6L-M/T-RH>: 120 ± 10 g
<2.0L-RH>: 105 ± 10 g
NOTE: The grease in the repair kit should be divided
in half for use, respectively, at the joint and inside the
boot.
>>D<< TJ BOOT BAND (SMALL)/TJ BOOT
BAND (LARGE) INSTALLATION
Set the TJ boot bands at the specified distance in
order to adjust the amount of air inside the TJ boot,
and then tighten the TJ boot band (small), TJ boot
band (large) securely.
Standard value (A):
<1.3L-RH, 1.6L-A/T-RH>: 85 ± 3 mm
<1.3L-LH, 1.6L-M/T, 1.6L-A/T-LH, 2.0L>: 90 ± 3
mm
AC101695AC
L
AC102654AC
Chamfered
side
AC102656AC
AC102657
A
AC
Page 153 of 788

DRIVE SHAFT ASSEMBLY
FRONT AXLE26-21
INSPECTIONM1261003800130
•Check the drive shaft for damage, bending or
corrosion.
•Check the drive shaft spline part for wear or
damage.
•Check the spider assembly for roller rotation,
wear or corrosion.
•Check the groove inside TJ case for wear or
corrosion.
•Check the dynamic damper for damage or
cracking.
•Check the boots for deterioration, damage or
cracking.
BJ BOOT (RESIN BOOT) REPLACEMENTM1261005200361
1. Remove the boot bands (large and small).
NOTE: The boot bands cannot be re-used.
2. Remove the BJ boot.
3. Wrap a plastic tape around the shaft spline, and
assemble the boot band and BJ boot.4. Align the centre groove on the BJ boot small end
with the shaft groove.
5. Turn the adjusting bolt on special tool boot band
crimping tool (MB991561) so that the size of the
opening (W) is at the standard value.
Standard value (W): 2.9 mm
Tighten the
adjusting bolt.
Loosen the
adjusting bolt.
NOTE: The value of W will change by
approximately 0.7 mm for each turn of the
adjusting bolt.
NOTE: The adjusting bolt should not be turned
more than once.
6. Position the BJ boot band (small) so that there is
even clearance at either end (A and B).
AC102658
AC102659
AC102660
WMB991561
Stopper
Adjusting bolt
AC
AC102661AC
Boot
A
Boot band
(small)
B
Projection