Page 99 of 417

98 Controls in detailLocking and unlockingFactory setting
Global unlocking�
Press buttonŒ.
All turn signal lamps flash once. The
anti-theft alarm system is disarmed.
The vehicle will lock again automatically
and reactivate the anti-theft alarm system
within approximately 40 seconds of un-
locking if:
�
neither door nor trunk is opened
�
the SmartKey is not inserted in the
starter switch
�
the central locking switch is not
activated
Global locking
�
Press button‹.
With the hood, trunk and all doors
closed, all turn signal lamps flash three
times. The anti-theft alarm system is
armed.Selective setting
If you frequently travel alone, you may wish
to reprogram the SmartKey so that
pressingŒ only unlocks the driver’s
door and the fuel filler flap.
�
Press and hold buttonsŒ and‹
simultaneously for about five seconds
until battery check lamp5 flashes
twice.
The SmartKey will then function as
follows:
Unlocking driver’s door and fuel filler
flap
�
Press buttonΠonce.
All turn signal lamps flash once. The
anti-theft alarm system is disarmed.Global unlocking
�
Press buttonΠtwice.
All turn signal lamps flash once. The
anti-theft alarm system is disarmed.
Global locking
�
Press button‹.
With the hood, trunk and all doors
closed, all turn signal lamps flash three
times. The anti-theft alarm system is
armed.
Page 104 of 417

103 Controls in detail
Locking and unlocking
Illumination of the emergency release
button:�
The button will flash for 30 minutes
after opening the trunk.
�
The button will flash for 60 minutes
after closing the trunk.
Automatic locking
The doors and the trunk lid lock automati-
cally when the vehicle is set into motion.
You can open a locked door from the in-
side. Open door only when conditions are
safe to do so.
You can deactivate the automatic locking
using the control system (
�page 135).
Locking and unlocking from the inside
You can lock or unlock the vehicle from in-
side using the central locking switches.
This can be useful, for example, if you want
to unlock the passenger door from the in-
side or want to lock the vehicle before
starting to drive.
The central locking switch does not lock or
unlock the fuel filler flap.
iThe emergency release button does
not open the trunk lid if the vehicle
battery is discharged or disconnected.
If the vehicle has previously been
locked from the outside with the
SmartKey, opening the trunk from the
inside using the emergency release
button will trigger the anti-theft alarm
system.
To cancel the alarm, do one of the
following:�
Press buttonŒ or‹ on the
SmartKey.
�
Insert the SmartKey in the starter
switch.
iThe doors unlock automatically after an
accident if the force of the impact ex-
ceeds a preset threshold.
The vehicle locks automatically when
the ignition is switched on and the
wheels are turning at vehicle speeds of
approximately 9 mph (15 km/h) or
more. You could therefore lock yourself
out when the vehicle �
is pushed
�
is on a test stand
Warning!
G
When leaving the vehicle, always remove the
SmartKey from the starter switch, take it
with you, and lock the vehicle. Do not leave
children unattended in the vehicle, or with
access to an unlocked vehicle. Unsuper-
vised use of vehicle equipment may cause
an accident and/or serious personal injury.
Page 116 of 417
.
�
If it is not d")
115 Controls in detail
Instrument cluster
Resetting the trip odometer�
Make sure you are viewing the trip
odometer and main odometer in the
right multifunction display
(�page 117).
�
If it is not displayed, press buttonè
orÿ on the multifunction steering
wheel until the trip odometer appears
in the right multifunction display.
�
Press and hold reset button 4
(�page 29) until the trip odometer is
reset.
Tachometer
The red marking on the tachometer
(�page 29) denotes excessive engine
speed.
To help protect the engine, the fuel supply
is interrupted if the engine is operated
within the red marking.
Outside temperature indicator
The outside temperature is displayed in
the right multifunction display
(�page 29). For information on how to se-
lect the unit of the displayed temperature,
i.e. degrees Celsius (°C) or degrees Fahr-
enheit (°F), see “Selecting temperature
display mode” (
�page 129).
!Avoid driving at excessive engine
speeds, as it may result in serious
engine damage that is not covered by
the Mercedes-Benz Limited Warranty.
Warning!
G
The outside temperature indicator is not de-
signed to serve as an ice-warning device and
is therefore unsuitable for that purpose.
Indicated temperatures just above the freez-
ing point do not guarantee that the road sur-
face is free of ice. The road may still be icy,
especially in wooded areas or on bridges.
Page 122 of 417
121 Controls in detail
Control system
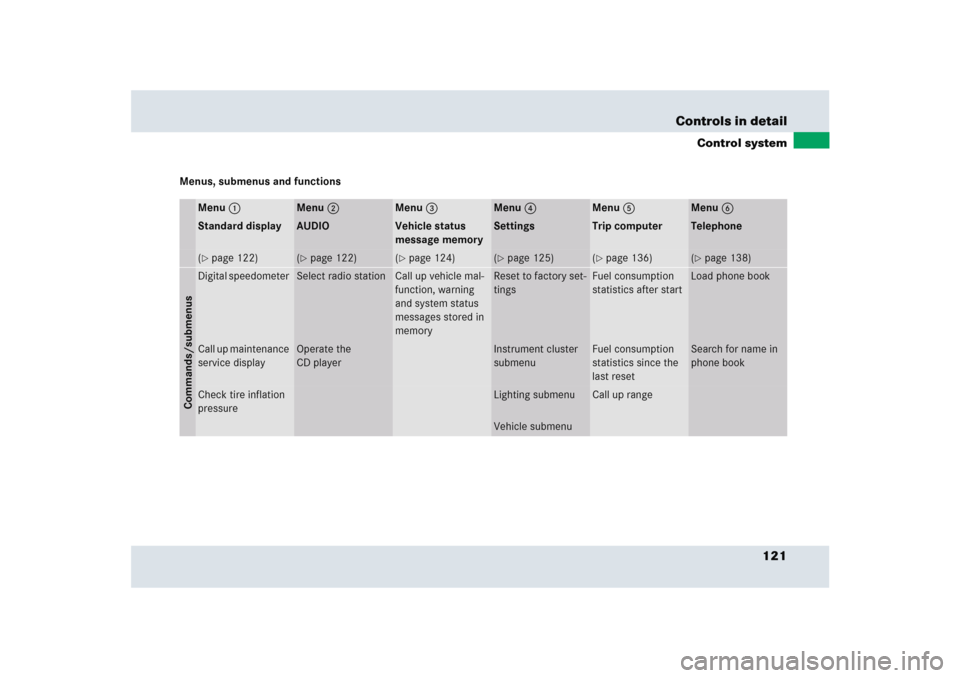
Menus, submenus and functions
Menu1
Menu2
Menu3
Menu4
Menu5
Menu6
Standard display
AUDIO
Vehicle status
message memory
Settings
Trip computer
Telephone
(�page 122)
(�page 122)
(�page 124)
(�page 125)
(�page 136)
(�page 138)
Commands/submenusDigital speedometer
Select radio station
Call up vehicle mal-
function, warning
and system status
messages stored in
memory
Reset to factory set-
tings
Fuel consumption
statistics after start
Load phone book
Call up maintenance
service display
Operate the
CD player
Instrument cluster
submenu
Fuel consumption
statistics since the
last reset
Search for name in
phone book
Check tire inflation
pressure
Lighting submenu
Call up range
Vehicle submenu
Page 137 of 417

136 Controls in detailControl system�
Press button j or k repeatedly
until you see this message in the left
display:
Automatic Door lock
.
The selection marker is on the current
setting.
�
Press æ or ç to switch Automatic Door lock
On or
Off
.Tire inflation pressure display
Use this function to set the unit for the tire
inflation pressure display.
�
Move the selection marker with the
æ or ç button to the
Vehicle
submenu.
�
Press button j or k repeatedly
until you see this message in the left
display:
Tire press. display
.
The selection marker is on the current
setting.
�
Press æ or ç to select the de-
sired tire inflation pressure unit.
Trip computer menu
Use the trip computer menu to call up
statistical data on your vehicle.
The following information is available:Function
Page
Fuel consumption statistics after
start
137
Fuel consumption statistics since
last reset
137
Call up range (distance to empty)
138
iThe last function called up will reap-
pear the next time you enter the trip
computer menu.
��
Page 138 of 417

137 Controls in detail
Control system
Fuel consumption statistics after start�
Press button ÿ or è repeatedly
until you see the first function of the
Trip computer menu.
�
Press button j or k repeatedly
until you see this message in the left
display:
After start.
1Distance driven since start
2Average speed since start
3Time elapsed since start
4Average fuel consumption since startFuel consumption since last reset
�
Press button ÿ or è repeatedly
until you see the first function of the
Trip computer menu.
�
Press button j or k repeatedly
until you see this message in the left
display:
From reset.
1Distance driven since last reset
2Average speed since last reset
3Time elapsed since last reset
4Average fuel consumption since last re-
set
iAll statistics stored since the last en-
gine start will be reset approximately
four hours after the SmartKey in the
starter switch is turned to position0 or
removed from the starter switch.
Resetting will not occur if you turn the
SmartKey back to position1 or2 with-
in this time period.
Page 139 of 417

138 Controls in detailControl systemResetting fuel consumption statistics�
Press button ÿ or è repeatedly
until you see the first function of the
Trip computer menu.
�
Press button j or k repeatedly
until you see the reading that you want
to reset in the left display.
�
Press and hold the reset button in the
instrument cluster (
�page 29) until
the value is reset to 0.Calling up range (distance to empty)
�
Press button ÿ or è repeatedly
until you see the first function of the
Trip computer menu.
�
Press button j or k repeatedly
until you see this message in the left
display:
Range
.
In the right display you will see the cal-
culated range based on the current fuel
tank level. Your driving style will affect
the accuracy of the calculated range.
TEL menuWarning!
G
A driver’s attention to the road must always
be his/her primary focus when driving. For
your safety and the safety of others, we rec-
ommend that you pull over to a safe location
and stop before placing or taking a tele-
phone call. If you choose to use the tele-
phone while driving, please use the
hands-free device and only use the tele-
phone when weather, road, and traffic con-
ditions permit.
Some jurisdictions prohibit the driver from
using a cellular telephone while driving a ve-
hicle.
Bear in mind that at a speed of just 30 mph
(approximately 50 km/h), your vehicle is
covering a distance of 44 feet
(approximately 14 m) every second.
Page 178 of 417
 on
the right side of the steering wheel.
or
�
Briefly press the gear selector lever to
the right in theD+dir")
177 Controls in detail
Automatic transmission
Upshifting
�
Press the button2 (
�page 174) on
the right side of the steering wheel.
or
�
Briefly press the gear selector lever to
the right in theD+direction.
The transmission shifts to the next
higher gear.
The current gear selector position ap-
pears in the right multifunction display
(�page 117).
If the red gearshift indicator lamp>
comes on in the speedometer display
(
�page 29), shift to the next higher gear.
The fuel supply will otherwise be interrupt-
ed to prevent the engine from overrevving.
Deactivating manual gearshift program
�
Turn program mode selector switch1
(�page 173) to the C or S setting.
The selected gearshift program ap-
pears in the right multifunction display.Emergency operation
(Limp Home Mode)
If vehicle acceleration worsens or the
transmission no longer shifts, the trans-
mission is most likely operating in limp
home (emergency operation) mode. In this
mode only second gear and reverse gear
can be activated.�
Stop the vehicle.
�
Move gear selector lever toP.
�
Turn off the engine.
�
Wait at least ten seconds before
restarting.
�
Restart the engine.
�
Move gear selector lever to positionD
(for second gear) orR.
�
Have the transmission checked at an
authorized Mercedes-Benz Center as
soon as possible.
!In the manual program modeM, the
transmission will not upshift, even if
the engine has reached its overrevving
range. Shift up to the next gear before
the engine has reached its overrevving
range. Make absolutely certain that the
engine speed does not reach the red
marking on the tachometer
(�page 28). Otherwise the engine
could be damaged which is not covered
by the Mercedes-Benz Limited
Warranty.