Page 113 of 417
112 Controls in detailLightingManual control
Switching lamps on�
Press switch3.
The interior lighting switches on.
Switching lamps off
�
Press switch 3 again.
The interior lighting switches off.
Trunk lamp
The trunk lamp switches on if the trunk lid
is opened.
If you leave the trunk open for an extended
period of time, the trunk lamp will switch
off automatically after approximately ten
minutes.
Courtesy lighting
For better orientation in the dark, courtesy
lamps will illuminate the interior of your
vehicle.
When you open a door:�
the driver’s and passenger’s footwells
If the SmartKey is in starter switch
position1:
�
the center console
!Make sure the interior lighting is
switched off when leaving the vehicle.
iThe setting selected for the interior
lighting is used for the trunk lighting as
well.
iThe center console is lit from the
interior rear view mirror.
Page 158 of 417

157 Controls in detail
Audio system
Operational readiness of CD changer
The CD changer is located in the trunk on
the left side.
1CD changer
The CD changer can be operated from the
front control panel of the radio. A loaded
magazine must be installed to play CDs.Loading/unloading a CD magazine
�
Slide changer door to the right and
press eject buttong.
1CD
2CD changer
3CD tray
4CD magazine
�
The CD magazine4 will be ejected.
�
Remove CD magazine and pull
CD tray3 fully out.
�
Place CD1 in recess of CD tray, label
side up.
�
Push CD tray into CD magazine in di-
rection of arrow.
�
Push magazine into CD changer2 in
direction of arrow and close sliding
door.
Playing CDs
�
Pressi button.CD will appear on the display.
The last CD listened to will then start play-
ing at the point where it was switched off.
After the last track on a CD has finished,
the next CD is automatically played.iCDs which have been inserted improp-
erly or are unreadable will not be
played.
You do not need to place CDs in all six
CD trays.
The lowest tray is magazine slot num-
ber 1 and the highest tray is magazine
slot number 6.
Page 201 of 417
200 Controls in detailUseful featuresMap pocket in passenger footwell
Storage compartments Armrest storage compartment
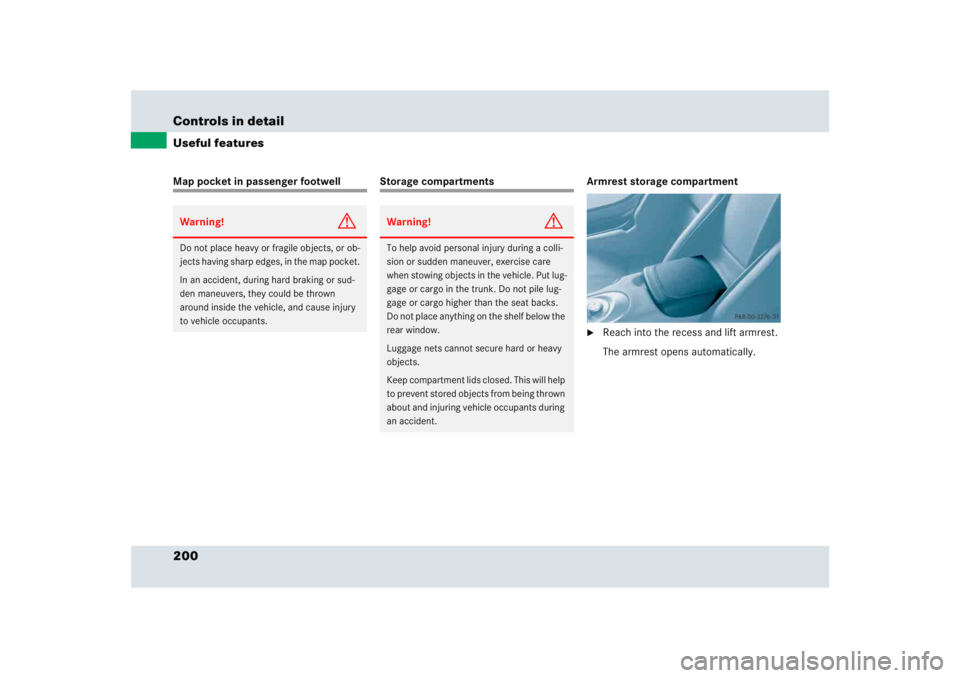
�
Reach into the recess and lift armrest.
The armrest opens automatically.
Warning!
G
Do not place heavy or fragile objects, or ob-
jects having sharp edges, in the map pocket.
In an accident, during hard braking or sud-
den maneuvers, they could be thrown
around inside the vehicle, and cause injury
to vehicle occupants.
Warning!
G
To help avoid personal injury during a colli-
sion or sudden maneuver, exercise care
when stowing objects in the vehicle. Put lug-
gage or cargo in the trunk. Do not pile lug-
gage or cargo higher than the seat backs.
Do not place anything on the shelf below the
rear window.
Luggage nets cannot secure hard or heavy
objects.
Keep compartment lids closed. This will help
to prevent stored objects from being thrown
about and injuring vehicle occupants during
an accident.
Page 202 of 417
201 Controls in detail
Useful features
Center storage compartment
1Release button
2Cover�
Press release button1.
Cover2 opens automatically.
The telephone is installed in the cover
of the storage compartment.Rear storage compartment
1Release button
2Cover
�
Press release button1.
Cover2 opens automatically.
Parcel net in trunk
There is a net available in the trunk to se-
cure loads:�
Pull the trunk floor net from the trunk
back wall towards the front over the
luggage.
�
Hang the hooks of the net on the eyes
on the trunk floor.
Page 204 of 417
.
�
Flip up cover and insert electrical pl")
203 Controls in detail
Useful features
12-V socket
The 12-V socket is located on the left side
in the trunk.
112-V socket�
Switch on the ignition (
�page 40).
�
Flip up cover and insert electrical plug
(cigar lighter type).
Telephone
The telephone is located in the center stor-
age compartment (
�page 201).Radio transmitters, such as a portable tele-
phone or a citizens band unit, should only
be used inside the vehicle if they are con-
nected to an antenna that is installed on
the outside of the vehicle.
The external antenna must be approved by
Mercedes-Benz. Please contact an autho-
rized Mercedes-Benz Center for informa-
tion on the installation of an approved
external antenna. Refer to the radio trans-
mitter operation instructions regarding use
of an external antenna.
iThe 12-V socket can be used to
accommodate electrical consumers
(e.g. air pump, auxiliary lamps) up to a
maximum of 180 W or as a battery
charging point (
�page 355).
Warning!
G
Never operate radio transmitters equipped
with a built-in or attached antenna (i.e. with-
out being connected to an external antenna)
from inside the vehicle while the engine is
running. Doing so could lead to a malfunc-
tion of the vehicle’s electronic system, pos-
sibly resulting in an accident and personal
injury.
Page 215 of 417
,
and the reserve SmartKey is not handy:�
Contact the Mer")
214 Controls in detailUseful features
Remote door unlock
In case you have locked your vehicle unin-
tentionally (e.g. SmartKey inside vehicle),
and the reserve SmartKey is not handy:�
Contact the Mercedes-Benz Response
Center at 1-800-756-9018 (in the USA)
or 1-888-881-6611 (in Canada).
You will be asked to provide your pass-
word which you provided when you
completed the subscriber agreement.
�
Then return to your vehicle and pull the
trunk recessed handle for a minimum
of 20 seconds until the SOS button is
flashing.
The message
Connecting call
ap-
pears in the multifunction display.
As an alternative, you may unlock the vehi-
cle via Internet using the ID and password
sent to you shortly after the completion of
your acquaintance call.
The Response Center will then unlock your
vehicle with the remote door unlocking
feature.
iThe indicator lamp in the respective
button flashes until the call is conclud-
ed. Calls can only be terminated by a
Response Center or Customer Assis-
tance Center representative except
Roadside Assistance and Information
calls, which can also be terminated by
pressing button ì on the multifunc-
tion steering wheel.iWhen a Tele Aid call has been initiated,
the audio system is muted and the se-
lected mode (radio or CD) pauses. The
cellular phone (if installed) switches
off. If you must use this phone, the ve-
hicle must be parked. Disconnect the
coiled cord and place the call. The dis-
play in the instrument cluster is avail-
able for use.
iThe remote door unlock feature is avail-
able if the relevant cellular phone net-
work is available.
The SOS button will flash and the mes-
sage
Connecting call
will appear in
the multifunction display to indicate re-
ceipt of the door unlock command.
Once the vehicle is unlocked, a Re-
sponse Center specialist will attempt
to establish voice contact with the ve-
hicle occupants.
If the trunk recessed handle was pulled
for more than 20 seconds before door
unlock authorization was received by
the Response Center, you must wait
15 minutes before pulling the trunk re-
cessed handle again.
Page 226 of 417
225 Controls in detail
Useful features
Roof and trunk lid racks
!To avoid damage to the vehicle and the
dust cover, observe the following:�
Once you have secured the dust
cover with the anti-theft device, the
dust cover can be removed only by
using force. This can cause damage
to the dust cover (tearing) or to the
paintwork.
�
The dust cover anti-theft device will
not prevent burglary or vehicle
theft.
Warning!
G
This vehicle has not been designed to
accommodate any type of roof or trunk lid
rack. Therefore do not fit such accessories.
Otherwise the rack could fall off and cause
serious personal injury.!Do not use any type of roof or trunk lid
rack. Otherwise you will damage the
bodywork or paintwork of your SLR.
Page 227 of 417
OperationThe first 1000 miles (1500 km)
Driving instructions
At the gas station
Engine compartment
Trunk
Tires and wheels
Winter driving
Maintenance
Vehicle care


Driving instructions
At the gas station
Engine compartment
Trunk
Tires and wheels
Winter driving
Maintenance
Vehicle care")