Page 205 of 417

204 Controls in detailUseful features
You can take and place telephone calls us-
ing the í and ì buttons on the
steering wheel. To carry out other tele-
phone functions, use the control system
(�page 138).
See separate instruction manual for in-
structions on how to operate the tele-
phone.Removing the cellular phone from the
cellular phone cradle
1Release button
2Remove the cellular phone
�
Press the release button1 and re-
move the cellular phone in direction of
arrow 2 from the cellular phone
cradle.
Warning!
G
Please do not forget that your primary re-
sponsibility is to drive the vehicle. A driver’s
attention to the road must always be
his/her primary focus when driving. For
your safety and the safety of others, we rec-
ommend that you pull over to a safe location
and stop before placing or taking a tele-
phone call.
If you choose to use the telephone
1 while
driving, please use the hands-free device
and only use the telephone when road,
weather and traffic conditions permit. Some
jurisdictions prohibit the driver from using a
cellular telephone while driving a vehicle.
Bear in mind that at a speed of just 30 mph
(approximately 50 km/h), your vehicle is
covering a distance of 44 feet
(approximately 14 m) every second.
1Observe all legal requirements.
iFor additional information on operating
the telephone using the audio system
head unit, see “Telephone operation”
(�page 160).
iStandard Mercedes-Benz cellular
phone design shown, SLR phone de-
sign may vary.
Page 210 of 417
 or airbags have deployed.")
209 Controls in detail
Useful features
Emergency calls
An emergency call is initiated
automatically following an accident in
which the emergency tensioning devices
(ETDs) or airbags have deployed.
An emergency call can also be initiated
manually by opening the cover next to the
inside rear view mirror labeled SOS, then
briefly pressing the button located under
the cover.
For more information, see “Initiating an
emergency call manually” (
�page 210).Once the emergency call is in progress, the
indicator lamp in the SOS button will begin
to flash. The message
Connecting call
appears in the multifunction display. When
the connection is established, the mes-
sage
Call connected
appears in the multi-
function display. All information relevant to
the emergency, such as the location of the
vehicle (determined by the GPS satellite lo-
cation system), vehicle model, identifica-
tion number and color are generated.
A voice connection between the Response
Center and the occupants of the vehicle
will be established automatically soon af-
ter the emergency call has been initiated.
The Response Center will attempt to deter-
mine more precisely the nature of the acci-
dent provided they can speak to an
occupant of the vehicle.
Warning!
G
If the indicator lamps in the SOS button, in
the Roadside Assistance button, and/or in
the Information button do not come on dur-
ing the system self-check, or if any of these
indicators remain illuminated continuously
in red and/or the message
Tele Aid -
Drive to workshop!
is displayed in the
multifunction display after the system
self-check, a malfunction in the system has
been detected.
If a malfunction is indicated as outlined
above, the system may not operate as ex-
pected. Have the system checked at the
nearest Mercedes-Benz Center as soon as
possible.
Page 211 of 417

210 Controls in detailUseful featuresThe Tele Aid system is available if�
it has been activated and is operation-
al. Activation requires a subscription
for monitoring services, connection
and cellular air time
�
the relevant cellular phone network
and GPS signals are available and pass
the information on to the Response
CenterInitiating an emergency call manually
1Cover
2SOS button
�
Briefly press on cover1.
The cover will open.
�
Press SOS button2 briefly.
The indicator lamp in SOS button2
will flash until the emergency call is
concluded.
�
Wait for a voice connection to the Re-
sponse Center.
�
Close cover1 after the emergency
call is concluded.
iLocation of the vehicle on a map is only
possible if the vehicle is able to receive
signals from the GPS satellite network
and pass the information on to the Re-
sponse Center.
Warning!
G
If the indicator lamp in the SOS button is
flashing continuously and there was no
voice connection to the Response Center
established, then the Tele Aid system could
not initiate an emergency call (e.g. the rele-
vant cellular phone network is not available).
The message
Call failed
appears in the
multifunction display for approximately
ten seconds.
Should this occur, assistance must be sum-
moned by other means.
Page 212 of 417

211 Controls in detail
Useful features
Roadside Assistance button •
The Roadside Assistance button• is
located below the center armrest cover.�
Press and hold the button (for longer
than two seconds)
A call to a Mercedes-Benz Roadside
Assistance dispatcher will be initiated.
The button will flash while the call is in
progress. The message Connecting call
will appear in the
multifunction display.
When the connection is established, the
message
Call connected
appears in the
multifunction display. The Tele Aid system
will transmit data generating the vehicle
identification number, model, color and lo-
cation (subject to availability of cellular
and GPS signals).A voice connection between the Roadside
Assistance dispatcher and the occupants
of the vehicle will be established.
�
Describe the nature of the need for as-
sistance.
The Mercedes-Benz Roadside Assistance
dispatcher will either dispatch a qualified
Mercedes-Benz technician or arrange to
tow your vehicle to the nearest authorized
Mercedes-Benz Center. For services such
as labor and/or towing, charges may ap-
ply. Refer to the Roadside Assistance Man-
ual for more information.
These programs are only available in the
USA:
�
Sign and Drive services: Services such
as jump start, a few gallons of fuel or
the replacement of a flat tire are ob-
tainable.
Warning!
G
If you feel at any way in jeopardy when in the
vehicle (e.g. smoke or fire in the vehicle, ve-
hicle in a dangerous road location), please
do not wait for voice contact after you have
pressed the emergency button. Carefully
leave the vehicle and move to a safe loca-
tion. The Response Center will automatically
contact local emergency officials with the
vehicle’s approximate location if they re-
ceive an automatic SOS signal and cannot
make voice contact with the vehicle occu-
pants.
Page 217 of 417

216 Controls in detailUseful featuresWarning!
G
Before programming the integrated remote
control to a garage door opener or gate
operator, make sure people and objects are
out of the way of the device to prevent po-
tential harm or damage. When programming
a garage door opener, the door moves up or
down. When programming a gate operator,
the gate opens or closes.
Do not use the integrated remote control
with any garage door opener that lacks
safety stop and reverse features as required
by U.S. federal safety standards (this
includes any garage door opener model
manufactured before April 1, 1982).
A garage door that cannot detect an object
- signaling the door to stop and reverse -
does not meet current U.S. federal safety
standards.
iCertain types of garage door openers
are incompatible with the integrated
opener. If you should experience
difficulties with programming the
transmitter, contact an authorized
Mercedes-Benz Center, or call
Mercedes-Benz Customer Assistance
Center (in the USA) at
1-800-FOR-MERCedes, or Customer
Service (in Canada) at
1-888-881-6611.
iUSA only:
This device complies with Part 15 of
the FCC Rules. Operation is subject to
the following two conditions:
(1) This device may not cause harmful
interference, and
(2) this device must accept any inter-
ference received, including interfer-
ence that may cause undesired
operation.
Any unauthorized modification to this
device could void the user’s authority
to operate the equipment.
Page 222 of 417
221 Controls in detail
Useful features
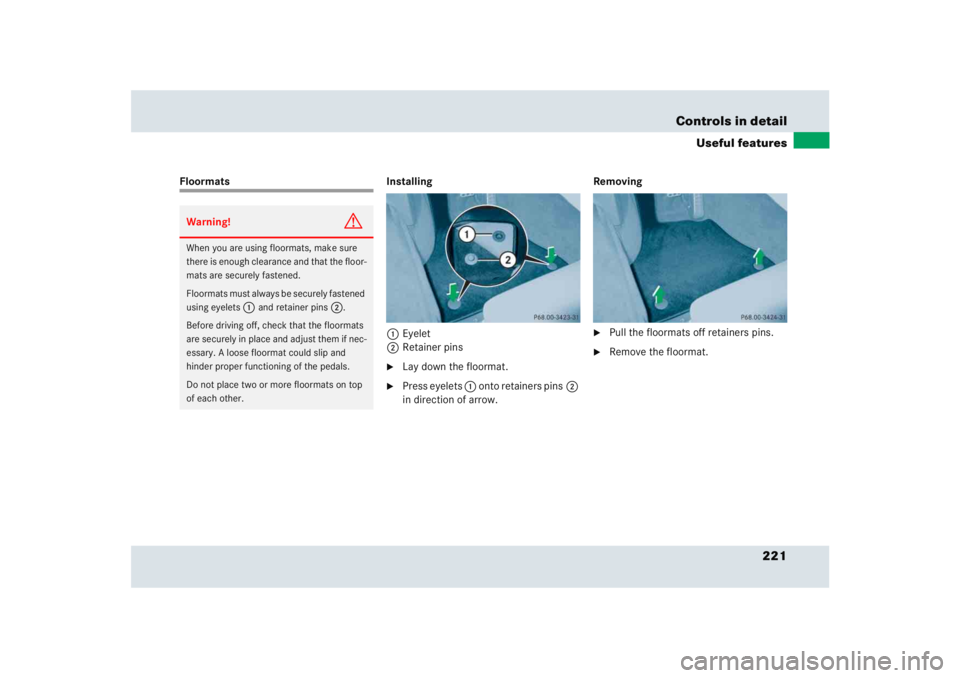
Floormats Installing
1Eyelet
2Retainer pins
�
Lay down the floormat.
�
Press eyelets 1 onto retainers pins2
in direction of arrow. Removing
�
Pull the floormats off retainers pins.
�
Remove the floormat.
Warning!
G
When you are using floormats, make sure
there is enough clearance and that the floor-
mats are securely fastened.
Floormats must always be securely fastened
using eyelets
1
and retainer pins
2
.
Before driving off, check that the floormats
are securely in place and adjust them if nec-
essary. A loose floormat could slip and
hinder proper functioning of the pedals.
Do not place two or more floormats on top
of each other.
Page 223 of 417
222 Controls in detailUseful featuresDust coverWarning!
G
Allow the engine to cool down completely
before slipping the dust cover on your vehi-
cle. Otherwise you could be seriously
burned when coming into contact with the
hot exhaust system.!To avoid damage to the vehicle and the
dust cover, observe the following:�
Use the dust cover only when the
vehicle is garaged.
�
Cover the vehicle only when the en-
gine has cooled down completely.
�
The vehicle as well as the dust cov-
er must be dry before slipping the
dust cover on the vehicle.
�
Remove the padlock that serves as
an antitheft device before slipping
the dust cover on or off
(�page 224).
�
To avoid scratches, make sure the
zip fastener and the steel cable do
not come into contact with the vehi-
cle (
�page 224).
�
Make sure the dust cover is clean
and dry before inserting it in the bag
provided with the dust cover.
iClean the dust cover according to the
care label on the inside of the dust cov-
er.
Page 226 of 417
225 Controls in detail
Useful features
Roof and trunk lid racks
!To avoid damage to the vehicle and the
dust cover, observe the following:�
Once you have secured the dust
cover with the anti-theft device, the
dust cover can be removed only by
using force. This can cause damage
to the dust cover (tearing) or to the
paintwork.
�
The dust cover anti-theft device will
not prevent burglary or vehicle
theft.
Warning!
G
This vehicle has not been designed to
accommodate any type of roof or trunk lid
rack. Therefore do not fit such accessories.
Otherwise the rack could fall off and cause
serious personal injury.!Do not use any type of roof or trunk lid
rack. Otherwise you will damage the
bodywork or paintwork of your SLR.