Page 23 of 464
23 At a glance
Cockpit
Item
Page
1
Automatic transmission*:
Steering wheel gearshift
control*
161
SLK 55 AMG:
Steering wheel gearshift
control (Speedshift)
162
2
Multifunction steering
wheel
26,
118
3
Horn
4
Instrument cluster
24,
115
5
Overhead control panel
30,
113
6
Glove box
250
7
Center console
28, 29
8
Starter switch
35
9
Steering wheel adjustment
handle, manual
41
a
Steering wheel adjustment
lever, electrical*
41
Heated steering wheel*
(SLK 350, Canada only)
270
b
Headlamp cleaning*
switch
167
c
Hood lock release
287
d
Exterior lamp switch
52,
106
e
Combination switch�
Turn signals
52
�
Windshield wipers
53
�
High beam headlamps
52
f
Power window switches
232
g
Door handle
94
h
Cruise control lever
244
Item
Page
Page 285 of 464

285 Operation
At the gas station
�
Remove the SmartKey from the starter
switch.
�
Open fuel filler flap by pushing at point
indicated by arrow1.
The fuel filler flap springs open.
�
Turn fuel filler cap counterclockwise
and hold on to it until possible pressure
is released.
�
Take off fuel filler cap and set it in di-
rection of arrow2 in the recess on the
inside of fuel filler flap.
To prevent fuel vapors from escaping
into open air, fully insert filler nozzle
unit.
�
Only fill your tank until the filler nozzle
unit cuts out – do not top up or over-
fill.
�
Replace the fuel filler cap by turning it
clockwise until it engages audibly.
�
Close the fuel filler flap.
Check regularly and before a long tripEngine compartment (SLK 350, example)1Windshield washer system and head-
lamp cleaning system* reservoir
2Brake fluid reservoir
3Coolant expansion tank
Warning!
G
Overfilling of the fuel tank may create pres-
sure in the system which could cause a gas
discharge. This could cause the gas to spray
back out when removing the fuel pump noz-
zle, which could cause personal injury.iLeaving the engine running and the fuel
cap open can cause the yellow fuel
tank reserve warning lamp to flash and
the ? malfunction indicator lamp
(USA only) or the ± malfunction in-
dicator lamp (Canada only) to illumi-
nate.
For more information, see “Practical
hints” (
�page 344).
iFor opening the hood, see “Hood”
(�page 287).
Page 287 of 464

287 Operation
Engine compartment
�Engine compartment
Hood
Opening
The hood release is located on the driver
side under the instrument panel.
1Hood lock release lever
�
Pull hood lock release lever1 in direc-
tion of arrow.
The hood is unlocked.
2Lever for opening the hood
�
Push lever2 on the hood upward to
release hood.
�
With the hood released, lift the hood by
lifting it at the front edge.
The hood will be automatically held
open at shoulder height by gas-filled
struts.
Warning!
G
Do not pull the release lever while the vehi-
cle is in motion. Otherwise the hood could
be forced open by passing air flow.
!To avoid damage to the windshield
wipers or hood, never open the hood if
the wiper arms are folded forward away
from the windshield.
Warning!
G
To help prevent personal injury, stay clear of
moving parts when the hood is open and the
engine is running. Make sure the hood is
properly closed before driving. When closing
the hood, use extreme caution not to catch
hands or fingers.
The radiator fan may continue to run for ap-
proximately 30 seconds or even restart af-
ter the engine has been turned off. Stay
clear of fan blades.
��
Page 338 of 464

338 OperationVehicle care�
Clean the wiper blade inserts with a
clean cloth and detergent solution.Window cleaning
�
Switch on wipers and place them in a
vertical position.
For information on placing the wipers
in a vertical position, see “Replacing
wiper blades” (
�page 386).
�
Use a window cleaning solution on all
glass surfaces.
An automotive glass cleaner is recom-
mended.
Warning!
G
For safety reasons, switch off wipers and re-
move SmartKey from starter switch before
cleaning the wiper blades. Otherwise, the
wiper motor could suddenly turn on and
cause injury.!Fold the windshield wipers back onto
the windshield before turning the
SmartKey in the starter switch.
Hold on to the wiper when folding the
windshield wiper back. If released, the
force of the impact from the tensioning
spring could crack the windshield.
!The windshield wipers must be in a ver-
tical position before folding them away
from the windshield. They could other-
wise damage the hood.Warning!
G
For safety reasons, switch off wipers and re-
move SmartKey from starter switch before
cleaning the wiper blade. Otherwise, the
wiper motor could suddenly turn on and
cause injury.
!Fold the windshield wipers back onto
the windshield before turning the
SmartKey in the starter switch.
Hold on to the wiper when folding the
windshield wiper back. If released, the
force of the impact from the tensioning
spring could crack the windshield.!Fold the windshield wiper arms back
onto the windshield before turning the
SmartKey in the starter switch.
Hold onto the wiper when folding the
wiper arm back. If released, the force
of the impact from the tensioning
spring could crack the windshield.
��
Page 344 of 464

(Canada only)
The yellow engine
malfunction indicator
lamp comes on while
driving.
There is a malfuncti")
344 Practical hintsWhat to do if …Problem
Possible cause
Suggested solution
?
±
(USA only)
(Canada only)
The yellow engine
malfunction indicator
lamp comes on while
driving.
There is a malfunction in:�
the fuel management system
�
the ignition system
�
the emission control system
�
systems which affect emissions
Such malfunctions may result in ex-
cessive emissions values and may
switch the engine to its limp-home
(emergency operation) mode.
�
Have the vehicle checked as soon as possible
by an authorized Mercedes-Benz Center.
An on-board diagnostic connector is used by
the service station to link the vehicle to the
shop diagnostics system. It allows the accu-
rate identification of system malfunctions
through the readout of diagnostic trouble
codes. It is located in the front left area of the
footwell near the hood release.
Your fuel tank is empty.
�
After refueling start, turn off and restart the
engine three or four times in succession.
The limp-home mode is canceled. You do not
need to have your vehicle checked.
Additionally you see
the message
Check
gas cap
See Operator’s
Manual
in the multi-
function display.
A loss of pressure has been detect-
ed in the fuel system. The fuel cap
may not be closed properly or the
fuel system may be leaking.
�
Check the fuel cap (
�page 284).
If it is not closed properly:
�
Close the fuel cap.
If it is closed properly:
�
Have the fuel system checked by an autho-
rized Mercedes-Benz Center.
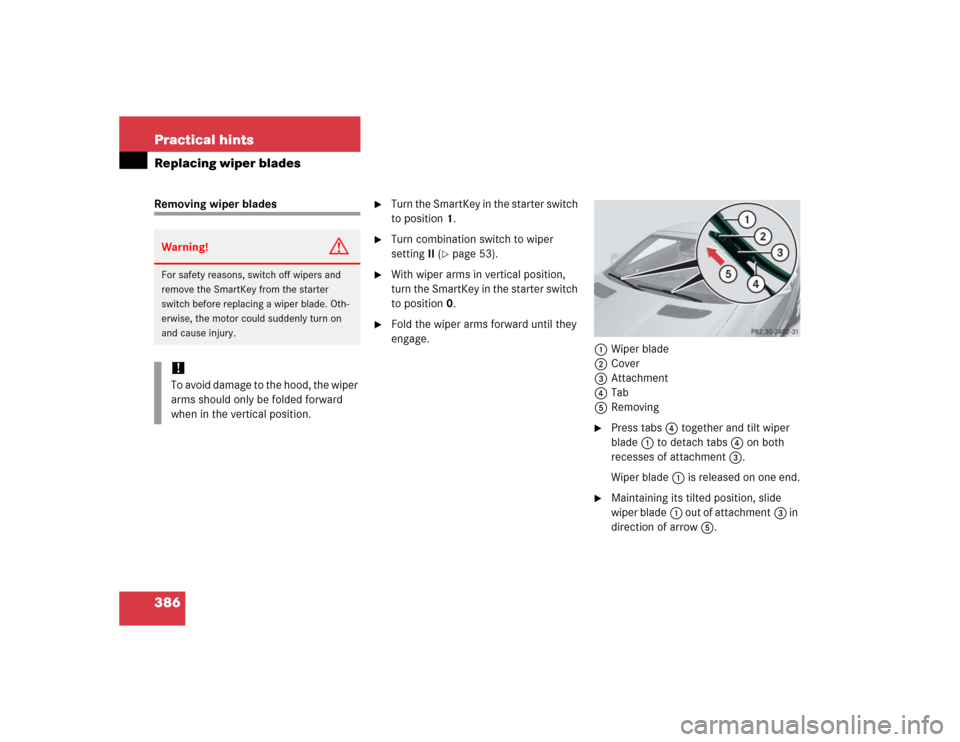
Page 386 of 464
386 Practical hintsReplacing wiper bladesRemoving wiper blades
�
Turn the SmartKey in the starter switch
to position1.
�
Turn combination switch to wiper
settingII (
�page 53).
�
With wiper arms in vertical position,
turn the SmartKey in the starter switch
to position0.
�
Fold the wiper arms forward until they
engage.
1Wiper blade
2Cover
3Attachment
4Tab
5Removing
�
Press tabs4 together and tilt wiper
blade1 to detach tabs4 on both
recesses of attachment3.
Wiper blade1 is released on one end.
�
Maintaining its tilted position, slide
wiper blade1 out of attachment3 in
direction of arrow5.
Warning!
G
For safety reasons, switch off wipers and
remove the SmartKey from the starter
switch before replacing a wiper blade. Oth-
erwise, the motor could suddenly turn on
and cause injury.!To avoid damage to the hood, the wiper
arms should only be folded forward
when in the vertical position.
Page 387 of 464

387 Practical hints
Replacing wiper blades
Installing wiper blades
1Installing
2Tabs
3Attachment
4Guide tab
5Cover
�
Slide the wiper blade into
attachment3 in direction of
arrow1.
�
Make sure guide tab4 will be placed
under cover5 when fully inserting the
wiper blade into attachment3.
�
Let tabs2 latch in into both recesses
of attachment3.
�
Check if the wiper blade is securely
fastened.
�
Fold the wiper arm backward to rest on
the windshield.
Make sure you hold on to the wiper arm
when folding it back.
!Never open the hood when the wiper
arms are folded forward.
Hold on to the wiper when folding the
wiper arm back. If released, the force
of the impact from the tensioning
spring could crack the windshield.
Do not allow the wiper arms to contact
the windshield glass without a wiper
blade inserted.
Make sure the wiper blades are proper-
ly installed. Improperly installed wiper
blades may cause windshield damage.
For your convenience, you should have
this work carried out by an authorized
Mercedes-Benz Center.
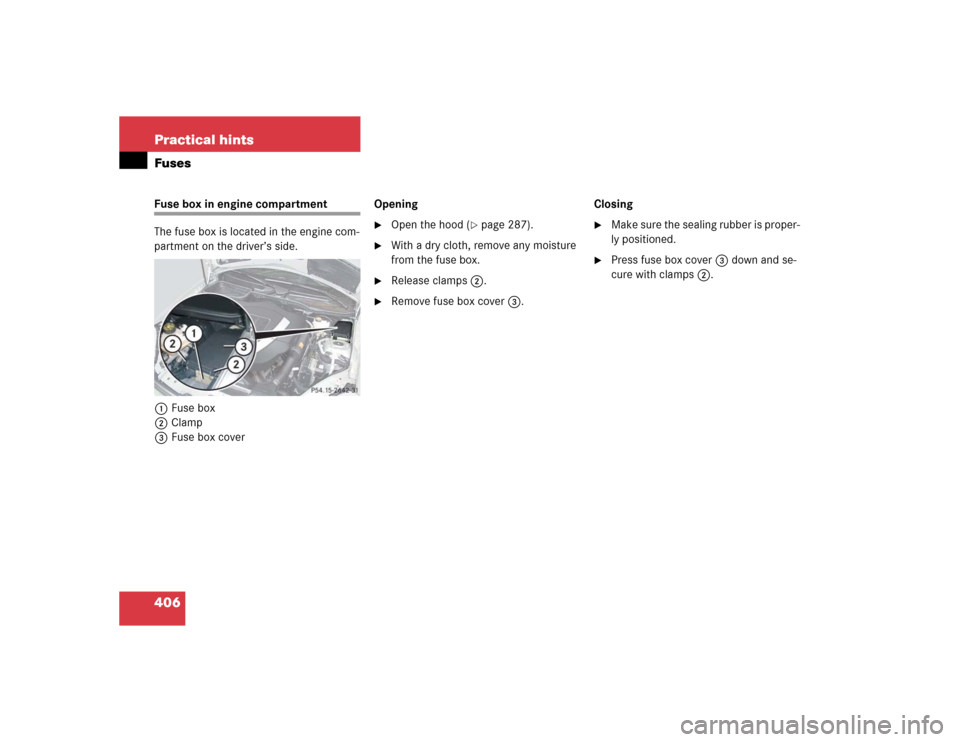
Page 406 of 464
406 Practical hintsFusesFuse box in engine compartment
The fuse box is located in the engine com-
partment on the driver’s side.
1Fuse box
2Clamp
3Fuse box coverOpening
�
Open the hood (
�page 287).
�
With a dry cloth, remove any moisture
from the fuse box.
�
Release clamps2.
�
Remove fuse box cover3.Closing
�
Make sure the sealing rubber is proper-
ly positioned.
�
Press fuse box cover3 down and se-
cure with clamps2.

162
2
Multifunction steering
wheel
26,
11")