Page 354 of 464

354 Practical hintsWhat to do if …Display messages
Possible cause
Possible solution
Run Flat Indicator
inactive
The Run Flat Indicator is malfunc-
tioning.
�
Have the Run Flat Indicator checked by an autho-
rized Mercedes-Benz Center.
Low pressure mode
Check tires
max. Speed 50 mph(Canada:max. Speed 80 km/h
)
The pressure is too low in one or
more tires.
�
Carefully bring the vehicle to a halt, avoiding
abrupt steering and braking maneuvers. Observe
the traffic situation around you.
�
Check and adjust the tire inflation pressure as re-
quired (
�page 308).
�
If necessary, change the wheel (
�page 388).
�
Reactivate the Run Flat Indicator after adjusting
the tire inflation pressure values (
�page 284).
Check tires
Then reactivate
Run Flat Indicator
There was a warning message about
a loss in tire inflation pressure and
the Run Flat Indicator has not been
reactivated yet.
�
Make sure that the correct tire inflation pressure
is set for each tire.
�
Then reactivate the Run Flat Indicator.
Run Flat Indicator
unavailable
The Run Flat Indicator has been
switched off due to an error.
�
Have the Run Flat Indicator checked by an autho-
rized Mercedes-Benz Center.
Warning!
G
Do not drive with a flat tire. A flat tire affects
the ability to steer or brake the vehicle.
You may lose control of the vehicle. Contin-
ued driving with a flat tire will cause exces-
sive heat build-up and possibly a fire.
Page 372 of 464

372 Practical hintsWhere will I find...?Storing the spare wheel with
collapsible tire
If you wish to store the spare wheel after
use, carry out the following steps. Other-
wise the spare wheel will not fit the storage
compartment.�
Unscrew the valve cap from the valve
of the collapsible tire.
�
Take the valve extractor from the vehi-
cle tool kit (
�page 369).
�
Unscrew the valve insert from the valve
and allow the air to escape.
�
Screw the valve insert back into the
valve.
�
Screw the valve cap back on the valve.
�
Pull the protective wrap provided with
the vehicle tool kit over the spare
wheel.
�
Store the spare wheel and the valve ex-
tractor in the storage compartment un-
derneath the trunk floor.
�
Pierce the protective wrap with retain-
ing screw3.
�
Secure the spare wheel by turning re-
taining screw3 clockwise.
!Make sure the collapsible tire is dry
when storing it.iIt may take a few minutes for the col-
lapsible tire to deflate completely.
Warning!
G
The dimensions of the spare wheel with col-
lapsible tire are different from those of the
road wheels. As a result, the vehicle han-
dling characteristics change when driving
with a spare wheel with collapsible tire
mounted.
The spare wheel with collapsible tire should
only be used temporarily, and should be re-
placed with a regular road wheel as quickly
as possible.
Page 373 of 464
373 Practical hints
Where will I find...?
In the case of a flat tire, you may
temporarily use the spare wheel with col-
lapsible tire when observing the following
restrictions:�
Do not exceed a vehicle speed of
50 mph (80 km/h).
�
Drive to the nearest tire repair facility
to have the flat tire repaired or
replaced as appropriate.
�
Do not operate vehicle with more than
one spare wheel with collapsible tire
mounted.
For more information, see “Rims and tires”
(
�page 413).
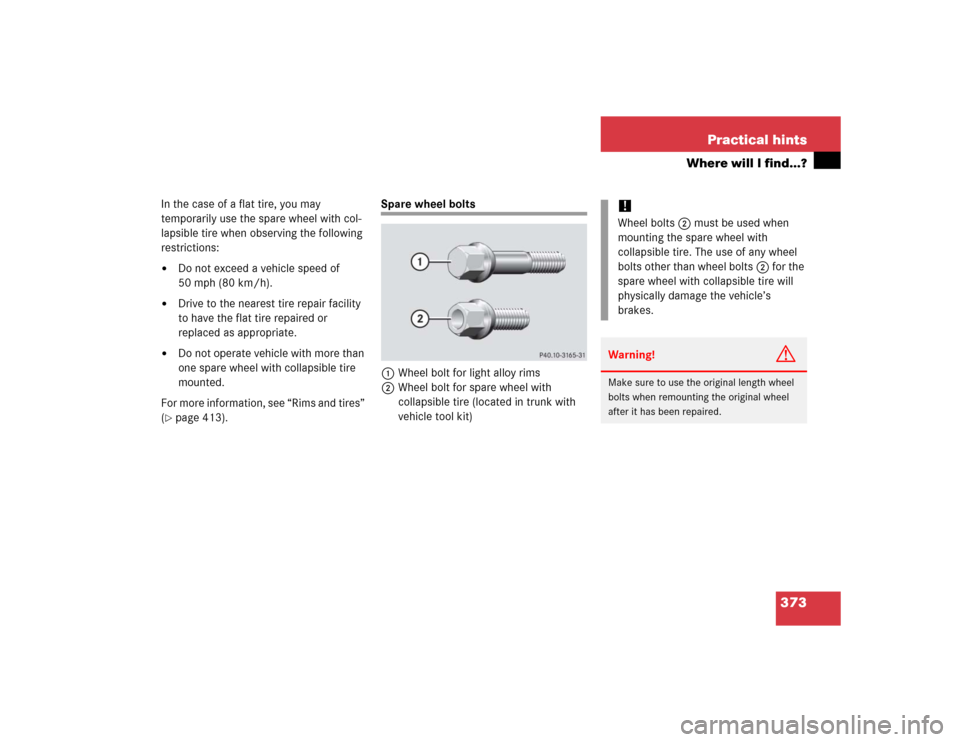
Spare wheel bolts
1Wheel bolt for light alloy rims
2Wheel bolt for spare wheel with
collapsible tire (located in trunk with
vehicle tool kit)
!Wheel bolts2 must be used when
mounting the spare wheel with
collapsible tire. The use of any wheel
bolts other than wheel bolts2 for the
spare wheel with collapsible tire will
physically damage the vehicle’s
brakes. Warning!
G
Make sure to use the original length wheel
bolts when remounting the original wheel
after it has been repaired.
Page 389 of 464
.
�
Take the collapsible tire, wheel wrench,
wheel bolts, jack, and electric air pump
out of the trun")
389 Practical hints
Flat tire
Preparing the vehicle
Prepare the vehicle as described
(�page 388).
�
Take the collapsible tire, wheel wrench,
wheel bolts, jack, and electric air pump
out of the trunk (
�page 369).Lifting the vehicle
�
Prevent the vehicle from rolling away
by blocking wheels with wheel chocks
(not included) or other sizeable ob-
jects.
One wheel chock is included with the
vehicle tool kit (
�page 369).
When changing wheel on a level sur-
face:
�
Place the wheel chock in front of
and another sizable object behind
the wheel that is diagonally oppo-
site to the wheel being changed.
When changing wheel on a hill:
�
Place the wheel chock and another
sizable object on the downhill side
blocking both wheels of the other
axle.
Warning!
G
The jack is designed exclusively for jacking
up the vehicle at the jack take-up brackets
built into either side of the vehicle. To help
avoid personal injury, use the jack only to lift
the vehicle during a wheel change. Never
get beneath the vehicle while it is supported
by the jack. Keep hands and feet away from
the area under the lifted vehicle. Always
firmly set parking brake and block wheels
before raising vehicle with jack.
Do not disengage parking brake while the
vehicle is raised. Be certain that the jack is
always vertical (plumb line) when in use, es-
pecially on hills. Always try to use the jack
on level surface. Be sure the jack arm is fully
seated in the jack take-up bracket. Always
lower the vehicle onto sufficient capacity
jackstands before working under the vehi-
cle.
Page 391 of 464
391 Practical hints
Flat tire
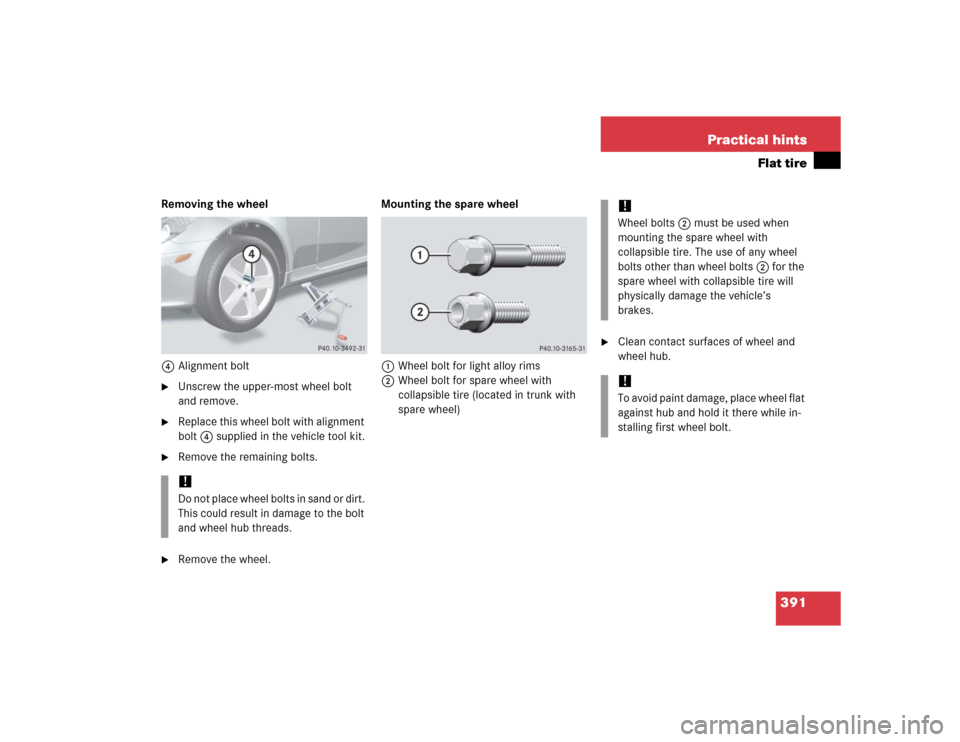
Removing the wheel
4Alignment bolt�
Unscrew the upper-most wheel bolt
and remove.
�
Replace this wheel bolt with alignment
bolt4 supplied in the vehicle tool kit.
�
Remove the remaining bolts.
�
Remove the wheel.Mounting the spare wheel
1Wheel bolt for light alloy rims
2Wheel bolt for spare wheel with
collapsible tire (located in trunk with
spare wheel)
�
Clean contact surfaces of wheel and
wheel hub.
!Do not place wheel bolts in sand or dirt.
This could result in damage to the bolt
and wheel hub threads.
!Wheel bolts2 must be used when
mounting the spare wheel with
collapsible tire. The use of any wheel
bolts other than wheel bolts2 for the
spare wheel with collapsible tire will
physically damage the vehicle’s
brakes. !To avoid paint damage, place wheel flat
against hub and hold it there while in-
stalling first wheel bolt.
Page 393 of 464
393 Practical hints
Flat tire
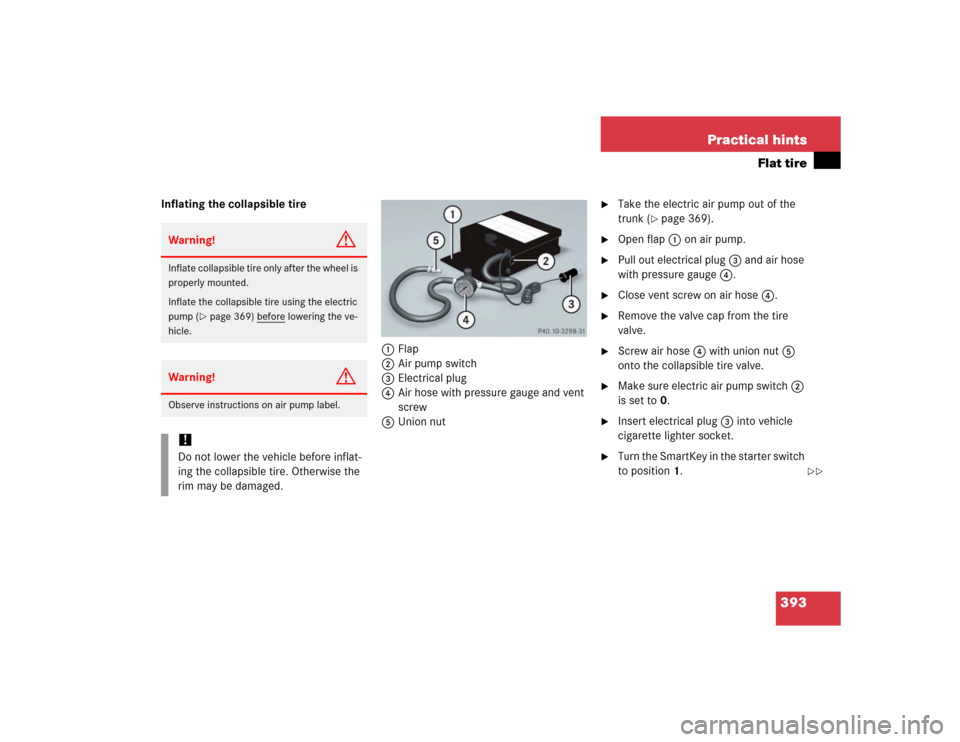
Inflating the collapsible tire
1Flap
2Air pump switch
3Electrical plug
4Air hose with pressure gauge and vent
screw
5Union nut
�
Take the electric air pump out of the
trunk (
�page 369).
�
Open flap1 on air pump.
�
Pull out electrical plug3 and air hose
with pressure gauge4.
�
Close vent screw on air hose4.
�
Remove the valve cap from the tire
valve.
�
Screw air hose4 with union nut5
onto the collapsible tire valve.
�
Make sure electric air pump switch2
is set to0.
�
Insert electrical plug3 into vehicle
cigarette lighter socket.
�
Turn the SmartKey in the starter switch
to position1.
Warning!
G
Inflate collapsible tire only after the wheel is
properly mounted.
Inflate the collapsible tire using the electric
pump (
�page 369) before
lowering the ve-
hicle.
Warning!
G
Observe instructions on air pump label.!Do not lower the vehicle before inflat-
ing the collapsible tire. Otherwise the
rim may be damaged.
��
Page 394 of 464

394 Practical hintsFlat tire�
PressI on electric air pump switch2.
The electric air pump switches on and
inflates the collapsible tire.
�
Inflate the collapsible tire to approxi-
mately 51 psi (3.5 bar).
This takes about five minutes for the
collapsible tire. Air hose4 and union
nut5 can become hot during infla-
tion. Exercise proper caution to avoid
burning yourself when using the equip-
ment.
�
Press0 on electric air pump switch2.
�
Turn the SmartKey in the starter switch
to position0.
The electric air pump should now be
switched off.
�
If the tire inflation pressure is above
51 psi (3.5 bar), release excess tire in-
flation pressure using the vent screw
on air hose4.
�
Detach the electric air pump.
�
Reinstall collapsible tire valve cap.
�
Store electrical plug3 and air
hose4 behind flap 1 and place the
electric air pump back in the trunk.
!Do not operate the electric air pump
longer than six minutes without inter-
ruption. Otherwise it may overheat.
You may operate the electric air pump
again after it has cooled off.
Warning!
G
Follow recommended tire inflation
pressures.
Do not underinflate tires. Underinflated tires
wear excessively and / or unevenly,
adversely affect handling and fuel economy,
and are more likely to fail from being over-
heated.
Do not overinflate tires. Overinflated tires
can adversely affect handling and ride
comfort, wear unevenly, increase stopping
distance, and result in sudden deflation
(blowout) because they are more likely to
become punctured or damaged by road
debris, potholes etc.
��
Page 395 of 464

395 Practical hints
Flat tire
Lowering the vehicle�
Lower vehicle by turning the crank
counterclockwise until vehicle is rest-
ing fully on its own weight.
�
Remove the jack.
1-5 Wheel bolts
�
Tighten the five wheel bolts evenly in
the direction of the arrow, following the
diagonal sequence illustrated
(1to5), until all bolts are tight.
Observe a tightening torque of
80 lb-ft (110 Nm).
�
Fully collapse the jack.
�
Place the vehicle tool kit, electric air
pump, and the jack back in the storage
compartment under the trunk floor.
�
Wrap the damaged wheel in the protec-
tive sheet provided with the spare
wheel and put the wheel in the trunk.
Warning!
G
Inflate the collapsible tire using the electric
pump (
�page 393) before
lowering the ve-
hicle.
Warning!
G
Have the tightening torque checked after
changing a wheel. The wheels could come
loose if they are not tightened to a torque of
80 lb-ft (110 Nm).iThe flat tire may be transported in the
trunk when the retractable hardtop is
closed.