Page 286 of 464

286 OperationAt the gas stationWindshield washer system and head-
lamp cleaning system*
For information on refilling the reservoir,
see “Windshield washer system and head-
lamp cleaning system*” (
�page 295).
Brake fluid
For information on brake fluid, see “Fuels,
coolants, lubricants, etc.” (�page 422).Coolant
For normal replenishing, use water (pota-
ble water quality).
For more information on coolant, see
“Coolant” (
�page 293) and “Fuels, cool-
ants, lubricants, etc.” (
�page 422).
Engine oil level
For information on engine oil, see “Engine
oil” (
�page 288).Vehicle lighting
Check function and cleanliness.
For more information on vehicle lighting,
see “Replacing bulbs” (
�page 380).
For information on switching on the exteri-
or lighting, see “Exterior lamp switch”
(
�page 106).
Tire inflation pressure
For information on tire inflation pressure,
see “Important notes on tire inflation
pressure” (
�page 307).
!If you find that the brake fluid in the
brake fluid reservoir has fallen to the
minimum mark or below, have the
brake system checked for brake pad
thickness and leaks immediately. Noti-
fy an authorized Mercedes-Benz Center
immediately. Do not add brake fluid as
this will not solve the problem.
For more information, see “Practical
hints” (
�page 343).
Page 363 of 464
363 Practical hints
What to do if …
Display symbol
Display message
Possible cause
Possible solution
.
3rd brake light
The high mounted brake lamp is
malfunctioning. This message will
only appear if a critical number of
LEDs have stopped working.
�
Visit an authorized Mercedes-Benz Center
as soon as possible.
Tail lamp / brake lamp
left
Back-up lamp on
The left tail lamp/brake lamp is
malfunctioning. This message will
only appear if a critical number of
LEDs have stopped working.
A backup bulb has been brought
into use.
�
Visit an authorized Mercedes-Benz Center
as soon as possible.
Tail lamp / brake lamp
right
Back-up lamp on
The right tail lamp/brake lamp is
malfunctioning. This message will
only appear if a critical number of
LEDs have stopped working.
A backup bulb has been brought
into use.
�
Visit an authorized Mercedes-Benz Center
as soon as possible.
Brake lamp
Visit workshop
Brake lamp illumination is delayed
or lamp is permanently on.
�
Visit an authorized Mercedes-Benz Center
as soon as possible.
Front foglamp, L
The left front fog lamp is malfunc-
tioning.
�
Visit an authorized Mercedes-Benz Center
as soon as possible.
Front foglamp, R
The right front foglamp is malfunc-
tioning.
�
Visit an authorized Mercedes-Benz Center
as soon as possible.
Page 373 of 464
373 Practical hints
Where will I find...?
In the case of a flat tire, you may
temporarily use the spare wheel with col-
lapsible tire when observing the following
restrictions:�
Do not exceed a vehicle speed of
50 mph (80 km/h).
�
Drive to the nearest tire repair facility
to have the flat tire repaired or
replaced as appropriate.
�
Do not operate vehicle with more than
one spare wheel with collapsible tire
mounted.
For more information, see “Rims and tires”
(
�page 413).
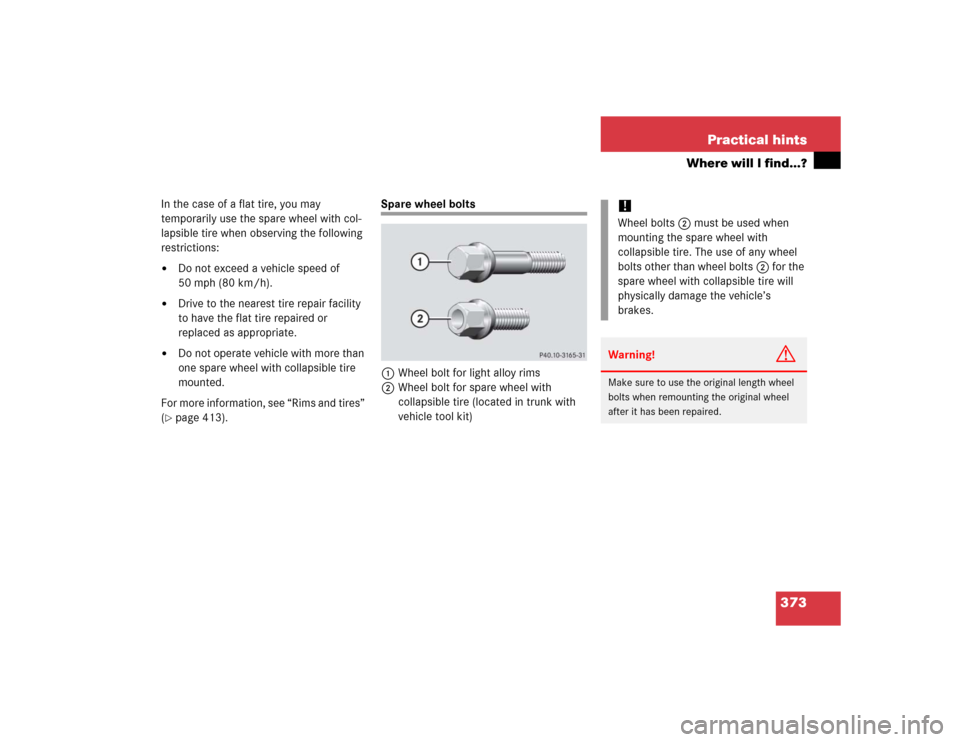
Spare wheel bolts
1Wheel bolt for light alloy rims
2Wheel bolt for spare wheel with
collapsible tire (located in trunk with
vehicle tool kit)
!Wheel bolts2 must be used when
mounting the spare wheel with
collapsible tire. The use of any wheel
bolts other than wheel bolts2 for the
spare wheel with collapsible tire will
physically damage the vehicle’s
brakes. Warning!
G
Make sure to use the original length wheel
bolts when remounting the original wheel
after it has been repaired.
Page 382 of 464

382 Practical hintsReplacing bulbsNotes on bulb replacement�
Only use 12-volt bulbs of the same type
and with the specified watt rating.
�
Switch lights off before changing a bulb
to prevent short circuits.
�
Always use a clean lint-free cloth when
handling bulbs.
�
Your hands should be dry and free of oil
and grease.
�
If the newly installed bulb does not
come on, visit an authorized
Mercedes-Benz Center.Have the LEDs and bulbs for the following
lamps replaced by an authorized
Mercedes-Benz Center:
�
Additional turn signal lamps in the
exterior rear view mirrors
�
Bi-Xenon* lamps
�
Front fog lamps
�
High mounted brake lamp
�
Brake lamps
�
Front and rear side marker lamps
�
Parking/standing lamps in the tail
lamp assemblies
Replacing bulbs for front lamps
Before you start to replace a bulb for a
front lamp, do the following first:�
Turn the exterior lamp switch to
positionM (
�page 106).
�
Open the hood (
�page 287) (except
for side marker lamps).
iHave the headlamp adjustment
checked regularly.
Page 391 of 464
391 Practical hints
Flat tire
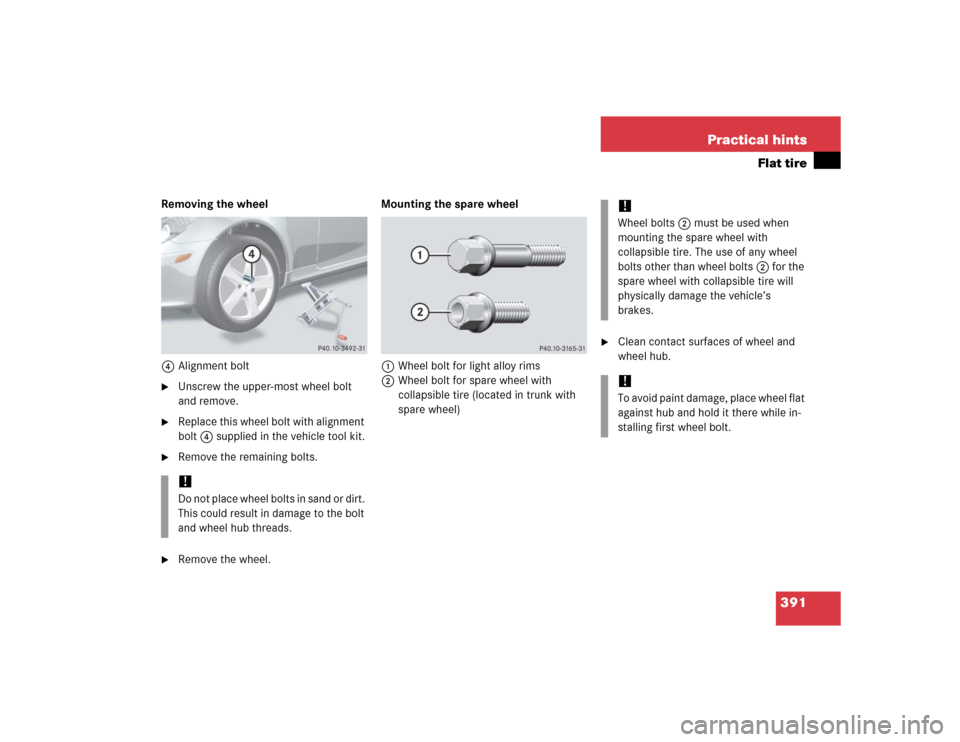
Removing the wheel
4Alignment bolt�
Unscrew the upper-most wheel bolt
and remove.
�
Replace this wheel bolt with alignment
bolt4 supplied in the vehicle tool kit.
�
Remove the remaining bolts.
�
Remove the wheel.Mounting the spare wheel
1Wheel bolt for light alloy rims
2Wheel bolt for spare wheel with
collapsible tire (located in trunk with
spare wheel)
�
Clean contact surfaces of wheel and
wheel hub.
!Do not place wheel bolts in sand or dirt.
This could result in damage to the bolt
and wheel hub threads.
!Wheel bolts2 must be used when
mounting the spare wheel with
collapsible tire. The use of any wheel
bolts other than wheel bolts2 for the
spare wheel with collapsible tire will
physically damage the vehicle’s
brakes. !To avoid paint damage, place wheel flat
against hub and hold it there while in-
stalling first wheel bolt.
Page 400 of 464
400 Practical hintsJump starting�
Make sure the two vehicles do not
touch.
�
Switch off all electrical consumers.
�
Apply parking brake.
�
Shift gear selector lever* to positionP
(manual transmission to Neutral).
�
Open the hood (
�page 287).
�
Remove the cover from positive under
hood terminal2 in front of discharged
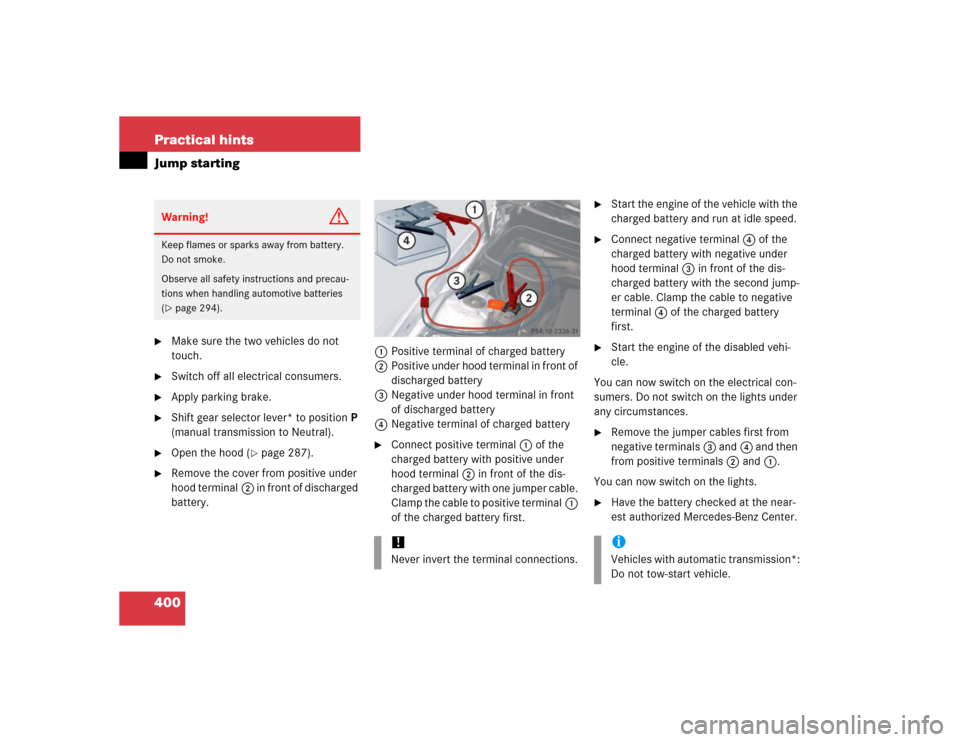
battery.1Positive terminal of charged battery
2Positive under hood terminal in front of
discharged battery
3Negative under hood terminal in front
of discharged battery
4Negative terminal of charged battery
�
Connect positive terminal1 of the
charged battery with positive under
hood terminal2 in front of the dis-
charged battery with one jumper cable.
Clamp the cable to positive terminal1
of the charged battery first.
�
Start the engine of the vehicle with the
charged battery and run at idle speed.
�
Connect negative terminal4 of the
charged battery with negative under
hood terminal3 in front of the dis-
charged battery with the second jump-
er cable. Clamp the cable to negative
terminal4 of the charged battery
first.
�
Start the engine of the disabled vehi-
cle.
You can now switch on the electrical con-
sumers. Do not switch on the lights under
any circumstances.
�
Remove the jumper cables first from
negative terminals3 and4 and then
from positive terminals2 and1.
You can now switch on the lights.
�
Have the battery checked at the near-
est authorized Mercedes-Benz Center.
Warning!
G
Keep flames or sparks away from battery.
Do not smoke.
Observe all safety instructions and precau-
tions when handling automotive batteries
(�page 294).
!Never invert the terminal connections.
iVehicles with automatic transmission*:
Do not tow-start vehicle.
Page 431 of 464

431 Technical terms
ABS
(A
ntilock B
rake S
ystem)
Prevents the wheels from locking up
during braking so that the vehicle can
continue to be steered.
Accessory weight
(
�page 323)
Air pressure
(�page 323)
AIRSCARF neck-level heating
AIRSCARF neck-level heating provides
the surrounding area of the occupants’
necks with a heated air stream flowing
from openings in the head restraints.
Alignment bolt
Metal pin with thread. The centering
pin is an aid used when changing a tire
to align the wheel with the wheel hub.
Aspect ratio
(�page 323)BabySmart
TM1
air bag deactivation
system
This system detects if a special
system-compatible child restraint seat
is installed on the passenger seat.
The system will automatically
deactivate the passenger front air bag
when such a seat is properly installed
(the 75indicator lamp
located in the center console comes
on).
BabySmart
TM
compatible child seats
Special restraint system for children.
The sensor system for the passenger
seat prevents deployment of the pas-
senger front air bag if a BabySmart
TM
compatible child seat is installed. See
an authorized Mercedes-Benz Center
for availability.
Bar
(
�page 323)BAS
(B
rake A
ssist S
ystem)
System for potentially reducing braking
distances in emergency braking situa-
tions. The system is activated when it
senses an emergency based on how
fast the brake is applied.
Bead
(
�page 323)
Bi-Xenon headlamps
Headlamps which use an electric arc as
the light source and produce a more in-
tense light than filament headlamps.
Bi-Xenon headlamps produce low
beam and high beam.
CAC
(Customer A
ssistance C
enter)
Mercedes-Benz customer service cen-
ter, which can help you with any ques-
tions about your vehicle and provide
assistance in the event of a break-
down.
1BabySmart
TM
is a trademark of Siemens
Automotive Corp.
Page 441 of 464

441 Index
Bi-Xenon
Description 431
Headlamps 381
Bolts
For spare wheel 373
Brake Assist System see BAS
Brakes 274
Brake fluid 286, 424
Display message 356
Salty roads 274
SLK 55 AMG 275
Warning lamp 343
Break-in period 272
Bulbs
Front/rear lamps 380
Replacing 380
Buttons (Audio system) 194C
CAC 431
California, important notice 11
CAN system, description 432
Capacities
(Fuels, coolants, lubricants, etc.) 422
Catalytic converter 282
CD
Changer 250
Player/changer, operation 125
CD changer (Audio system) 207, 209
CD operation (Audio system) 207
Center console
Lamp 347
Overview 28
Central locking
Automatic (Control system) 141
Automatic (When driving) 97
From outside (SmartKey) 59
Locking/unlocking from inside 97
Central locking/unlocking switches 98
Certification label 410
CHECK ENGINE indicator lamp 344Child safety
Air bags 64
Children in the vehicle 73
Cigarette lighter 254
Cleaning tires 299
Climate control 172
Air conditioning 178
Air distribution 176
Air recirculation mode 176
Air volume 176
Control panel, overview 175
Defrosting 181
Maximum cooling 179
Rear window defroster 171
Switching on/off 175
Temperature 175
Clock 116
Cockpit
Description 432
Overview 22
Cold tire inflation pressure 323
Collapsible tire, description 432
Collapsible wheel chock 371