Page 384 of 474

382 Practical hintsReplacing bulbs
Notes on bulb replacement�
Only use 12-volt bulbs of the same type
and with the specified watt rating.
�
Switch the lights off before changing a
bulb to prevent short circuits.
�
Always use a clean lint-free cloth when
handling bulbs.
�
Your hands should be dry and free of oil
and grease.
�
If the newly installed bulb does not
come on, visit an authorized
Mercedes-Benz Center.Have the LEDs and bulbs for the following
lamps replaced by an authorized
Mercedes-Benz Center:
�
the additional turn signals in the exteri-
or rear view mirrors
�
the high mounted brake lamp
�
the brake lamps
�
the parking lamps and the side marker
lamps in the tail lamp unit
�
the rear fog lamps
�
the low beam (Xenon or Bi-Xenon*)
lamps
�
the front fog lamps
Warning!
G
Bulbs and bulb sockets can be very hot. Al-
low the lamp to cool down before changing
a bulb.
Keep bulbs out of reach of children.
Halogen lamps contain pressurized gas. A
bulb can explode if you:�
touch or move it when hot
�
drop the bulb
�
scratch the bulb
Wear eye and hand protection.
Because of high voltage in Xenon lamps, it is
dangerous to replace the bulb or repair the
lamp and its components. We recommend
that you have such work done by a qualified
technician.
iHave the headlamp adjustment
checked regularly.
Page 385 of 474

383 Practical hints
Replacing bulbs
Replacing bulbs for front lamps
Before you start to replace a bulb for a
front lamp, do the following first:�
Turn the exterior lamp switch to posi-
tion M (
�page 123).
�
Open the hood (
�page 270)
(except for side marker lamps).
1Bulb socket for turn signal lamp
2High beam headlamp cover
3Low beam headlamp cover (Xenon or
Bi-Xenon* lamp). Do not remove.4High beam bulbs
5Locking mechanism
6Parking and standing lampsFront turn signal bulb
�
Turn bulb socket 1 counterclockwise
and pull it out.
�
Push the bulb into socket 1, turn
socket 1 counterclockwise and re-
move it.
�
Insert the new bulb in socket 1, push
and turn bulb socket 1 clockwise.
�
Reinsert bulb socket 1 in lamp and
turn bulb socket 1 clockwise.
Warning!
G
Do not remove the cover for the Xenon or
Bi-Xenon* headlamp. Because of high volt-
age in Xenon and Bi-Xenon* lamps, it is dan-
gerous to replace the bulb or repair the lamp
and its components. We recommend that
you have such work done by a qualified
technician.
Page 387 of 474
385 Practical hints
Replacing bulbs
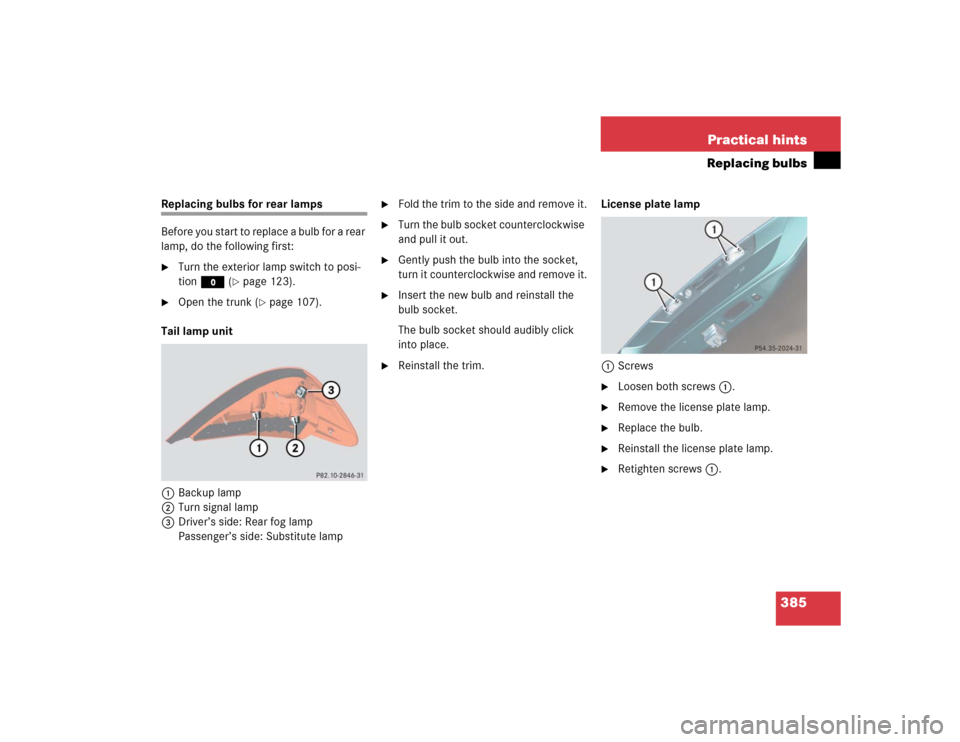
Replacing bulbs for rear lamps
Before you start to replace a bulb for a rear
lamp, do the following first:�
Turn the exterior lamp switch to posi-
tion M (
�page 123).
�
Open the trunk (
�page 107).
Tail lamp unit
1Backup lamp
2Turn signal lamp
3Driver’s side: Rear fog lamp
Passenger’s side: Substitute lamp
�
Fold the trim to the side and remove it.
�
Turn the bulb socket counterclockwise
and pull it out.
�
Gently push the bulb into the socket,
turn it counterclockwise and remove it.
�
Insert the new bulb and reinstall the
bulb socket.
The bulb socket should audibly click
into place.
�
Reinstall the trim.License plate lamp
1Screws
�
Loosen both screws 1.
�
Remove the license plate lamp.
�
Replace the bulb.
�
Reinstall the license plate lamp.
�
Retighten screws 1.
Page 411 of 474

409 Practical hints
Towing the vehicle
!
To be certain to avoid a possibility of
damage to the transmission, however,
we recommend the drive shaft be dis-
connected at the rear axle drive flange
for any towing beyond a short tow to a
nearby garage.
Warning!
G
If circumstances require towing the vehicle
with all wheels on the ground, always tow
with a tow bar if:�
the engine will not run
�
there is a malfunction in the SBC brake
system
�
there is a malfunction in the power sup-
ply or in the vehicle’s electrical system
as that will be necessary to adequately con-
trol the towed vehicle.
Prior to towing the vehicle with all wheels on
the ground, make certain that the SmartKey
is in starter switch position2.
If the SmartKey is left in starter switch
position0 for an extended period of time, it
can no longer be turned in the switch. In this
case, the steering is locked. To unlock, re-
move SmartKey from starter switch and re-
insert.
iTo signal turns while being towed with
the hazard warning flasher in use, turn
SmartKey in starter switch to
position2 and activate the combina-
tion switch for the left or right turn sig-
nal in the usual manner – only the
selected turn signal will operate.
Upon canceling the turn signal, the haz-
ard warning flasher will operate again.
Page 449 of 474

447 Index
B
BabySmart
TM airbag deactivation
system 76, 439
BabySmartTM compatible child
seats 439
Backrest supports
Lumbar region 116
Shoulder region 116
Backrest tilt 40
Backup lamp bulbs 381
Backup lamps 385
Bar 305
BAS 79, 81, 439
Batteries, SmartKey
Changing 377
Batteries, SmartKey with KEYLESS-GO*
Changing 378
Check lamp 105
Batteries, vehicle 277
Charging 404
Disconnecting 403
For electrical consumers 277, 373,
401For starter 277, 401
Messages in display 345, 346
Reconnecting 405
Removing 404
Service 401
Battery
For electrical consumers 373
Bead 305
Bi-Xenon* 439
Bi-Xenon* headlamps 439
Block heater 310
Brake fluid 269, 431, 433
Brake lamp bulb, high mounted 381
Brake lamp bulbs, left and right 381
Brake pads
Message in display 346
Brake system
Messages in display 350
Brakes 256
High-performance brake system (SL 65
AMG only) 258
Warning lamp 326Break-in period 254
Bulbs, replacing
Backup lamps 385
Brake lamps 381
Front lamps 380, 383
License plate lamps 385
Parking lamps 384
Rear fog lamp 385
Standing lamps 384
Tail lamp assemblies 385
Turn signal lamps, front 383
Turn signal lamps, rear 385
C
CAC see Customer Assistance Center
CAN System 440
Capacities
Fuels, coolants, lubricants etc. 431
Catalytic converter 265
CD player
Operating 141
Page 457 of 474

455 Index
Light sensor 361
Replacing bulbs for rear 381, 385
Switching off 123
Switching on 123
Lamps, indicator and warning
ABS 27, 325
ABS/ESP 324
AIRBAG OFF 334
Airbag Off 68
Brakes 326
CHECK ENGINE 327, 328
Coolant 328
DTR* 210
Engine diagnostics 327, 328
ESP 82
Fuel reserve 330
SBC 85
Seat belts 332
SRS 63, 332
Turn signals 25Language
Multifunction display 149
Leather upholstery
Cleaning 321
License plate lamps 153, 381
Replacing bulbs 385
Light sensor 361
Lighter see Cigarette lighter
Lighting
Instruments 131
Interior 129
Settings (control system) 152
Trunk 130
Limiting the gear range 167
Limp Home Mode 177
Load assist 235
Lowering manually 376
Loading terminology 305
Loading the vehicle 282
Lock buttons 34
Door handle (KEYLESS-GO*) 60
Trunk (KEYLESS-GO*) 104Locking 56
Automatic while driving 110
Centrally from inside 111
Fuel filler flap 267
Global (SmartKey with
KEYLESS-GO*) 102
Global (SmartKey) 96
Storage compartments 230
Vehicle in an emergency 376
Low beam headlamps 51, 123, 381
Replacing bulbs 383
Lowering
Load assist manually 376
Roll bar 74
Luggage compartment, rear 232
Luggage cover 197
Messages in display 371
Opening/closing 197
Lumbar support adjustment 115
Page 461 of 474

459 Index
Power train 442
Power window
Closing with KEYLESS-GO* 195
Power windows 193
Side windows 193
Synchronizing 195
Problems while driving 55
Production options weight 306
Program mode selector switch 443
Automatic transmission 30, 170
PSI 306
PULSE function (Massage function) 116
Q
Quick search
Phone book* 163
R
Radio
Satellite* 140
Select station 140Radio transmitters
Control and operation 264
Range (distance to empty)
Calling up 161
Reading lamp 31
Rear lamps see Tail lamps
Rear luggage compartment 232
Rear view mirrors see Mirrors
Rear window defroster 178, 189
Recommended inflation pressure 306
Redial memory 163
Refuelling 267
Regular checks 269
Regular driving style 220
Replacing
Backup lamp bulbs 385
Brake lamp bulbs 381
Bulbs 380
Front lamp bulbs 383
Front turn signal bulbs 383
Fuses 412High beam bulbs 383
License plate lamp bulbs 385
Low beam bulbs 383
Rear fog lamp bulb 385
Rear lamp bulbs 381, 385
Rear turn signal bulbs 385
Wiper blades 386
Reset button 25
Resetting
All functions (control system) 145
Fuel consumption statistics 160
Maintenance service indicator
(FSS) 314
Trip odometer 132
Residual heat utilization 190
Restraint systems 62
Airbags 62
Child seat recognition 62
Child seats 62
Emergency Tensioning Device
(ETD) 62, 72
Seat belts 62, 69
Page 468 of 474

466 IndexTurn signals 23, 52
Additional in mirrors 381
Front bulbs 381
Indicator lamps 25
Rear bulbs 381
Turning off the engine 58
U
Uniform Tire Quality Grading
Standards 307
Units
Setting speedometer units 148
Setting temperature units 148
Setting tire inflation pressure
units 156
Unlocking 34
Centrally from inside 111
Driver’s door in an emergency 374
Fuel filler flap 267
Storage compartments 231, 375
Trunk 98, 108
Trunk (KEYLESS-GO*) 105
Trunk in an emergency 375
Vehicle in an emergency 374
With the SmartKey 34With the SmartKey with
KEYLESS-GO* 35, 99
Uphill driving
Cruise control 206
Upholstery
Cleaning 321
Upshifting 166
V
Vehicle
Individual settings 144
Locking 29
Locking in an emergency 376
Minimum distance (Parktronic*) 225
Towing 408
Unlocking 29
Unlocking in an emergency 374
Vehicle capacity weight 307
Vehicle care
Cup holder 320
Gear selector lever 320
Hard plastic trim items 320Headliner 320
Leather upholstery 321
Plastic and rubber parts 321
Seat belts 320
Steering wheel 320
Upholstery 321
Wood trims 321
Vehicle level 221, 444
Changing 222
Setting 222
Vehicle level control 444
Vehicle level control switch 30
Vehicle lighting
Checking 269
Vehicle loading terminology 305
Vehicle maximum load on the tire 307
Vehicle status messages 335
Vehicle tool kit 372
Ventilation and residual heat 190
VIN (vehicle identification number) 418,
444
Voice control system* 23, 444
Hands-free microphone 31