Page 375 of 474
373 Practical hints
Where will I find ...?
Vehicles with spare wheel
1Spare wheel
2Electric air pump
3Vehicle tool kit
4Battery for electrical consumers5Jack (under spare wheel)
6Wheel wrench (under spare wheel)Vehicles with TIREFIT kit
(SL 65 AMG only)
1TIREFIT kit
2Electric air pump
3Vehicle tool kit
4Battery for electrical consumers
5Wheel wrench
6Jack
Page 379 of 474

377 Practical hints
Locking/unlocking in an emergency
�
Using the hex-socket wrench provided
in the vehicle tool kit, carefully turn the
locking screw 2 approximately one
quarter turn.
�
Hook luggage cover into holders
(�page 197).
�
Let go of the hardtop.
It should gradually lower into the trunk.
�
When top is completely lowered, return
locking screw 2 to its original posi-
tion.
�
Close the lid.
�
Replace the trunk floor.
�
Visit an authorized Mercedes-Benz
Center as soon as possible.Replacing batteries in the SmartKey/
SmartKey with KEYLESS-GO*
If the batteries in the SmartKey or the
SmartKey with KEYLESS-GO* are dis-
charged, the vehicle can no longer be
locked or unlocked. It is recommended to
have the batteries replaced at an autho-
rized Mercedes-Benz Center.
Batteries contain materials that can harm
the environment if disposed of improperly.
Recycling of batteries is the preferred
method of disposal. Many states require
sellers of batteries to accept old batteries
for recycling.SmartKey
1Mechanical key
2Battery compartment
Replacement batteries: Lithium, type
CR 2025 or equivalent.
!Do not overtighten the screw.
Warning!
G
Keep the batteries out of reach of children.
If a battery is swallowed, seek medical help
immediately.
iWhen replacing batteries, always re-
place both batteries. The required re-
placement batteries are available at
any Mercedes-Benz Center.
Page 380 of 474
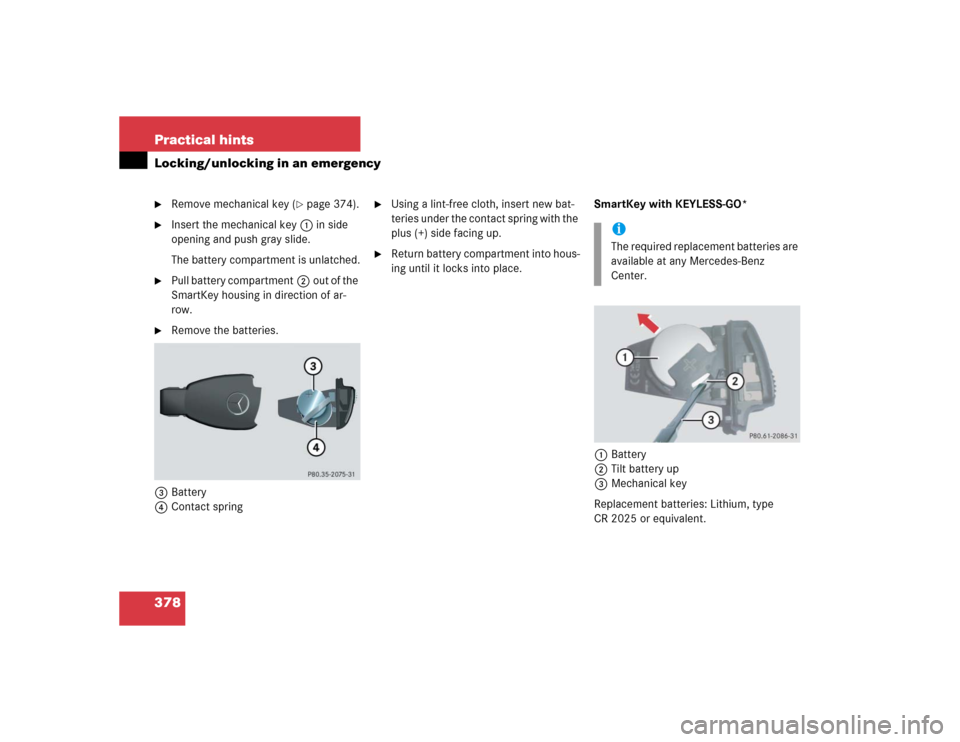
378 Practical hintsLocking/unlocking in an emergency�
Remove mechanical key (
�page 374).
�
Insert the mechanical key1in side
opening and push gray slide.
The battery compartment is unlatched.
�
Pull battery compartment2out of the
SmartKey housing in direction of ar-
row.
�
Remove the batteries.
3Battery
4Contact spring
�
Using a lint-free cloth, insert new bat-
teries under the contact spring with the
plus (+) side facing up.
�
Return battery compartment into hous-
ing until it locks into place.SmartKey with KEYLESS-GO*
1Battery
2Tilt battery up
3Mechanical key
Replacement batteries: Lithium, type
CR 2025 or equivalent.
iThe required replacement batteries are
available at any Mercedes-Benz
Center.
Page 381 of 474
379 Practical hints
Locking/unlocking in an emergency
�
Remove mechanical key (
�page 374).
�
Insert the mechanical key in side open-
ing and push gray slide.
The battery compartment is unlatched.
�
Pull the battery compartment out of the
SmartKey housing.
�
Using mechanical key3, apply pres-
sure to position 2.
Battery 1 tilts up slightly.
�
Pull battery 1 out in direction of ar-
row.
�
Using a lint-free cloth, insert new bat-
teries under the contact spring with the
plus (+) side facing up.
�
Return battery compartment into hous-
ing until it locks into place.
Page 403 of 474
.
Your vehicle is equipped with two
batteries:
�
The starter battery
�
The battery for elect")
401 Practical hints
Batteries
�Batteries
For more information on batteries, see
“Battery” (
�page 277).
Your vehicle is equipped with two
batteries:
�
The starter battery
�
The battery for electrical consumers
(consumer battery), located in the
trunk
The starter battery is located on the
right-hand side of the engine compart-
ment.
1Positive terminal
2Negative terminalThe consumer battery is located on the
right-hand side of the trunk.
3Positive terminal
4Negative terminal
!The starter battery, its filler caps, and
the vent tube must always be securely
installed when the vehicle is in opera-
tion.!The consumer battery located in the
trunk is valve-regulated lead acid
(VRLA) battery, also referred to as
“fleece” battery. Such batteries do not
require topping-up of the electrolyte
level. VRLA batteries therefore do not
have cell caps and the battery cover is
non-removable. Do not attempt to
open the consumer battery as other-
wise the battery will be damaged.
Even though VRLA batteries do not
require topping-up of the electrolyte
level and cannot be opened to check
the electrolyte level, the battery condi-
tion must be checked periodically by
performing a battery conductance test.
Refer to Maintenance Booklet for bat-
tery condition testing intervals.
As with any other battery, disconnect
the consumer battery if you do not in-
tend to operate your vehicle for an
extended period of time to prevent bat-
tery discharge. Contact an authorized
Mercedes-Benz Center for further infor-
mation.
Page 404 of 474

402 Practical hintsBatteriesWarning!
G
Failure to follow these instructions can re-
sult in severe injury or death.
Never lean over batteries while connecting,
you might get injured.
Battery fluid contains sulfuric acid. Do not
allow this fluid to come in contact with eyes,
skin or clothing. In case it does, immediately
flush affected area with water and seek
medical help if necessary.
A battery will also produce hydrogen gas,
which is flammable and explosive. Keep
flames or sparks away from battery, avoid
improper connection of jumper cables,
smoking, etc.
!Never loosen or detach battery termi-
nal clamps while the engine is running
or the SmartKey is in the starter switch.
Otherwise the alternator and other
electronic components could be se-
verely damaged.
Have the starter battery checked regu-
larly by an authorized Mercedes-Benz
Center.
Refer to Maintenance Booklet for main-
tenance intervals or contact an autho-
rized Mercedes-Benz Center for further
information.
Warning!
G
Do not place metal objects on the battery as
this could result in a short circuit.
Use leak-proof batteries only to avoid the
risk of acid burns in the event of an acci-
dent.
Page 405 of 474
.
�
Turn off the engine (
�page 58).
�
T")
403 Practical hints
Batteries
Disconnecting the batteries�
Make sure the gear selector lever is set
to position P.
�
Close the retractable hardtop
(�page 196).
�
Turn off the engine (
�page 58).
�
Turn off all electrical consumers.
�
Remove the SmartKey from the starter
switch.
or
�
Vehicles with KEYLESS-GO*: Open the
driver’s door.
�
Depress the parking brake.
�
Open the trunk.
Warning!
G
The brake system requires electrical power
to operate.
A malfunction in the vehicle’s power supply
or electrical system may impair brake sys-
tem operation and switch it into its emer-
gency operation mode. The same applies if
battery is disconnected. To brake, the driver
must then apply significantly greater brake
pedal pressure and depress the pedal much
further to obtain the expected braking ef-
fect. If necessary, apply full pressure to the
brake pedal. Brakes are only applied to the
front wheels. Stopping distance is in-
creased! Adjust your driving style according-
ly. For more information, see “SBC brake
system” (
�page 85).
Warning!
G
With a disconnected battery�
you will no longer be able to turn the
SmartKey in the starter switch and
pressing the KEYLESS-GO* start/stop
button on the gear selector lever will
have no effect
�
the gear selector lever will remain
locked in positionP
!Always disconnect the batteries in the
order described below, even if you only
want to charge the starter battery, for
example. Otherwise the vehicle’s
electronics can be damaged.
��
Page 406 of 474
.
�
Use")
404 Practical hintsBatteries�
Unhook the luggage cover in the trunk.
�
Remove the trunk floor.
The battery for electrical consumers is
located in the right hand area of the
trunk (
�page 372).
�
Use the 10 mm open-end wrench from
the vehicle tool kit to disconnect the
negative lead from negative
terminal4 of the consumer battery.
�
Open the hood (
�page 270).
�
Use the 10 mm open-end wrench from
the vehicle tool kit to disconnect the
negative lead from negative
terminal2 of the starter battery.
�
Remove the covers from the positive
terminals 1 and 3.
�
Disconnect the positive lead from pos-
itive terminal 3 of the consumer bat-
tery.
�
Disconnect the positive lead from pos-
itive terminal 1 of the starter battery.
Removing the batteries
Removing the consumer battery�
Remove the screws securing the bat-
tery in the trunk.
�
Remove the battery support and
bracket.
�
Take out the battery.
Removing the starter battery
�
Remove the screws securing the start-
er battery in the engine compartment.
�
Lift the retaining bracket.
�
Remove the battery.
Charging and reinstalling batteries�
Charge batteries in accordance with
the instructions of the battery charger
manufacturer.
�
Reinstall the charged batteries. Follow
the previously described steps in re-
verse order.Warning!
G
Never charge a battery while still installed in
the vehicle. Gases may escape during charg-
ing and cause explosions that may result in
paint damage, corrosion or personal injury.
��

6Wheel wrench (under s")