Page 325 of 474
323 Practical hints
What to do if …
Where will I find ...?
Locking/unlocking in an emergency
Replacing bulbs
Replacing wiper blades
Flat tire
Batteries
Jump starting
Towing the vehicle
Fuses
Page 350 of 474

348 Practical hintsWhat to do if …Left display
Right display
Possible cause
Possible solution
USA only:;Canada only:3
Reduced
brake effect
Visit
workshop
The SBC brake system is in emer-
gency operation mode. Consider-
able brake pedal force is required
and the stopping distance is in-
creased.
�
Continue driving with added caution.
�
Adjust driving to be consistent with reduced
braking responsiveness.
�
Visit an authorized Mercedes-Benz Center im-
mediately. Adjust driving to be consistent
with reduced braking responsiveness.
Warning!
G
Driving while these messages are displayed
can result in an accident. Have your brake
system checked immediately.
If there is a malfunction in the SBC brake
system, we recommend that the vehicle be
transported with all wheels off the ground
using flatbed or appropriate wheel lift/dolly
equipment.
A tow bar must be used if circumstances do
not permit the use of the recommended
towing methods and the vehicle requires
towing with all four wheels on the ground.
Towing the vehicle with all four wheels on
the ground is only permissible for distances
up to 30 miles (50 km) and at a speed not to
exceed 30 mph (50 km/h). For more infor-
mation, see “Towing the vehicle”
(�page 408).
If the SBC brake system enters its emergen-
cy operation mode, the driver must apply
significantly greater brake pedal pressure
and depress the pedal much further than
normal to obtain braking effect.
If necessary, apply full pressure to the brake
pedal. Brakes are only applied to the front
wheels. Stopping distance is increased!
Page 374 of 474

372 Practical hintsWhere will I find ...?First aid kit
The first aid kit is located in storage com-
partment under the passenger seat.
1Handle
2Lid�
Pull handle 1 up.
�
Fold lid 2 down.
You can now remove the first-aid kit.
Vehicle tool kit, jack, and spare wheel
The vehicle tool kit, jack, and spare wheel
are stored in the space underneath the
trunk floor.�
Lift up the trunk floor cover.
You can now remove the tools and ac-
cessories.
The vehicle tool kit includes�
One pair of universal pliers
�
Two open-end wrenches
�
One hex-socket wrench
�
One interchangeable slot/Phillips
screwdriver
�
One towing eye bolt
�
One alignment bolt
�
One fuse extractor
�
One fuse chart for the main fuse
box
�
Spare fuses
The jack is exclusively designed for lifting
the vehicle during a wheel change. Always
lower the vehicle on sufficient capacity
jack stands before working under the vehi-
cle.
iCheck expiration dates and contents
for completeness at least once a year
and replace missing/expired items.
Page 410 of 474

408 Practical hintsTowing the vehicleMercedes-Benz recommends that the vehi-
cle be transported with all wheels off the
ground using flatbed or appropriate wheel
lift/dolly equipment.When circumstances do not permit the
recommended towing methods, the vehi-
cle may be towed with all wheels on the
ground or front wheels raised only so far as
necessary to have the vehicle moved to a
safe location where the recommended
towing methods can be employed.
!Use flatbed or wheel lift/dolly equip-
ment with SmartKey in starter switch
turned to position0.
Do not tow with sling-type equipment.
Towing with sling-type equipment over
bumpy roads will damage radiator and
supports.
To prevent damage during transport,
do not tie down vehicle by its chassis or
suspension parts.
Switch off the tow-away alarm and the
automatic central locking.
!If the vehicle is towed with the front
axle raised, the engine must be shut off
(SmartKey in starter switch position0
or1). Otherwise, the ESP will immedi-
ately be engaged and will apply the rear
wheel brakes.
When towing the vehicle with all wheels
on the ground, the gear selector lever
must be in positionN and the
SmartKey must be in starter switch
position2.
When towing the vehicle with all wheels
on the ground or the front axle raised,
the vehicle may be towed only for dis-
tances up to 30 miles (50 km) and at a
speed not to exceed 30 mph
(50 km/h).
Page 411 of 474

409 Practical hints
Towing the vehicle
!
To be certain to avoid a possibility of
damage to the transmission, however,
we recommend the drive shaft be dis-
connected at the rear axle drive flange
for any towing beyond a short tow to a
nearby garage.
Warning!
G
If circumstances require towing the vehicle
with all wheels on the ground, always tow
with a tow bar if:�
the engine will not run
�
there is a malfunction in the SBC brake
system
�
there is a malfunction in the power sup-
ply or in the vehicle’s electrical system
as that will be necessary to adequately con-
trol the towed vehicle.
Prior to towing the vehicle with all wheels on
the ground, make certain that the SmartKey
is in starter switch position2.
If the SmartKey is left in starter switch
position0 for an extended period of time, it
can no longer be turned in the switch. In this
case, the steering is locked. To unlock, re-
move SmartKey from starter switch and re-
insert.
iTo signal turns while being towed with
the hazard warning flasher in use, turn
SmartKey in starter switch to
position2 and activate the combina-
tion switch for the left or right turn sig-
nal in the usual manner – only the
selected turn signal will operate.
Upon canceling the turn signal, the haz-
ard warning flasher will operate again.
Page 412 of 474

410 Practical hintsTowing the vehicleWarning!
G
The brake system requires electrical power
to operate.
A malfunction in the vehicle’s power supply
or electrical system may impair brake sys-
tem operation and switch it into its emer-
gency operation mode. To brake, the driver
must then apply significantly greater brake
pedal pressure and depress the pedal much
further to obtain the expected braking ef-
fect. If necessary, apply full pressure to the
brake pedal. Brakes are only applied to the
front wheels. Stopping distance is in-
creased! Adapt your driving style according-
ly. For more information, see “SBC brake
system” (
�page 85).
With the engine not running, there is no
power assistance for the brake and steering
systems. In this case, it is important to keep
in mind that a considerably higher degree of
effort is necessary to brake and steer the ve-
hicle. Adapt your driving accordingly.
!When towing the vehicle with all wheels
on the ground, please note the follow-
ing:
With the automatic central locking acti-
vated and the SmartKey in starter
switch position2, or KEYLESS-GO*
start/stop button in position2, the ve-
hicle doors lock if the left front wheel
as well as the right rear wheel are turn-
ing at vehicle speeds of approx. 9 mph
(15 km / h) or more.
To prevent the vehicle door locks from
locking, deactivate the automatic cen-
tral locking (
�page 110).
Towing of the vehicle should only be
done using the properly installed tow-
ing eye bolt. Never attach tow cable,
tow rope or tow rod to the vehicle chas-
sis, frame or suspension parts.
iIf the battery is disconnected or dis-
charged�
the SmartKey will not turn in the
starter switch
�
the gear selector lever will remain
locked in positionP.
For more information, see “Batteries”
(
�page 401) and
“Jump starting” (
�page 406).
Page 413 of 474
411 Practical hints
Towing the vehicle
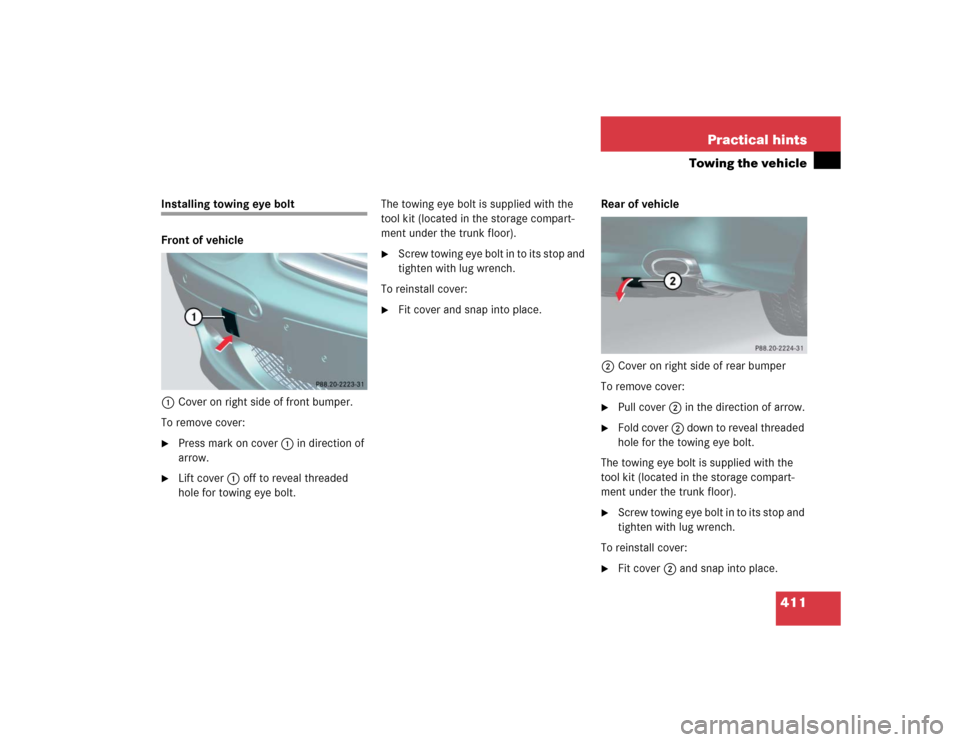
Installing towing eye bolt
Front of vehicle
1Cover on right side of front bumper.
To remove cover:�
Press mark on cover 1 in direction of
arrow.
�
Lift cover1off to reveal threaded
hole for towing eye bolt.The towing eye bolt is supplied with the
tool kit (located in the storage compart-
ment under the trunk floor).
�
Screw towing eye bolt in to its stop and
tighten with lug wrench.
To reinstall cover:
�
Fit cover and snap into place.Rear of vehicle
2Cover on right side of rear bumper
To remove cover:
�
Pull cover 2 in the direction of arrow.
�
Fold cover 2 down to reveal threaded
hole for the towing eye bolt.
The towing eye bolt is supplied with the
tool kit (located in the storage compart-
ment under the trunk floor).
�
Screw towing eye bolt in to its stop and
tighten with lug wrench.
To reinstall cover:
�
Fit cover 2 and snap into place.
Page 467 of 474

465 Index
Tire inflation pressure see the placard on
the fuel filler flap
Tire inspection 280
Tire load rating 307
Tire ply composition and material
used 307
Tire speed rating 261, 297, 307, 444
Tire terminology 305
Tire traction 261
TIREFIT
Instructions for use 388
TIREFIT kit 373, 388
Tires 279
Direction of rotation 282
Driving instructions 259
Messages in display 365
Messages in the display 343, 344
Retreads 279
Rims and tires 422
Rotating 308
Service life 280Temperature 289, 304
Tire pressure monitor warning
lamp* 333
Tread depth 281, 309
Wear pattern 308
Winter 309
Tools 372
Tow-away alarm 90
Arming 90
Disarming 90
Disarming for transport 90
Tow-away alarm switch 30
Towing eye bolt (vehicle tool kit)
Installing 411
Towing eye bolt see Vehicle tool kit
Towing the vehicle 408
Traction 170, 307, 444
Transmission see Automatic transmission
Tread 307
Tread depth 281Treadwear indicators 307
Trip computer 159
Trip odometer 25
Resetting 132
Trunk
Closing the lid 109
Lighting 130
Load assist 235
Lock button (KEYLESS-GO*) 104
Messages in display 371
Opening from inside vehicle 108
Parcel net 231
Trunk lid lock 375
Unlocking (KEYLESS-GO*) 105
Unlocking in an emergency 375
Unlocking separately 98
Trunk lid
Opening 107
Trunk lid emergency release 109