Page 197 of 474

195 Controls in detail
Power windows
Fully closing the windows
(Express-close)�
Pull switch1 or2 past the resis-
tance point and release.
The corresponding window closes com-
pletely.
If the upward movement of the window is
blocked during the closing procedure, the
window will stop and open slightly.
Stopping windows
�
Press or pull the respective switch
again.Closing the windows with the
SmartKey with KEYLESS-GO*
�
Press and hold lock button at door
(�page 60) until the side windows are
closed.
Synchronizing power windows
The power window must be resynchro-
nized each time�
after the battery has been disconnect-
ed
�
if the power windows cannot be fully
opened (Express-open) or closed
(Express-close)
Synchronizing the power windows
�
Switch on ignition.
�
Pull the power window switches until
the side windows are closed.
Hold the switches for approximately
one second.
The power windows are synchronized.
Warning
G
Driver’s door only:
If within five seconds the switch is again
pulled past the resistance point and re-
leased, the automatic reversal will not
operate.
Warning!
G
When closing the windows make sure that
there is no danger of anyone being harmed
by the closing procedure.
The windows will not automatically re-open
if blocked during convenience closing.
If potential danger exists, proceed as fol-
lows:�
Release the lock button.
�
Pull on the door handle and hold firmly.
The side windows open for as long as
the door handle is held but the door not
opened.
Page 381 of 474
379 Practical hints
Locking/unlocking in an emergency
�
Remove mechanical key (
�page 374).
�
Insert the mechanical key in side open-
ing and push gray slide.
The battery compartment is unlatched.
�
Pull the battery compartment out of the
SmartKey housing.
�
Using mechanical key3, apply pres-
sure to position 2.
Battery 1 tilts up slightly.
�
Pull battery 1 out in direction of ar-
row.
�
Using a lint-free cloth, insert new bat-
teries under the contact spring with the
plus (+) side facing up.
�
Return battery compartment into hous-
ing until it locks into place.
Page 409 of 474

407 Practical hints
Jump starting
The starter battery is located on the right
side of the engine compartment.�
Make sure the two vehicles do not
touch.
�
Turn off all electrical consumers.
�
Apply parking brake.
�
Shift gear selector lever to positionP.
�
Remove the red cover from positive ter-
minal on both vehicles (
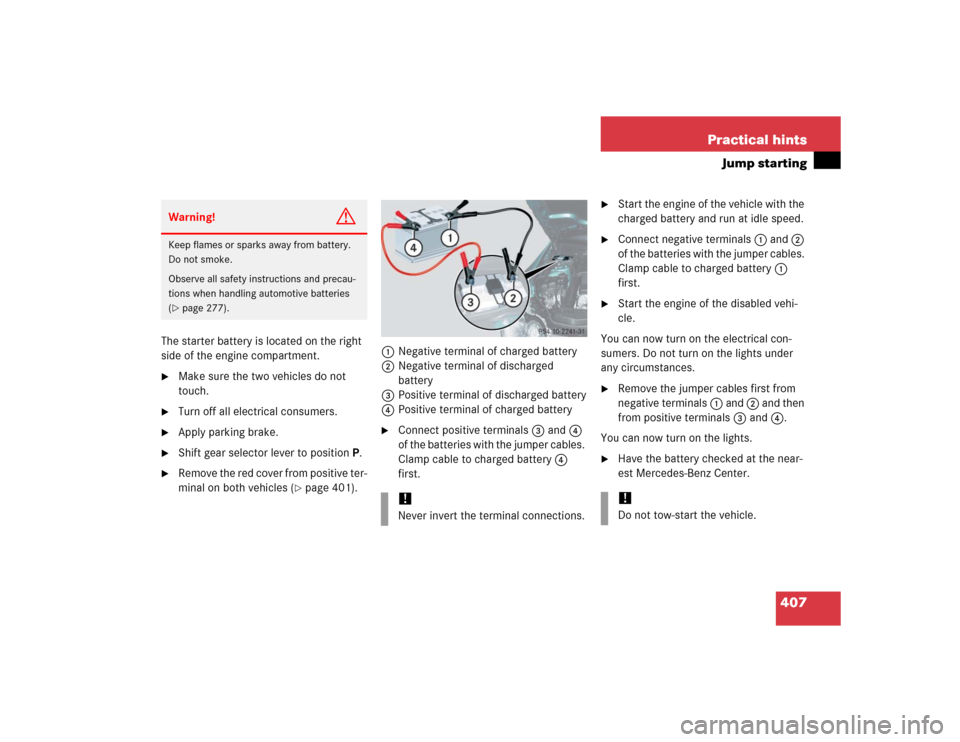
�page 401).1Negative terminal of charged battery
2Negative terminal of discharged
battery
3Positive terminal of discharged battery
4Positive terminal of charged battery
�
Connect positive terminals 3 and 4
of the batteries with the jumper cables.
Clamp cable to charged battery 4
first.
�
Start the engine of the vehicle with the
charged battery and run at idle speed.
�
Connect negative terminals 1 and 2
of the batteries with the jumper cables.
Clamp cable to charged battery 1
first.
�
Start the engine of the disabled vehi-
cle.
You can now turn on the electrical con-
sumers. Do not turn on the lights under
any circumstances.
�
Remove the jumper cables first from
negative terminals 1 and 2 and then
from positive terminals 3 and 4.
You can now turn on the lights.
�
Have the battery checked at the near-
est Mercedes-Benz Center.
Warning!
G
Keep flames or sparks away from battery.
Do not smoke.
Observe all safety instructions and precau-
tions when handling automotive batteries
(�page 277).
!Never invert the terminal connections.
!Do not tow-start the vehicle.
Page 465 of 474

463 Index
Starter battery 277, 401
Starter switch 23, 36
Starter switch positions 36
SmartKey 36
SmartKey with KEYLESS-GO* 37
Starting difficulties 49
Starting position 36
Starting the engine
With the SmartKey 48
With the SmartKey with
KEYLESS-GO* 49
Steering column
In/out adjustment 42
Length adjustment 42
Up/down adjustment 42
Steering wheel
Adjusting 42
Buttons 28
Cleaning 320
Heating* 234
Height adjustment 42Steering wheel adjustment lever 23
Steering wheel gearshift control 172
Vehicles with Sport Package*172
SL 55 AMG and SL 65 AMG 174
Stopping
Windows 195
Storage compartments 228
Armrest 229
Cup holder 228
Glove box 228
In door 229
In rear 230
Locking compartments
separately 230
Locking storage compartments 230
Rear 230
Storage tray 230
Unlocking compartments
separately 231
Unlocking storage
compartments 231, 375
Ventilated compartments 192Storing tires 281
Submenus 138
Convenience 157
Instrument cluster 148, 149
Lighting 152
Resetting functions 146
Selecting 145
Settings menus 145
Time 149
Vehicle 156
Summer opening feature 200
Sun blind see Sunshade
Sun visors 180
Sunshade 203
Closing 204
Opening 204
Suspension tuning
For regular driving style 220
For sporty driving style 220
Setting 220