Page 365 of 474

363 Practical hints
What to do if …
Left display
Right display
Possible cause
Possible solution
.
Right turn signal
Mirror
The right turn signal in the side mir-
ror is malfunctioning. This message
will only appear if all light emitting
diodes have stopped working.
�
Have the LEDs replaced as soon as possible.
Tail lamp
Left
Auxiliary
lamp on!
The left tail lamp is malfunctioning.
An auxiliary lamp has been brought
into use.
�
Visit an authorized Mercedes-Benz Center as
soon as possible.
Tail lamp
Right
Auxiliary
lamp on!
The right tail lamp is malfunction-
ing. An auxiliary lamp has been
brought into use.
�
Visit an authorized Mercedes-Benz Center as
soon as possible.
Turn off
lamps
You have removed the SmartKey
from the starter switch and opened
the driver’s door or removed the
SmartKey with KEYLESS-GO* from
the vehicle and left the headlamps
on.
Turn the exterior lamp switch toM.
Turn signal
Rear left
Auxiliary
lamp on!
The left rear turn signal lamp is mal-
functioning. An auxiliary lamp has
been brought into use.
�
Replace the bulb as soon as possible.
Page 376 of 474
374 Practical hintsLocking/unlocking in an emergencyUnlocking the vehicle
If you are unable to unlock the driver’s
door using the SmartKey, open the door
using the mechanical key.
1Mechanical key locking tab
2Mechanical key
�
Move locking tab 1 direction of arrow
and slide the mechanical key 2 out of
the housing.Unlocking the driver’s door
1Unlocking
2Locking
�
Unlock the door with the mechanical
key. To do so, push the mechanical key
in the lock until it stops and turn it to
the left.
iUnlocking your vehicle with the me-
chanical key will trigger the anti-theft
alarm system. To cancel the alarm, do
one of the following:�
Press button Œ or ‹on the
SmartKey.
�
Insert the SmartKey in the starter
switch.
�
Press the KEYLESS-GO* start/stop
button (
�page 37).
�
Grasp the outside door handle (ve-
hicles with KEYLESS-GO* only).
Page 377 of 474
 is required to open the
trunk lid.
If you are unable to unlock the trunk with")
375 Practical hints
Locking/unlocking in an emergency
Unlocking the trunk
A minimum height clearance of
6.2 ft (1.89 m) is required to open the
trunk lid.
If you are unable to unlock the trunk with
the SmartKey, open the trunk with the me-
chanical key.
The handle is located above the rear li-
cense plate recess.Trunk lid lock1Unlocking
2Handle
�
Insert the mechanical key into the
trunk lid lock.
�
Turn the mechanical key counterclock-
wise to position 1 and hold it in this
position.
�
Pull the trunk lid handle 2 and lift lid.Unlocking interior storage compart-
ments
Locking storage areas in the passenger
compartment include:
�
the glove box
�
the storage compartment under the
armrest
�
the rear storage compartments
If these cannot be unlocked by means of
the SmartKey, the SmartKey with
KEYLESS-GO*, or the central locking but-
ton, use the mechanical key to open the
glove box.
iUnlocking your vehicle with the me-
chanical key will trigger the anti-theft
alarm system. To cancel the alarm, do
one of the following:�
Press button Œ or ‹on the
SmartKey.
�
Insert the SmartKey in the starter
switch.
�
Press the KEYLESS-GO* start/stop
button (
�page 37).
�
Grasp the outside door handle (ve-
hicles with KEYLESS-GO* only).
iThe storage compartment under the
armrest and the rear storage compart-
ments can only be unlocked at the
glove box lock using the mechanical
key.
Page 379 of 474

377 Practical hints
Locking/unlocking in an emergency
�
Using the hex-socket wrench provided
in the vehicle tool kit, carefully turn the
locking screw 2 approximately one
quarter turn.
�
Hook luggage cover into holders
(�page 197).
�
Let go of the hardtop.
It should gradually lower into the trunk.
�
When top is completely lowered, return
locking screw 2 to its original posi-
tion.
�
Close the lid.
�
Replace the trunk floor.
�
Visit an authorized Mercedes-Benz
Center as soon as possible.Replacing batteries in the SmartKey/
SmartKey with KEYLESS-GO*
If the batteries in the SmartKey or the
SmartKey with KEYLESS-GO* are dis-
charged, the vehicle can no longer be
locked or unlocked. It is recommended to
have the batteries replaced at an autho-
rized Mercedes-Benz Center.
Batteries contain materials that can harm
the environment if disposed of improperly.
Recycling of batteries is the preferred
method of disposal. Many states require
sellers of batteries to accept old batteries
for recycling.SmartKey
1Mechanical key
2Battery compartment
Replacement batteries: Lithium, type
CR 2025 or equivalent.
!Do not overtighten the screw.
Warning!
G
Keep the batteries out of reach of children.
If a battery is swallowed, seek medical help
immediately.
iWhen replacing batteries, always re-
place both batteries. The required re-
placement batteries are available at
any Mercedes-Benz Center.
Page 380 of 474
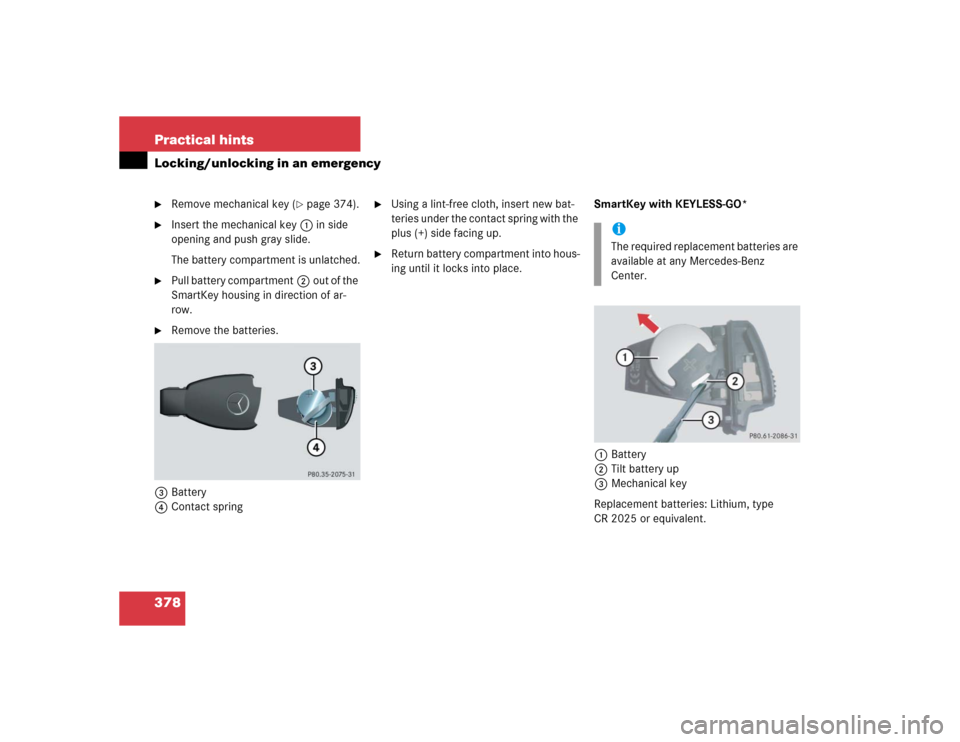
378 Practical hintsLocking/unlocking in an emergency�
Remove mechanical key (
�page 374).
�
Insert the mechanical key1in side
opening and push gray slide.
The battery compartment is unlatched.
�
Pull battery compartment2out of the
SmartKey housing in direction of ar-
row.
�
Remove the batteries.
3Battery
4Contact spring
�
Using a lint-free cloth, insert new bat-
teries under the contact spring with the
plus (+) side facing up.
�
Return battery compartment into hous-
ing until it locks into place.SmartKey with KEYLESS-GO*
1Battery
2Tilt battery up
3Mechanical key
Replacement batteries: Lithium, type
CR 2025 or equivalent.
iThe required replacement batteries are
available at any Mercedes-Benz
Center.
Page 388 of 474
386 Practical hintsReplacing wiper blades
Removing wiper blades�
Turn SmartKey in starter switch to
position1.
�
Turn combination switch to wiper
settingII (
�page 53).
�
With wiper arms in the vertical position,
turn SmartKey in starter switch to
position0.
�
Fold the wiper arm forward until it
snaps into place.
�
Turn wiper blade at a right angle to the
wiper arm.
�
Slide the wiper blade sideways out of
the retainer.
!To avoid damage to the hood, the wiper
arms should only be folded forward
when in the vertical position.
Warning!
G
For safety reasons, switch off wipers and re-
move SmartKey from starter switch (vehi-
cles with KEYLESS-GO*: Make sure the
vehicle’s on-board electronics have
status0) before replacing a wiper blade.
Otherwise the wiper motor could suddenly
turn on and cause injury.
Page 390 of 474

388 Practical hintsFlat tireYour SL 65 AMG is be equipped with a
TIREFIT kit.Preparing the vehicle�
Park the vehicle as far as possible from
moving traffic on a hard surface.
�
Turn on the hazard warning flashers.
�
Turn the steering wheel so that the
front wheels are in a straight ahead po-
sition.
�
Set the parking brake.
�
Move the gear selector lever to P.
Vehicles with SmartKey:
�
Turn off the engine (
�page 58).
�
Remove the SmartKey from the starter
switch.Vehicles with KEYLESS-GO*:
�
Turn off the engine by pressing the
KEYLESS-GO* button on the gear se-
lector lever once (
�page 59).
�
Open the driver’s door (this puts the
starter switch in position 0, same as
with the SmartKey removed from the
starter switch). The driver’s door then
can be closed again.
�
Have any passenger exit the vehicle at
a safe distance from the roadway.
Sealing tires with TIREFIT
Small tire punctures, particularly those in
the tread, can be sealed with TIREFIT.
TIREFIT can be used in ambient tempera-
tures down to -4°F (-20°C).
iOpen door only when conditions are
safe to do so.
Warning!
G
Keep TIREFIT away from sparks, open flame
or heat source.
Do not smoke.
Page 392 of 474

390 Practical hintsFlat tire�
Screw the air pump’s air hose5 onto
flange6 of the TIREFIT container.
�
Stick TIREFIT container1 upside
down into notch3 of the electric air
pump.
7Tire valve
8Electric air pump switch
9Air hose with pressure gauge and vent
screw
aFiller hose
�
Unscrew the valve cap from tire
valve7.
�
Screw filler hosea onto tire valve7.
�
Insert electrical plug4 into vehicle
cigarette lighter socket.
�
Turn the SmartKey in the starter switch
to position1 (
�page 36).
or
�
Press the KEYLESS-GO* start/stop
button (
�page 37) on the gear selec-
tor lever once. Do not depress brake
pedal.
�
Press I on electric air pump switch8.
The electric air pump should now
switch on and inflate the tire.After 5 minutes, the pressure gauge must
display at least 26 psi (1.8 bar). The air
hose can become hot during inflation.
Please exercise appropriate caution.
�
If this tire inflation pressure is not at-
tained, turn off the electric air pump,
detach the filler hose from the tire
valve, and drive vehicle back and forth
very slowly approximately 30 ft (10 m).
This serves to better distribute the
TIREFIT sealant material inside the tire.
�
Unscrew the air pump’s air hose5
from flange6 of the TIREFIT contain-
er.
�
Screw air hose5onto tire valve7.
�
Inflate the tire again.
Warning!
G
Observe safety instructions on air pump la-
bel.
!Do not operate the electric air pump
longer than eight minutes without in-
terruption. Otherwise it may overheat.
You may operate the air pump again af-
ter it has cooled off.
��