Page 89 of 474

87 Safety and Security
Driving safety systems
The SBC brake servo assistance switches
off automatically�
approximately two minutes after you
turned the SmartKey in the starter
switch to position0 or removed the
SmartKey
�
approximately two minutes after you
pressed the KEYLESS-GO* start/stop
button to turn off the engine or power
supply and opened the driver’s door
(with driver’s door open, the starter
switch is set to position 0, same as
SmartKey removed from starter
switch)
�
approximately 20 seconds after you
locked the vehicle from outside Note on driving with the SBC brake
system
�
Following extended periods of only mi-
nor loads to your brake system, you
should occasionally apply the brakes
when traveling at high speeds. This im-
proves the grip of the brake pads.
After driving on wet or snow-covered
roads, you should apply your brakes
firmly before parking your vehicle. This
produces heat which serves to dry the
brake disks and help prevent corro-
sion.
�
On long and steep grades, shift to a
lower gear (gear range1, 2, or 3) to
prevent the brakes from overheating
and to reduce brake wear.
�
After hard braking, it is advisable to
drive on for some time so that the air
stream will cool down the brakes fast-
er.
�
Only Mercedes-Benz approved compo-
nents (e.g. brake pads) should be in-
stalled on your vehicle. Brake pads not
approved by Mercedes-Benz may im-
pair the safety of your vehicle.
Warning!
G
Be very careful not to endanger other road
users when you apply the brakes.
Page 97 of 474

95 Controls in detail
Locking and unlocking
SmartKey with remote control1‹Lock button
2Š Unlock button for the trunk lid
3Mechanical key locking tab
4ΠUnlock button
5Battery check lamp
6Â Panic button (
�page 78)
Warning!
G
When leaving the vehicle, always remove the
SmartKey from the starter switch, take it
with you, and lock the vehicle. Do not leave
children unattended in the vehicle, or with
access to an unlocked vehicle. It is possible
for children to open a locked door from the
inside, which could result in an accident
and/or serious injury.!To prevent possible malfunction, avoid
exposing the SmartKey to high levels of
electromagnetic radiation.
iUSA only:
This device complies with Part 15 of
the FCC Rules. Operation is subject to
the following two conditions:
(1) This device may not cause harmful
interference, and
(2) this device must accept any inter-
ference received, including interfer-
ence that may cause undesired
operation.
Any unauthorized modification to this
device could void the user’s authority
to operate the equipment.
Page 101 of 474
99 Controls in detail
Locking and unlocking
If the SmartKey with KEYLESS-GO is valid,
your vehicle unlocks �
the doors
�
the trunk lid
�
the glove box
�
the storage compartment under the
armrest
�
the storage compartment in the rear
�
the fuel filler flap
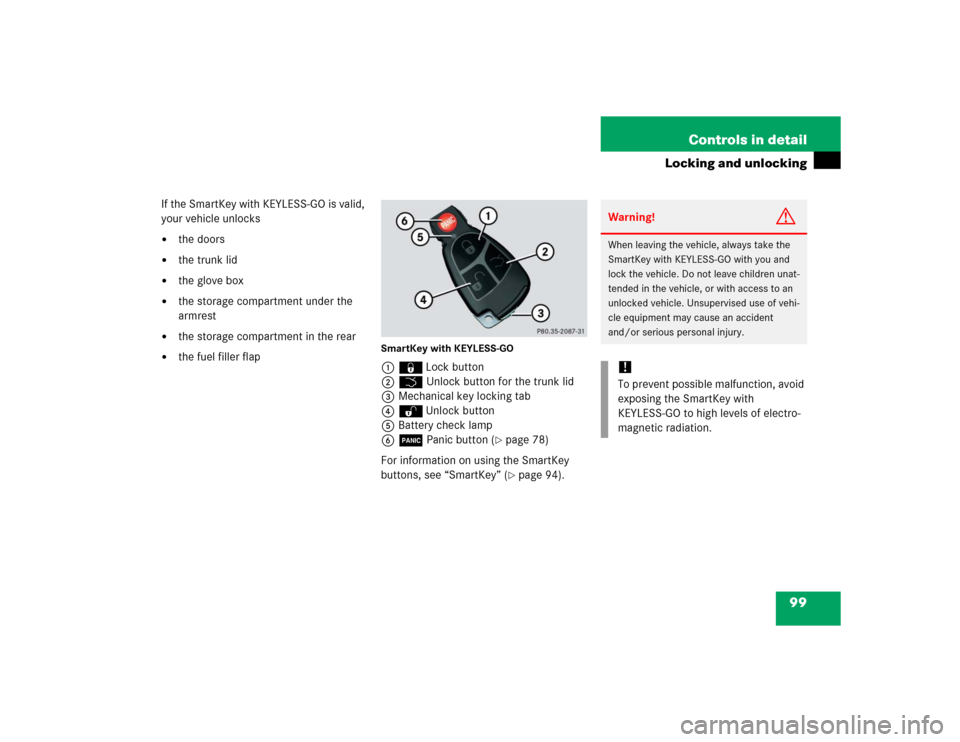
SmartKey with KEYLESS-GO1‹Lock button
2Š Unlock button for the trunk lid
3Mechanical key locking tab
4ŒUnlock button
5Battery check lamp
6Â Panic button (
�page 78)
For information on using the SmartKey
buttons, see “SmartKey” (�page 94).
Warning!
G
When leaving the vehicle, always take the
SmartKey with KEYLESS-GO with you and
lock the vehicle. Do not leave children unat-
tended in the vehicle, or with access to an
unlocked vehicle. Unsupervised use of vehi-
cle equipment may cause an accident
and/or serious personal injury.!To prevent possible malfunction, avoid
exposing the SmartKey with
KEYLESS-GO to high levels of electro-
magnetic radiation.
Page 111 of 474

109 Controls in detail
Locking and unlocking
Closing the trunk
1Handle�
Lower trunk lid by firmly pulling on
handle1.
�
Close trunk lid with hands placed flat
on trunk lid.
Trunk lid emergency release
The emergency release button is located
on the left side of the trunk.
1Emergency release button�
Briefly press emergency release
button1.
The trunk unlocks and the trunk lid
opens slightly.
�
Push up the trunk lid to fully open.
Warning!
G
To prevent possible personal injury, always
keep hands and fingers away from the trunk
opening when closing the trunk lid. Be espe-
cially careful when small children are
around.
Warning!
G
Only drive with the trunk closed. Among oth-
er dangers, such as your view being blocked,
exhaust fumes may enter the vehicle interi-
or.iTo prevent an inadvertent lockout, do
not place the SmartKey in the trunk.
Vehicles with KEYLESS-GO*: To pre-
vent a possible inadvertent lockout, the
trunk lid will open automatically if a
SmartKey with KEYLESS-GO is recog-
nized inside the trunk.
When the hardtop is retracted, it must
be completely lowered in the trunk be-
fore the trunk lid can be closed
(�page 235).
��
Page 113 of 474

111 Controls in detail
Locking and unlocking
Locking and unlocking from the inside
You can lock or unlock the vehicle from in-
side using the central locking switches.
This can be useful, for example, if you want
to unlock the passenger door from the in-
side or want to lock the vehicle before
starting to drive.
The central locking switch does not lock or
unlock the fuel filler flap.The switches are located above and be-
tween the center air vents of the air condi-
tioning.
Central locking switches1Locking
2UnlockingLocking
�
Press central locking switch1.
If all the doors are closed, the vehicle
locks.
Unlocking
�
Press central locking switch2.
The vehicle unlocks.
Warning!
G
When leaving the vehicle, always remove the
SmartKey or the SmartKey with
KEYLESS-GO* from the starter switch, take
it with you, and lock the vehicle. Do not
leave children unattended in the vehicle, or
with access to an unlocked vehicle. Unsu-
pervised use of vehicle equipment may
cause an accident and/or serious personal
injury.
Warning!
G
You can open a locked door from inside at
any time. Open door only when conditions
are safe to do so.
Page 115 of 474
.
Easy-entry / exit feature
This feature allows for easier entry into and
exit from t")
113 Controls in detailSeats
�Seats
For more information on seat adjustment,
see “Seat adjustment” (
�page 40).
Easy-entry / exit feature
This feature allows for easier entry into and
exit from the vehicle.
The easy-entry/exit feature can be activat-
ed or deactivated in the
Convenience
sub-
menu of the
SETTINGS
menu of the control
system (
�page 157).When exiting the vehicle, with the
easy-entry/exit feature activated and
depending on your selection, the steering
wheel tilts upwards and/or the driver’s
seat moves a few inches to the rear when
you
�
remove the SmartKey from the starter
switch
or
�
open the driver’s door with the
SmartKey in starter switch position 0
or 1 or the KEYLESS-GO* start/stop
button in position 1 (
�page 37)
Warning!
G
You must make sure no one can become
trapped or injured by the moving steering
wheel and driver’s seat when the easy-en-
try/exit feature is activated.
To cancel seat/steering wheel movement,
do one of the following:�
Press seat adjustment switch
(�page 40).
�
Move steering column stalk
(�page 42).
�
Press the memory button (
�page 120).
Do not leave children unattended in the ve-
hicle, or with access to an unlocked vehicle.
Children could open the driver’s door and
unintentionally activate the easy-entry/exit
feature, which could result in an accident
and/or serious personal injury.
Page 117 of 474

115 Controls in detailSeats
Moving the seats forward and backward
You can move the seats forward and back
to facilitate loading and unloading.The switch is located on the top side of the
seat.
1Seat forward
2Seat backward
Moving the seat forward
�
Press switch at1.
Moving the seat backward
�
Press switch at2.
Lumbar support
You can adjust the contour of the seat’s
lumbar support to best support your spine.
The thumbwheel is located on the lower
side of the seat.
1Thumb wheel�
Switch on the ignition (
�page 36).
�
Set the lumbar support between 0
and 5.
Warning!
G
When moving the seats, be sure that no one
can be caught by them. Never place hands
under seat or near any moving parts during
a seat adjustment procedure. To stop the
seat from moving when potential danger ex-
ists:�
press the switch again
�
move the seat adjustment switch on the
door (
�page 39)
!When moving the seats, make sure that
there are no items in the footwell or be-
hind the seats. Otherwise you could
damage the seats.
Page 122 of 474

120 Controls in detailMemory function
With the memory switch you can store up
to three different settings per SmartKey or
SmartKey with KEYLESS-GO*.
The following settings are saved for each
stored position:�
Driver’s seat and backrest position
�
Steering wheel position
�
Driver’s side exterior rear view mirror
position
�
Passenger side exterior rear view mir-
ror position
These key-dependent memory settings
can be deactivated if desired
(
�page 158).The memory switch is located on the door.
M Memory button
1, 2, 3 Stored positions
�
Switch on the ignition (
�page 36).
or
�
Open the respective door.
!Prior to operating the vehicle, the driv-
er should check and adjust the seat
height, seat position fore and aft, and
seat backrest angle if necessary, to en-
sure adequate control, reach and com-
fort. The head restraint should also be
adjusted for proper height. See also the
section on airbags (
�page 63) for
proper seat positioning.
In addition, adjust the steering wheel to
ensure adequate control, reach, opera-
tion and comfort. Both the interior and
exterior rear view mirrors should be
adjusted for adequate rear vision.
Fasten seat belts. Infants and small
children should be seated in a properly
secured restraint system that complies
with U.S. Federal Motor Vehicle Safety
Standard 213 and Canadian Motor Ve-
hicle Safety Standard 213.
Warning!
G
Do not activate the memory function while
driving. Activating the memory function
while driving could cause the driver to lose
control of the vehicle.