Page 149 of 474
147 Controls in detail
Control system
Menus, submenus and functions
Menu1
Standard dis-
play
Menu2
AUDIO
Menu3
Telephone*
Menu4
NAVI
Menu5
Distronic*
Menu6
Trip computer
Menu7
Vehicle status
message memory
Menu8
Settings
(�page 148)
(�page 148)
(�page 153)
(�page 155)
(�page 156)
(�page 157)
(�page 159)
(�page 160)
Commands/submenusCall up mainte-
nance service
display
Select radio
station
Load phone
book
Activate
route guid-
ance
Call up set-
tings
Fuel consump-
tion statistics
after start
Call up vehicle mal-
function, warning
and system status
messages stored in
memory
Reset to fac-
tory settings
Check tire in-
flation pres-
sure*
Select satellite
radio station*
(USA only)
Search for
name in
phone book
Fuel consump-
tion statistics
since the last
reset
Instrument
cluster
submenu
Check engine
oil level
Select CD
track
Select
number last
dialed
Call up range
Lighting
submenu
Digital speed-
ometer
Select MP3-CD
track
Vehicle
submenuConvenience
submenu
Page 161 of 474

159 Controls in detail
Control system
Vehicle status message memory menu
Use the vehicle status message memory
menu to scan malfunction and warning
messages that may be stored in the sys-
tem. Such messages appear in the multi-
function display and are based on
conditions or system status the vehicle’s
system has recorded.
�
Press buttonè orÿ repeatedly
until the vehicle status message mem-
ory appears in the multifunction dis-
play.
No vehicle status messages
If no conditions are recorded in the memo-
ry, the message in the multifunction dis-
play is:
NO MESSAGESVehicle status messages have been re-
corded
If conditions have occurred causing status
messages to be recorded, the number of
messages appears in the multifunction dis-
play:
1Number of messages
�
Press buttonk orj.
The stored messages will now be dis-
played in the order in which the mal-
functions have occurred. See the
“Practical hints” section for malfunc-
tion and warning messages
(�page 347).
Should the vehicle’s system record any
conditions while driving, the number of
messages will reappear in the multifunc-
tion display when the SmartKey in the
starter switch is turned to position0 or re-
moved from the starter switch. If you press
the reset buttonJ in the instrument clus-
ter (�page 140), the next message will be
displayed immediately.
Warning!
G
Malfunction and warning messages are only
indicated for certain systems and are inten-
tionally not very detailed. The malfunction
and warning messages are simply a remind-
er with respect to the operation of certain
systems and do not replace the owner’s
and/or driver’s responsibility to maintain
the vehicle’s operating safety by having all
required maintenance and safety checks
performed on the vehicle and by bringing
the vehicle to an authorized Mercedes-Benz
Center to address the malfunction and
warning messages (
�page 347).
iThe vehicle status message memory
will be cleared when you switch on igni-
tion. You will then only see high-priority
messages in the multifunction display.
These are highlighted in red color
(�page 347).
Page 182 of 474

180 Controls in detailAutomatic transmissionDriving tips
Accelerator position
Your driving style influences the
transmission’s shifting behavior:
Less throttle Earlier upshifting
More throttle Later upshifting
Kickdown
Use kickdown when you want maximum
acceleration.�
Press the accelerator past the point of
resistance.
The transmission shifts into a lower
gear.
�
Ease on the accelerator when you have
reached the desired speed.
The transmission shifts up again.Stopping
When you stop briefly, e.g. at traffic lights:
�
Leave the transmission in gear.
�
Hold the vehicle with the brake.
When you stop longer with the engine
idling or on an uphill gradient:
�
Move the gear selector lever to
positionP.
�
Set the parking brake.Maneuvering
When you maneuver in tight areas,
e.g. when pulling into a parking space:
�
Control the vehicle speed by gradually
releasing the brakes.
�
Accelerate gently.
�
Never abruptly step on the accelerator.
Working on the vehicleWarning!
G
When working on the vehicle, set the
parking brake and move gear selector lever
to positionP. Otherwise the vehicle could
roll away.
Page 189 of 474

187 Controls in detail
Good visibility
Activating exterior rear view mirror
parking position
Follow these steps to activate the mirror
parking position so that the passen-
ger-side exterior rear view mirror will be
turned downward to the stored position.�
Make sure you have stored a parking
position for the passenger-side exterior
rear view mirror (
�page 130).
�
Make sure the
MIRROR SETTING WHEN
PARKING
function in the
CONVENIENCE
submenu of the control system is
switched to
ON (�page 171).
�
Switch on ignition (
�page 34).
Warning!
G
The auto-dimming function does not react if
incoming light is not aimed directly at sen-
sors in the interior rear view mirror.
The interior rear view mirror and the exterior
rear view mirror on the driver’s side do not
react, for example, if the rear window sun
shade* is in raised position.
Glare can endanger you and others.Warning!
G
In the case of an accident, liquid electrolyte
may escape from the mirror housing if the
mirror glass breaks.
Electrolyte has an irritating effect. Do not al-
low the liquid to come into contact with
eyes, skin, clothing, or respiratory system.
In case it does, immediately flush affected
area with water, and seek medical help if
necessary.
!Electrolyte drops coming into contact
with the vehicle paint finish can be
completely removed only while in the
liquid state by applying plenty of water.Warning!
G
Exercise care when using the passen-
ger-side exterior rear view mirror. The mirror
surface is convex (outwardly curved surface
for a wider field of view). Objects in mirror
are closer than they appear. Check your in-
side rear view mirror or glance over your
shoulder before changing lanes.
��
Page 209 of 474

207 Controls in detail
Power windows
�Power windows
Opening and closing the power windows
The side windows are opened and closed
electrically. The switches for all side win-
dows are on the driver’s door. The switch-
es for the respective windows are on the
front passenger door and the rear doors.
1Left front window
2Right front window
3Right rear window
4Left rear window
5Rear window override switch
(
�page 78)
Warning!
G
When closing the windows, make sure that
there is no danger of anyone being harmed
by the closing procedure.
The closing of the door windows can be im-
mediately halted by releasing the switch or,
if the switch was pressed past the resis-
tance point and released, by pressing the re-
spective switch.
The door windows are equipped with the ex-
press-close and automatic reversal func-
tion. If the window encounters an
obstruction that blocks its path in a circum-
stance where you pressed the switch past
the resistance point and released it to close
the window, the automatic reversal function
will stop the window and open it slightly.
If the window encounters an obstruction
that blocks its path in a circumstance where
you are closing the window by pressing and
holding the switch, by pressing and holding
button ‹ on the SmartKey, or by press-
ing and holding the lock button (vehicles
with KEYLESS-GO*) on the door handle, the
automatic reversal function will not operate.
When leaving the vehicle, always remove the
SmartKey or SmartKey with KEYLESS-GO*
from the starter switch, take it with you, and
lock the vehicle. Do not leave children unat-
tended in the vehicle, or with access to an
unlocked vehicle. Unsupervised use of vehi-
cle equipment may cause an accident
and/or serious personal injury.iYou can also open or close the win-
dows using the SmartKey, see “Sum-
mer opening feature” (
�page 209) and
“Convenience closing feature”
(
�page 210).
You can close and reopen the windows
using the air recirculation button,
or the charcoal filter buttone in the
climate control panel (
�page 194).
Page 252 of 474
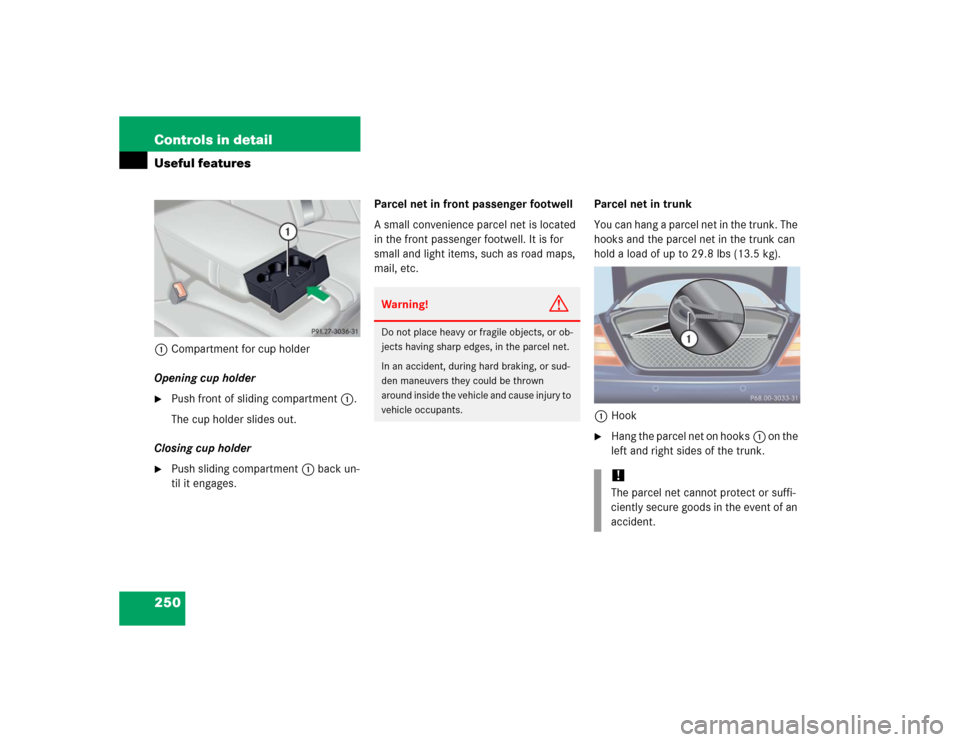
250 Controls in detailUseful features1Compartment for cup holder
Opening cup holder�
Push front of sliding compartment1.
The cup holder slides out.
Closing cup holder
�
Push sliding compartment1 back un-
til it engages.Parcel net in front passenger footwell
A small convenience parcel net is located
in the front passenger footwell. It is for
small and light items, such as road maps,
mail, etc.Parcel net in trunk
You can hang a parcel net in the trunk. The
hooks and the parcel net in the trunk can
hold a load of up to 29.8 lbs (13.5 kg).
1Hook
�
Hang the parcel net on hooks1 on the
left and right sides of the trunk.
Warning!
G
Do not place heavy or fragile objects, or ob-
jects having sharp edges, in the parcel net.
In an accident, during hard braking, or sud-
den maneuvers they could be thrown
around inside the vehicle and cause injury to
vehicle occupants.
!The parcel net cannot protect or suffi-
ciently secure goods in the event of an
accident.
Page 253 of 474

251 Controls in detail
Useful features
Ashtrays
Center console ashtray
1Cover plate
2Button for disengaging ashtray
Opening ashtray�
Briefly touch cover plate1.
The ashtray opens automatically.Removing ashtray insert
�
Secure vehicle from movement by set-
ting the parking brake. Move the gear
selector lever to positionN.
Now you have more room to take out
the insert.
�
Push sliding button2 to the right.
The ashtray is disengaged and slides
out a short way.
�
Remove insert from ashtray frame.
Reinstalling the ashtray insert
�
Install insert by pushing it back into the
frame until it engages.Rear door ashtray
Opening ashtray
�
Lightly touch the back of the ashtray.
Removing ashtray insert
�
Pull the ashtray back slightly and re-
move the insert (see arrows).
Reinstalling the ashtray insert
�
Position the insert and press down
while sliding forward.
Warning!
G
Remove front ashtray only with vehicle
standing still. Set the parking brake to se-
cure vehicle from movement. Move gear se-
lector lever to positionN. With gear selector
lever in positionN turn off the engine.
Page 254 of 474

252 Controls in detailUseful featuresCigarette lighters
1Center console cigarette lighter�
Make sure the ignition is switched on.
All the lamps in the instrument cluster
should come on.
�
Push in cigarette lighter1.
The lighter will pop out automatically
when hot.1Rear door lighters
�
Make sure the ignition is switched on.
All the lamps in the instrument cluster
should come on.
�
Lightly touch the back of the ashtray to
open it (
�page 251).
�
Push in cigarette lighter1.
The lighter will pop out automatically
when hot.
Warning!
G
Never touch the heating element or sides of
the lighter; they are extremely hot. Hold the
knob only.
When leaving the vehicle, always remove the
SmartKey or SmartKey with KEYLESS-GO*
from the starter switch, take it with you, and
lock the vehicle. Do not leave children unat-
tended in the vehicle, or with access to an
unlocked vehicle. Unsupervised use of vehi-
cle equipment may cause an accident
and/or serious personal injury.iThe lighter socket can be used to ac-
commodate electrical accessories up
to a maximum 85 W.
iOperation of the rear door lighters is
only possible, if the override switch
(�page 78) is deactivated.