Page 401 of 474
.
Lifting the vehicle
�
Prevent the")
399 Practical hints
Flat tire
Preparing the vehicle�
Take vehicle tool kit tray and vehicle
jack out of trunk.
�
Take the spare wheel out of wheel well
(�page 379).
Lifting the vehicle
�
Prevent the vehicle from rolling away
by blocking wheels with wheel chocks
(not included) or other sizable objects.
When changing wheel on a level surface:
�
Place one chock in front of and one be-
hind the wheel that is diagonally oppo-
site to the wheel being changed.
When changing wheel on a hill:
�
Place chocks behind the downhill sides
of both wheels of the axle not being
worked on.
�
Take the two-piece wheel wrench out
of the vehicle tool kit tray. Assemble
wheel wrench.
�
On wheel to be changed, loosen but do
not yet remove the wheel bolts (ap-
proximately one full turn with wrench).
The tube openings are located directly be-
hind the front wheel housings and in front
of the rear wheel housings.
The dimensions of the spare wheel are dif-
ferent from those of the road wheels. As a
result, the vehicle handling characteristics
change when driving with a mounted spare
wheel. Adapt your driving style accordingly.
Warning!
G
The jack is designed exclusively for jacking
up the vehicle at the jack tubes built both
sides of the vehicle. To help avoid personal
injury, use the jack only to lift the vehicle
during a wheel change. Never get beneath
the vehicle while it is supported by the jack.
Keep hands and feet away from the area un-
der the lifted vehicle. Always firmly set park-
ing brake and block wheels before raising
vehicle with jack.
Do not disengage parking brake while the
vehicle is raised. Be certain that the jack is
always vertical (plumb line) when in use, es-
pecially on hills. Always try to use the jack
on level surface. Make sure the jack arm is
fully inserted in the jack tube. Always lower
the vehicle onto sufficient capacity jack-
stands before working under the vehicle.
Page 402 of 474
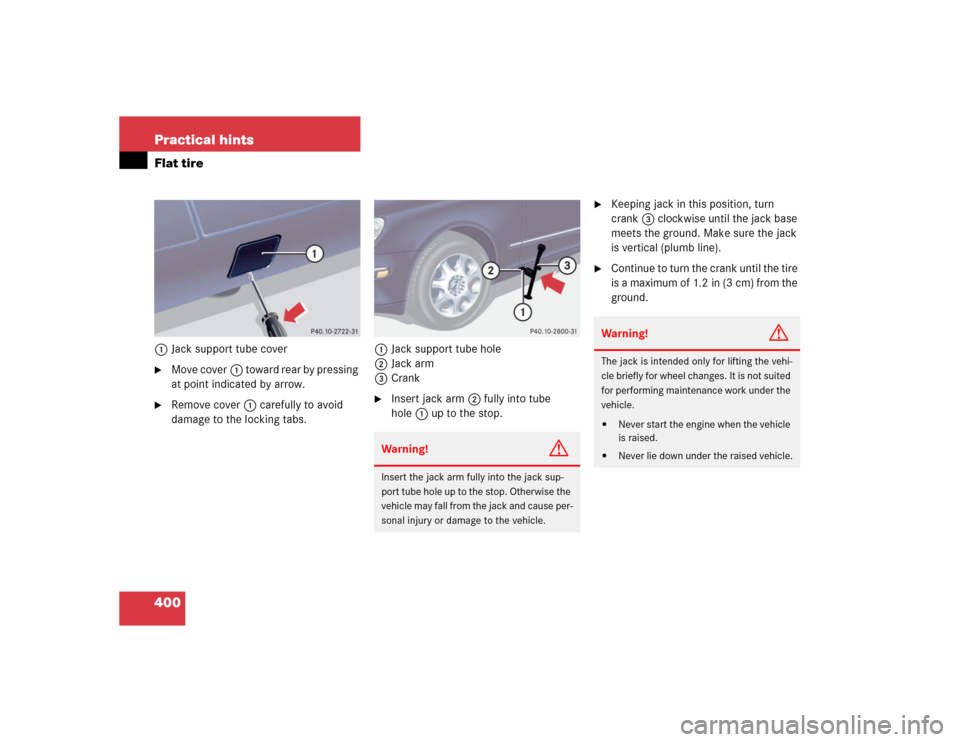
400 Practical hintsFlat tire1Jack support tube cover�
Move cover1 toward rear by pressing
at point indicated by arrow.
�
Remove cover1 carefully to avoid
damage to the locking tabs.1Jack support tube hole
2Jack arm
3Crank
�
Insert jack arm2 fully into tube
hole1 up to the stop.
�
Keeping jack in this position, turn
crank3 clockwise until the jack base
meets the ground. Make sure the jack
is vertical (plumb line).
�
Continue to turn the crank until the tire
is a maximum of 1.2 in (3 cm) from the
ground.
Warning!
G
Insert the jack arm fully into the jack sup-
port tube hole up to the stop. Otherwise the
vehicle may fall from the jack and cause per-
sonal injury or damage to the vehicle.
Warning!
G
The jack is intended only for lifting the vehi-
cle briefly for wheel changes. It is not suited
for performing maintenance work under the
vehicle.�
Never start the engine when the vehicle
is raised.
�
Never lie down under the raised vehicle.
Page 403 of 474

401 Practical hints
Flat tire
Removing the wheel
1Alignment bolt�
Unscrew upper-most wheel bolt and re-
move.
�
Replace this wheel bolt with alignment
bolt1 supplied in the tool kit.
�
Remove the remaining bolts.
�
Remove the wheel.Mounting the new wheel
�
Clean contact surfaces of wheel and
wheel hub.
�
Guide the spare wheel onto the align-
ment bolt and push it on.
�
Insert wheel bolts and tighten them
slightly.
�
Unscrew the alignment bolt, install last
wheel bolt and tighten slightly.
!Do not place wheel bolts in sand or dirt.
This could result in damage to the bolt
and wheel hub threads.
!To avoid paint damage, place wheel flat
against hub and hold it there while in-
stalling first wheel bolt.Warning!
G
Always replace wheel bolts that are dam-
aged or rusted.
Never apply oil or grease to wheel bolts.
Damaged wheel hub threads should be re-
paired immediately. Do not continue to drive
under these circumstances! Contact an au-
thorized Mercedes-Benz Center or call
Roadside Assistance.
Incorrect wheel bolts or improperly tight-
ened wheel bolts can cause the wheel to
come off. This could cause an accident.
Make sure you are using the correct wheel
bolts.
Warning!
G
Use only genuine equipment
Mercedes-Benz wheel bolts. Other wheel
bolts may come loose.
Do not tighten the wheel bolts when the ve-
hicle is raised. Otherwise the vehicle could
tip over.
Page 404 of 474

402 Practical hintsFlat tireLowering the vehicle�
Lower vehicle by turning crank coun-
terclockwise until vehicle is resting ful-
ly on its own weight.
�
Remove the jack.
1 - 5 Wheel bolts
�
Tighten the five wheel bolts evenly, fol-
lowing the diagonal sequence illustrat-
ed (1 to 5), until all bolts are tight.
Observe a tightening torque of
110 lb-ft (150 Nm).
�
Before storing the jack in the trunk, it
should be fully collapsed, with handle
folded in.
�
Place the wheel bolt wrench, alignment
bolt and jack back in the vehicle tool kit
in the trunk and close the covering lid.Replacing jack support tube cover
�
Slide tongue of cover under the upper
edge of the tube opening.
�
Applying even pressure, press cover
until it snaps into place. Be careful not
to damage the locking tabs or clamp
the plastic retaining strap.
Warning!
G
Have the tightening torque checked after
changing a wheel. The wheels could come
loose if they are not tightened to a torque of
110 lb-ft (150 Nm).
!You can also screw the faulty wheel
down into the spare wheel well in the
trunk.
Do not activate the tire inflation pres-
sure monitor* until the depressurized
tire is no longer in the vehicle.
Page 424 of 474

422 Technical dataRims and tiresUse only tires and rims which have been
specifically developed for your vehicle and
tested and approved by Mercedes-Benz.
Other tires and rims can have detrimental
effects, such as:�
Poor handling characteristics
�
Increased noise
�
Increased fuel consumption
!Moreover, tires and rims not approved
by Mercedes-Benz may, under load, ex-
hibit dimensional variations and differ-
ent tire deformation characteristics
that could cause them to come into
contact with the vehicle body or axle
parts. Damage to the tires or the vehi-
cle may be the result.
iFurther information on tires and rims is
available at any authorized
Mercedes-Benz Center. A placard with
the recommended tire inflation pres-
sures is located on the driver's door
B-pillar. Some vehicles may have sup-
plemental tire pressure information for
driving at high speeds (
�page 306) or
for vehicle loads less than the maxi-
mum loaded vehicle condition. If such
information is provided, it can be found
on the placard located on the inside of
the fuel filler flap. The tire pressure
should be checked regularly and
should only be adjusted on cold tires.
Follow tire manufacturer’s mainte-
nance recommendation included with
vehicle.
Page 446 of 474

444 Index
Seat cushion tilt 38
Seat fore and aft adjustment 38
Seat height 38
Seat in the lumbar region 123
Seat in the shoulder region 123
Seats 37
Steering column height 40
Steering column in or out 40
Steering column up or down 40
Steering wheel 40
ADS 229, 437
Air bags 61
BabySmart
TM air bag deactivation
system 73, 437
Children 62
Front 65
Passenger 65
Safety guidelines 64
Side impact 65
Window curtain 66
Air bag off indicator lamp 346Air conditioning
Turning off 202
Turning on 202
Air pressure 322
Air pressure see Tire inflation pressure
Air recirculation mode 199
Activating 199
Deactivating 200
Air vents, rear passenger compartment
Adjustable 204
Air volume
Adjusting 198
AIRMATIC 229
Airmatic 229, 437
Alarm
Audible 79, 88
Canceling 88
Visual 87Alarm system
Anti-theft 87
Anti-theft alarm system indicator
lamp 27
Alignment bolt (vehicle tool kit) 380,
401, 437
Antiglare
Automatic 186
Antilock brake system (ABS) 437
Antilock Brake System see ABS 25
Anti-theft alarm system
Arming 87
Canceling alarm 88
Disarming 88
Anti-theft systems 86
Anti-theft alarm system 87
Anti-theft alarm system indicator
lamp 27
Immobilizer 86
Tow-away alarm 89
Aquaplaning see Hydroplaning 277
Page 449 of 474

Setting temperature units 163
Central locking
Automatic 112
From inside 113
Switch 113
Switching on/off (control
system) 168
Unlocking from inside 113
Change of address or")
447 Index
Centigrade (°C)
Setting temperature units 163
Central locking
Automatic 112
From inside 113
Switch 113
Switching on/off (control
system) 168
Unlocking from inside 113
Change of address or ownership 12
Changing
CDs 151
SmartKey setting 169
Vehicle level 230, 233
Charcoal filter 200
Activating 200
Deactivating 201
Charging
Vehicle battery 404Checking
Brake fluid 284
Coolant level 292
Oil level 285, 287
Oil level via control system 288
Tire inflate pressure 285
Vehicle lighting 285
Child safety 71
Air bags 62
Infant and child restraint systems 66,
71
LATCH child seat anchors 76
Cigarette lighter 252
Cleaning
Cup holder 335
Distronic* system sensor cover 333
Gear selector lever 335Hard plastic trim items 335
Headlamps 186
Headliner and shelf below rear
window 335
Instrument cluster 335
Leather upholstery 336
Light alloy wheels 335
Nubuck leather upholstery 336
Parktronic* system sensor 333
Plastic and rubber parts 336
Seat belts 335
Steering wheel 335
Upholstery 336
Windows 334
Windshield 53
Wiper blades 333
Wood trims 336
Cleaning tires 298
Page 450 of 474

448 IndexClock 25
Closing 58
Cup holder 250
Glove box 244
Hood 287
Power tilt/sliding sunroof 211
Power windows 207, 208
Side windows 208
Trunk 105
Closing from the inside automatically*
Trunk 105
Closing in an emergency
Power tilt/sliding sunroof 386
Cockpit 22, 438
Cockpit management and data system
(COMAND) 438
Cold tire inflation pressure 322
COMAND 438
COMAND* see separate operating instruc-
tions
Combination switch 135
High beam 50
High beam flasher 135
Turn signals 51
Windshield wipers 52Control and operation of radio
transmitters 280
Control system 143, 438
AUDIO menu 148
Checking oil level 288
Convenience submenu 169
Display digital speedometer 148
Distronic* menu 156
Functions 145, 147
Instrument cluster submenu 163
Lighting submenu 164
Menus 146, 147
Multifunction display 143
Multifunction steering wheel 144
NAVI menu 155
Settings menu 160
Standard display menu 148
Submenus 145, 147
TEL* menu 153
Trip computer menu 157
Vehicle status message memory
menu 159
Vehicle submenu 168Convenience submenu 169
Activating easy-entry/exit
feature 170
Adjusting drive-dynamic seat* 172
Setting Key-dependency 169
Setting parking position for exterior
rear view mirror 171
Coolant 292
Adding 293
Checking level 292
Messages in display 358, 359
Temperature 282
Temperature gauge 141
Warning lamp 359
Coolant level
Checking 292
Coolant temperature gauge 25
Courtesy lighting 139