Page 113 of 474
111 Controls in detail
Locking and unlocking
Trunk lid emergency release
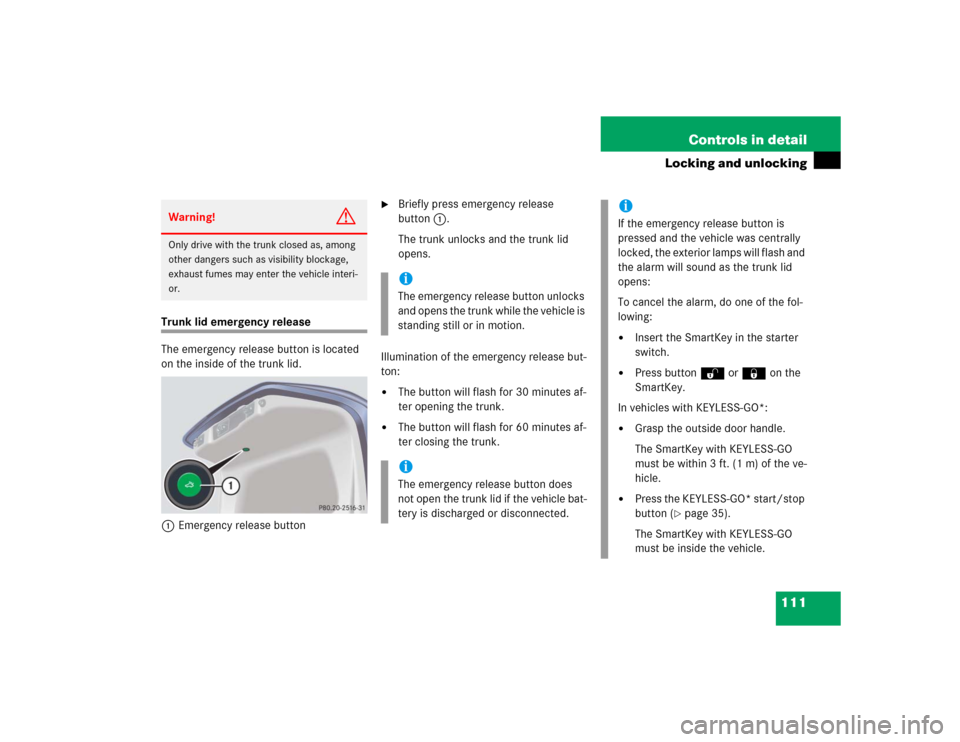
The emergency release button is located
on the inside of the trunk lid.
1Emergency release button
�
Briefly press emergency release
button1.
The trunk unlocks and the trunk lid
opens.
Illumination of the emergency release but-
ton:
�
The button will flash for 30 minutes af-
ter opening the trunk.
�
The button will flash for 60 minutes af-
ter closing the trunk.
Warning!
G
Only drive with the trunk closed as, among
other dangers such as visibility blockage,
exhaust fumes may enter the vehicle interi-
or.
iThe emergency release button unlocks
and opens the trunk while the vehicle is
standing still or in motion.iThe emergency release button does
not open the trunk lid if the vehicle bat-
tery is discharged or disconnected.
iIf the emergency release button is
pressed and the vehicle was centrally
locked, the exterior lamps will flash and
the alarm will sound as the trunk lid
opens:
To cancel the alarm, do one of the fol-
lowing:�
Insert the SmartKey in the starter
switch.
�
Press button Œ or ‹ on the
SmartKey.
In vehicles with KEYLESS-GO*:
�
Grasp the outside door handle.
The SmartKey with KEYLESS-GO
must be within 3 ft. (1 m) of the ve-
hicle.
�
Press the KEYLESS-GO* start/stop
button (
�page 35).
The SmartKey with KEYLESS-GO
must be inside the vehicle.
Page 114 of 474
112 Controls in detailLocking and unlockingPower closing assist for doors and trunk lid
It is not necessary to slam the door or
trunk lid closed. A pneumatic power-as-
sisted mechanism draws doors and trunk
lid closed quietly and automatically once
door and trunk lid has been latched. When
the pneumatic power-assisted mechanism
has stopped, doors and/or trunk can be
re-opened.Power closing assist for doors
�
Press the doors gently past the initial
engage position into the lock.
The doors close automatically.
Power closing assist for trunk lid
�
Press the trunk lid gently into its lock.
The trunk closes automatically.
Automatic central locking
The doors and the trunk automatically lock
when the ignition is switched on and the
wheels are turning at vehicle speeds of ap-
proximately 9 mph (15 km/h) or more.
You can open a locked door from the in-
side. Open door only when conditions are
safe to do so.
You can deactivate the automatic locking
using the control system (
�page 168).
Warning!
G
To prevent possible personal injury, always
keep hands and fingers away from the door
or trunk opening when closing a door or the
trunk lid. Be especially careful when small
children are around.
In case of danger, pull the inside or outside
door handle, or press the trunk lid lock.
To prevent personal injury, never actuate
the closing assist mechanism by tampering
with the door or trunk lid latch.
Warning!
G
Only drive with the doors closed. Otherwise,
one or more of the doors could open while
the vehicle is in motion, putting you and/or
others at risk.Warning!
G
Only drive with the trunk closed as, among
other dangers such as visibility blockage,
exhaust fumes may enter the vehicle interi-
or.
iThe doors unlock automatically after an
accident if the force of the impact ex-
ceeds a preset threshold. The vehicle
locks automatically when the ignition is
switched on and the wheels are turning
at vehicle speeds of approximately
9 mph (15 km/h) or more. You could
therefore lock yourself out when the
vehicle�
is pushed or towed
�
is on a test stand
Page 115 of 474
113 Controls in detail
Locking and unlocking
Locking and unlocking from the inside
You can lock or unlock the doors and the
trunk from inside using the central locking
or unlocking switch. This can be useful, for
example, if you want to lock the vehicle be-
fore starting to drive.
The fuel filler flap will not be locked or un-
locked with the central locking or unlock-
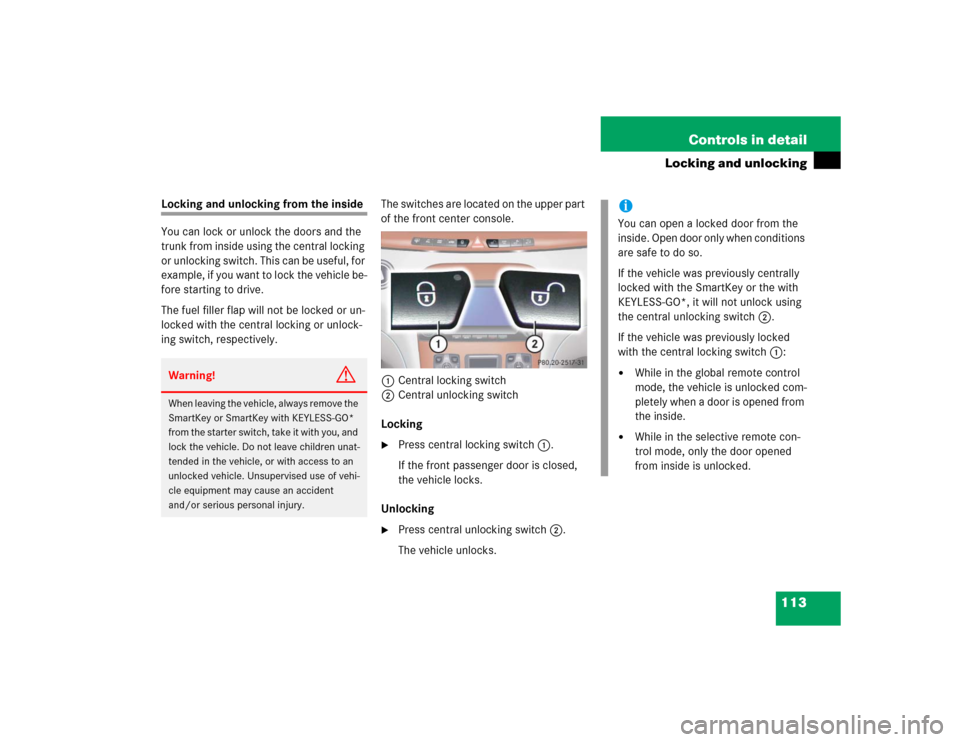
ing switch, respectively.The switches are located on the upper part
of the front center console.
1Central locking switch
2Central unlocking switch
Locking
�
Press central locking switch1.
If the front passenger door is closed,
the vehicle locks.
Unlocking
�
Press central unlocking switch2.
The vehicle unlocks.
Warning!
G
When leaving the vehicle, always remove the
SmartKey or SmartKey with KEYLESS-GO*
from the starter switch, take it with you, and
lock the vehicle. Do not leave children unat-
tended in the vehicle, or with access to an
unlocked vehicle. Unsupervised use of vehi-
cle equipment may cause an accident
and/or serious personal injury.
iYou can open a locked door from the
inside. Open door only when conditions
are safe to do so.
If the vehicle was previously centrally
locked with the SmartKey or the with
KEYLESS-GO*, it will not unlock using
the central unlocking switch2.
If the vehicle was previously locked
with the central locking switch1:�
While in the global remote control
mode, the vehicle is unlocked com-
pletely when a door is opened from
the inside.
�
While in the selective remote con-
trol mode, only the door opened
from inside is unlocked.
Page 116 of 474
114 Controls in detailSeatsFor more information on seat adjustment,
see “Adjusting” (
�page 37).
Easy-entry/exit feature
This feature allows for easier entry into and
exit from the vehicle.
The easy-entry/exit feature can be activat-
ed or deactivated in the
CONVENIENCE
sub-
menu of the control system (
�page 170).When exiting the vehicle, with the easy-en-
try/exit feature activated and depending
on your selection, the steering wheel tilts
upwards and/or the driver’s seat moves a
few inches to the rear when you:
�
remove the SmartKey from the starter
switch,
or
�
open the driver’s door with the
SmartKey in starter switch position 0
or 1 or the KEYLESS-GO* start/stop
button (
�page 35) in position 1.
Warning!
G
You must make sure no one can become
trapped or injured by the moving steering
wheel and driver’s seat when the easy-en-
try/exit feature is activated.
To cancel seat/steering wheel movement,
do one of the following:�
Press seat adjustment switch
(�page 38).
�
Move steering column stalk
(�page 40).
�
Press one of the memory position but-
tons (
�page 129).
Do not leave children unattended in the ve-
hicle, or with access to an unlocked vehicle.
Children could open the driver’s door and
unintentionally activate the easy-entry/exit
feature, which could result in an accident
and/or serious personal injury.
Page 120 of 474

118 Controls in detailSeatsSeat fore and aft adjustment�
Press switch forward or backward in di-
rection of arrow1.
Seat height
�
Press switch up or down in the direc-
tion of arrow2.
Head restraint height
�
Press switch up or down in direction of
arrow3.
Power seat, setting front passenger
seat position from rear*
This function lets you adjust the position of
the front passenger seat from the rear.
Warning!
G
For your protection, drive only with properly
positioned head restraints.
Adjust head restraint so that the center of
the head restraint supports the back of the
head at eye level. This will reduce the poten-
tial for injury to the head and neck in the
event of an accident or similar situation.
Do not drive the vehicle without the seat
head restraints. Head restraints are intend-
ed to help reduce injuries during an acci-
dent.
Warning!
G
When adjusting the front passenger seat,
make sure the seat, if occupied, is as far
from the passenger front air bag as possi-
ble.
Otherwise, the passenger could be seriously
or even fatally injured in the event of an ac-
cident or braking maneuver.
Make sure no one is caught or injured while
the seat is being adjusted.
Even with the SmartKey or SmartKey with
KEYLESS-GO* removed from the starter
switch or the SmartKey with KEYLESS-GO*
removed from the vehicle, the power seats
can be operated when the respective door is
open. Therefore, do not leave children unat-
tended in the vehicle, or with access to an
unlocked vehicle. Unsupervised use of vehi-
cle equipment may cause an accident
and/or serious personal injury.
Page 123 of 474
121 Controls in detailSeats
Placing head restraints upright�
Pull the rear head restraint upright until
it locks into position.Placing power head restraints* upright
�
Switch on ignition (
�page 34).
�
Press switch1 in the front center con-
sole and hold.
The rear head restraints will fold up-
right.Folding back and placing upright power
head restraints* with the switches in
the rear doors
You can fold the rear power head restraints
backward or upright using the head re-
straint folding switches in the respective
rear doors.
1Head restraint switch, rear
�
Switch on ignition (
�page 34).
or
�
Open the respective door.
�
Press switch up in direction of
arrow1.
!Make sure the head restraints engage
when placing them upright manually.
Otherwise their protective function
cannot be ensured.
��
Page 139 of 474
137 Controls in detail
Lighting
Interior lighting
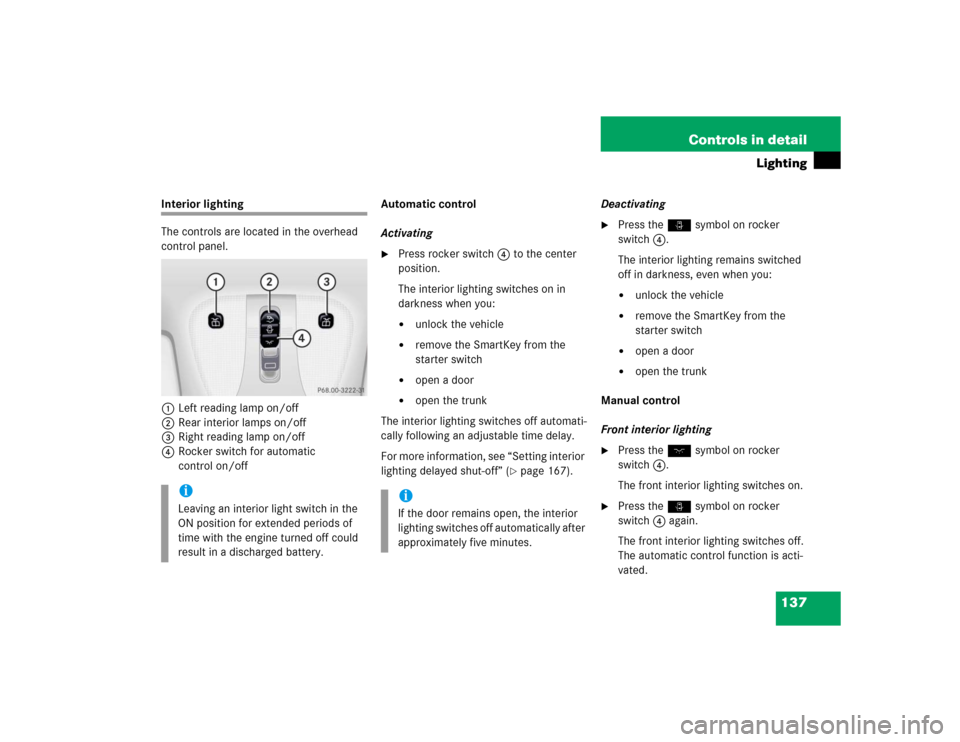
The controls are located in the overhead
control panel.
1Left reading lamp on/off
2Rear interior lamps on/off
3Right reading lamp on/off
4Rocker switch for automatic
control on/offAutomatic control
Activating
�
Press rocker switch 4 to the center
position.
The interior lighting switches on in
darkness when you:�
unlock the vehicle
�
remove the SmartKey from the
starter switch
�
open a door
�
open the trunk
The interior lighting switches off automati-
cally following an adjustable time delay.
For more information, see “Setting interior
lighting delayed shut-off” (
�page 167).Deactivating
�
Press the ñ symbol on rocker
switch 4.
The interior lighting remains switched
off in darkness, even when you:�
unlock the vehicle
�
remove the SmartKey from the
starter switch
�
open a door
�
open the trunk
Manual control
Front interior lighting
�
Press the ð symbol on rocker
switch 4.
The front interior lighting switches on.
�
Press the ñ symbol on rocker
switch 4 again.
The front interior lighting switches off.
The automatic control function is acti-
vated.
iLeaving an interior light switch in the
ON position for extended periods of
time with the engine turned off could
result in a discharged battery.
iIf the door remains open, the interior
lighting switches off automatically after
approximately five minutes.
Page 142 of 474

140 Controls in detailInstrument clusterA full view illustration of the instrument
cluster can be found in the “At a glance”
section of this manual (
�page 24).
1Reset buttonJ
The instrument cluster is activated when
you:
�
open a door
�
turn on the ignition
�
press the reset buttonJ1
�
switch on the exterior lamps
You can change the instrument cluster set-
tings in the instrument cluster submenu of
the control system (
�page 163).
Instrument cluster illumination
1Knob for adjusting instrument cluster
illumination
Use knob1 to adjust the illumination
brightness for the instrument cluster.
�
Press knob1.
The knob will pop out.
To brighten illumination
�
Turn knob1 in the instrument cluster
clockwise.
The instrument cluster illumination will
brighten.
To dim illumination
�
Turn knob1 in the instrument cluster
counterclockwise.
The instrument cluster illumination will
dim.
iThe instrument cluster illumination is
dimmed or brightened automatically to
suit ambient light conditions.
The instrument cluster illumination will
also be adjusted automatically when
you switch on the vehicle’s exterior
lamps.