Page 377 of 474
375 Practical hints
What to do if …?
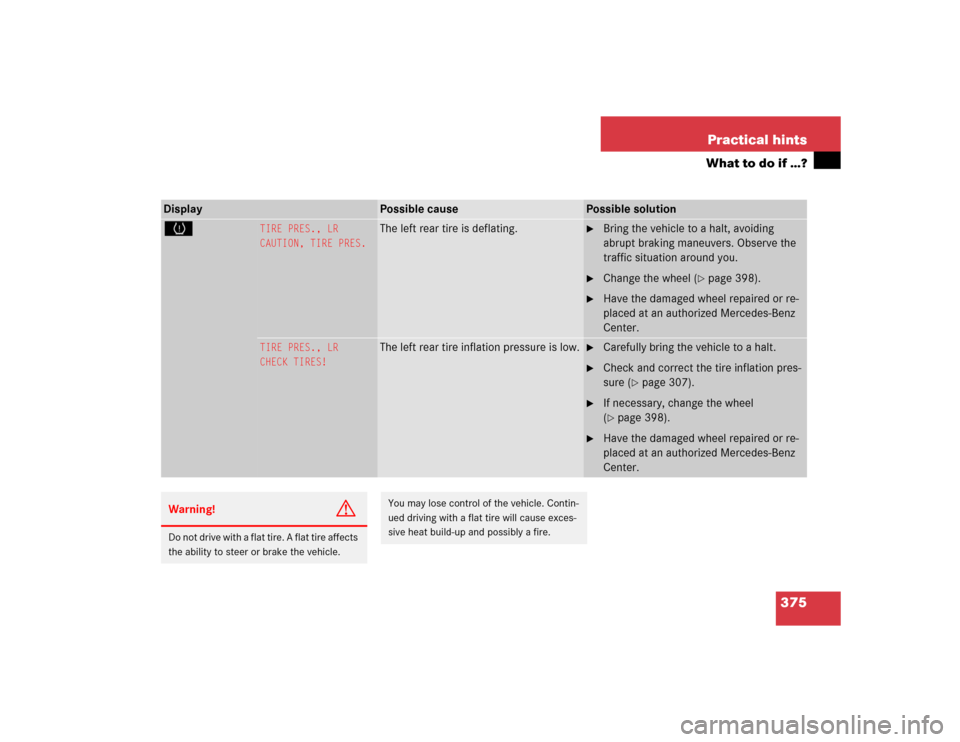
Display
Possible cause
Possible solution
H
TIRE PRES., LR
CAUTION, TIRE PRES.
The left rear tire is deflating.
�
Bring the vehicle to a halt, avoiding
abrupt braking maneuvers. Observe the
traffic situation around you.
�
Change the wheel (
�page 398).
�
Have the damaged wheel repaired or re-
placed at an authorized Mercedes-Benz
Center.
TIRE PRES., LR
CHECK TIRES!
The left rear tire inflation pressure is low.
�
Carefully bring the vehicle to a halt.
�
Check and correct the tire inflation pres-
sure (
�page 307).
�
If necessary, change the wheel
(�page 398).
�
Have the damaged wheel repaired or re-
placed at an authorized Mercedes-Benz
Center.
Warning!
G
Do not drive with a flat tire. A flat tire affects
the ability to steer or brake the vehicle.
You may lose control of the vehicle. Contin-
ued driving with a flat tire will cause exces-
sive heat build-up and possibly a fire.
Page 378 of 474
376 Practical hintsWhat to do if …?Display
Possible cause
Possible solution
H
TIRE PRES., RR
CAUTION, TIRE PRES.
The right rear tire is deflating.
�
Bring the vehicle to a halt, avoiding
abrupt braking maneuvers. Observe the
traffic situation around you.
�
Change the wheel (
�page 398).
�
Have the damaged wheel repaired or re-
placed at an authorized Mercedes-Benz
Center.
TIRE PRES., RR
CHECK TIRES!
The right rear tire inflation pressure is
low.
�
Carefully bring the vehicle to a halt.
�
Check and correct the tire inflation pres-
sure (
�page 307).
�
If necessary, change the wheel
(�page 398).
�
Have the damaged wheel repaired or re-
placed at an authorized Mercedes-Benz
Center.
Warning!
G
Do not drive with a flat tire. A flat tire affects
the ability to steer or brake the vehicle.
You may lose control of the vehicle. Contin-
ued driving with a flat tire will cause exces-
sive heat build-up and possibly a fire.
Page 382 of 474
380 Practical hintsWhere will I find ...?The vehicle tool kit includes:�
One interchangeable slot/Phillips
screwdriver
�
One towing eye bolt
�
One wheel bolt wrench with socket
wrench
�
One alignment bolt
�
One pair of gloves
�
One fuse extractor
�
One fuse chart for the main fuse box
�
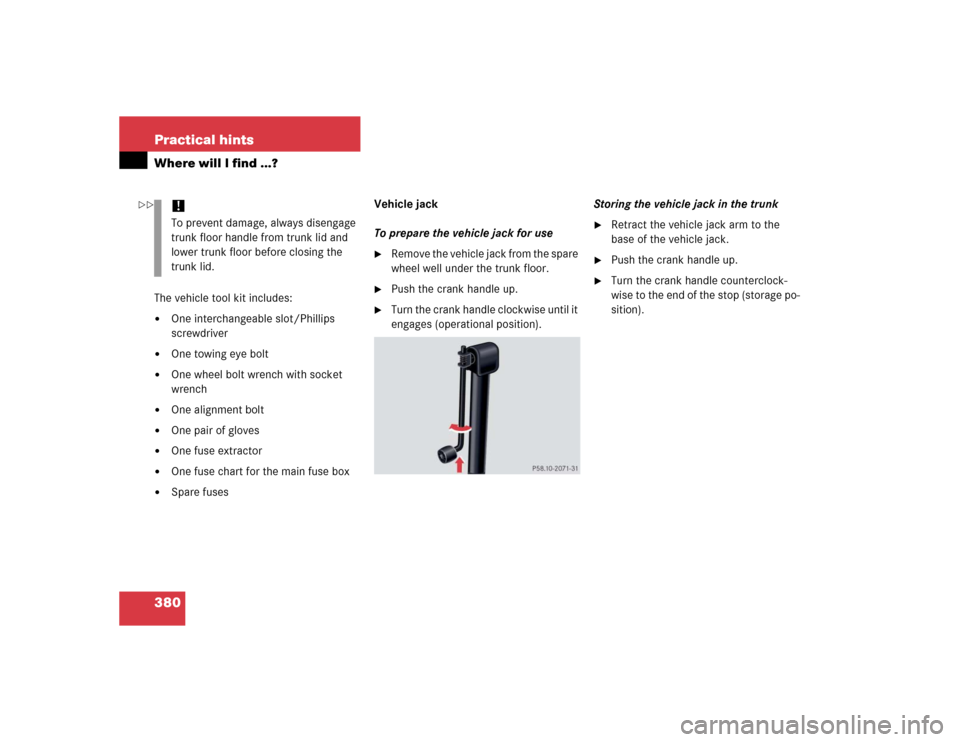
Spare fusesVehicle jack
To prepare the vehicle jack for use
�
Remove the vehicle jack from the spare
wheel well under the trunk floor.
�
Push the crank handle up.
�
Turn the crank handle clockwise until it
engages (operational position).Storing the vehicle jack in the trunk
�
Retract the vehicle jack arm to the
base of the vehicle jack.
�
Push the crank handle up.
�
Turn the crank handle counterclock-
wise to the end of the stop (storage po-
sition).
!To prevent damage, always disengage
trunk floor handle from trunk lid and
lower trunk floor before closing the
trunk lid.
��
Page 383 of 474

381 Practical hints
Where will I find ...?
Spare wheel
Removing the spare wheel�
Take out the vehicle tool kit tray2.
�
Loosen the luggage bowl3. To do so,
turn the luggage bowl counterclock-
wise.
�
Remove the spare wheel4.
Storing the spare wheel
�
Place spare wheel4in wheel well.
�
Secure the spare wheel. To do so, turn
the luggage bowl3 clockwise to its
stop.
�
Place vehicle tool kit tray2 in luggage
bowl.
Spare wheel S 430, S 500 and S 600
(except Sport Package*)
The spare wheel rim is mounted with a full
sized tire of the same type as on the vehi-
cle, and it is fully functional.However, that spare wheel rim is weight
optimized and has a limited service life of
12 000 miles (20 000 km) use before a
standard wheel rim must replace it.
In case of flat tire, you may temporarily use
the spare wheel.
Do not operate vehicle with more than one
spare wheel mounted.
For more information, see “Rims and tires”
(
�page 422).
Warning!
G
The jack is designed exclusively for jacking
up the vehicle at the jack take-up brackets
built into both sides of the vehicle. To help
avoid personal injury, use the jack only to lift
the vehicle during a wheel change. Never
get beneath the vehicle while it is supported
by the jack. Keep hands and feet away from
the area under the lifted vehicle. Always
firmly set parking brake and block wheels
before raising vehicle with jack.
Do not disengage parking brake while the
vehicle is raised. Be certain that the jack is
always vertical (plumb line) when in use, es-
pecially on hills. Always try to use the jack
on level surface. Make sure the jack arm is
fully seated in the jack take-up bracket. Al-
ways lower the vehicle onto sufficient ca-
pacity jackstands before working under the
vehicle.
Warning!
G
Never operate the vehicle with more than
one spare wheel mounted.
The spare wheel rim is for temporary use
only. Use for over a total of 12 000 miles
(20 000 km) (aggregate of all uses) may
cause wheel rim failure leading to an acci-
dent and possible injuries.
The spare wheel should only be used tempo-
rarily and replaced with a regular road wheel
as quickly as possible.
Page 384 of 474

382 Practical hintsWhere will I find ...?Spare wheel S 55 AMG and Sport
Package*
In case of a flat tire, you may temporarily
use the spare wheel when observing the
following restrictions:�
Do not exceed a vehicle speed of
50 mph (80 km/h).
�
Drive to the nearest tire repair facility
to have the flat tire repaired or re-
placed as appropriate.
�
Do not operate vehicle with more than
one spare wheel mounted.For more information, see “Rims and tires”
(
�page 422).
Warning!
G
The dimensions of the spare wheel are dif-
ferent from those of the road wheels. As a
result, the vehicle handling characteristics
change when driving with a mounted spare
wheel. Adapt your driving style accordingly.
Never operate the vehicle with more than
one spare wheel mounted.
The spare wheel is for temporary use only.
When driving with spare wheel mounted, en-
sure proper tire inflation pressure and do
not exceed vehicle speed of 50 mph
(80 km).
The spare wheel rim is for temporary use
only. Use for over a total of 12 000 miles
(20 000 km) (aggregate of all uses) may
cause wheel rim failure leading to an acci-
dent and possible injuries.
The spare wheel should only be used tempo-
rarily and replaced with a regular road wheel
as quickly as possible.
Page 401 of 474
.
Lifting the vehicle
�
Prevent the")
399 Practical hints
Flat tire
Preparing the vehicle�
Take vehicle tool kit tray and vehicle
jack out of trunk.
�
Take the spare wheel out of wheel well
(�page 379).
Lifting the vehicle
�
Prevent the vehicle from rolling away
by blocking wheels with wheel chocks
(not included) or other sizable objects.
When changing wheel on a level surface:
�
Place one chock in front of and one be-
hind the wheel that is diagonally oppo-
site to the wheel being changed.
When changing wheel on a hill:
�
Place chocks behind the downhill sides
of both wheels of the axle not being
worked on.
�
Take the two-piece wheel wrench out
of the vehicle tool kit tray. Assemble
wheel wrench.
�
On wheel to be changed, loosen but do
not yet remove the wheel bolts (ap-
proximately one full turn with wrench).
The tube openings are located directly be-
hind the front wheel housings and in front
of the rear wheel housings.
The dimensions of the spare wheel are dif-
ferent from those of the road wheels. As a
result, the vehicle handling characteristics
change when driving with a mounted spare
wheel. Adapt your driving style accordingly.
Warning!
G
The jack is designed exclusively for jacking
up the vehicle at the jack tubes built both
sides of the vehicle. To help avoid personal
injury, use the jack only to lift the vehicle
during a wheel change. Never get beneath
the vehicle while it is supported by the jack.
Keep hands and feet away from the area un-
der the lifted vehicle. Always firmly set park-
ing brake and block wheels before raising
vehicle with jack.
Do not disengage parking brake while the
vehicle is raised. Be certain that the jack is
always vertical (plumb line) when in use, es-
pecially on hills. Always try to use the jack
on level surface. Make sure the jack arm is
fully inserted in the jack tube. Always lower
the vehicle onto sufficient capacity jack-
stands before working under the vehicle.
Page 402 of 474
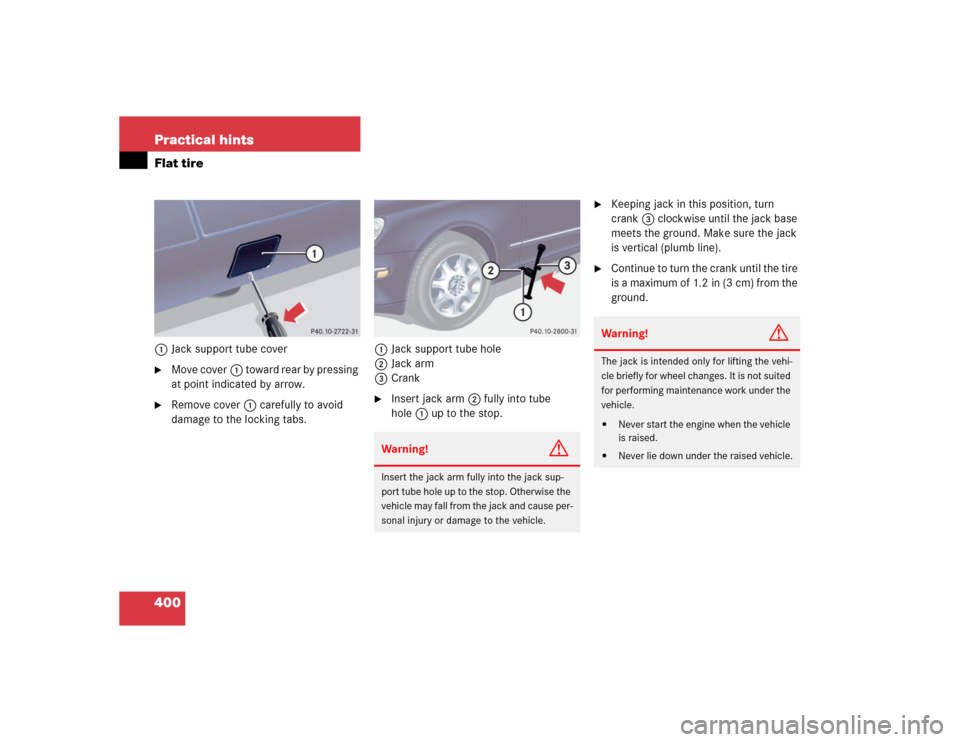
400 Practical hintsFlat tire1Jack support tube cover�
Move cover1 toward rear by pressing
at point indicated by arrow.
�
Remove cover1 carefully to avoid
damage to the locking tabs.1Jack support tube hole
2Jack arm
3Crank
�
Insert jack arm2 fully into tube
hole1 up to the stop.
�
Keeping jack in this position, turn
crank3 clockwise until the jack base
meets the ground. Make sure the jack
is vertical (plumb line).
�
Continue to turn the crank until the tire
is a maximum of 1.2 in (3 cm) from the
ground.
Warning!
G
Insert the jack arm fully into the jack sup-
port tube hole up to the stop. Otherwise the
vehicle may fall from the jack and cause per-
sonal injury or damage to the vehicle.
Warning!
G
The jack is intended only for lifting the vehi-
cle briefly for wheel changes. It is not suited
for performing maintenance work under the
vehicle.�
Never start the engine when the vehicle
is raised.
�
Never lie down under the raised vehicle.
Page 440 of 474

Data bus network serving to control ve-
hicle functions such as door locking or
windshield wiping.
Cockpit
All instruments, switches, button")
438 Technical termsCAN system
(C
ontroller A
rea N
etwork)
Data bus network serving to control ve-
hicle functions such as door locking or
windshield wiping.
Cockpit
All instruments, switches, buttons and
indicator/warning lamps in the passen-
ger compartment needed for vehicle
operation and monitoring.
COMAND
(C
ockpit M
anagement and D
ata Sys-
tem)
Information and operating center for
vehicle sound and communications
systems, including the radio and navi-
gation system, as well as other optional
equipment (CD changer, telephone,
etc.).Control system
The control system is used to call up
vehicle information and to change
component settings. Information and
messages appear in the multifunction
display. The driver uses the buttons on
the multifunction steering wheel to
navigate through the system and to ad-
just settings.
Cruise control
Driving convenience system that auto-
matically maintains the vehicle speed
set by the driver.Distronic*
A driving convenience cruise control
system which helps the driver maintain
a pre-selected speed:
�
If there is no vehicle directly ahead,
the system operates in the same
way as conventional ->cruise con-
trol.
�
If a slower moving vehicle is ahead,
Distronic will reduce your vehicle
speed to the extent permitted by re-
duced throttle and up to 20% brak-
ing power to maintain the preset
minimum following distance.