Page 378 of 474
376 Practical hintsWhat to do if …?Display
Possible cause
Possible solution
H
TIRE PRES., RR
CAUTION, TIRE PRES.
The right rear tire is deflating.
�
Bring the vehicle to a halt, avoiding
abrupt braking maneuvers. Observe the
traffic situation around you.
�
Change the wheel (
�page 398).
�
Have the damaged wheel repaired or re-
placed at an authorized Mercedes-Benz
Center.
TIRE PRES., RR
CHECK TIRES!
The right rear tire inflation pressure is
low.
�
Carefully bring the vehicle to a halt.
�
Check and correct the tire inflation pres-
sure (
�page 307).
�
If necessary, change the wheel
(�page 398).
�
Have the damaged wheel repaired or re-
placed at an authorized Mercedes-Benz
Center.
Warning!
G
Do not drive with a flat tire. A flat tire affects
the ability to steer or brake the vehicle.
You may lose control of the vehicle. Contin-
ued driving with a flat tire will cause exces-
sive heat build-up and possibly a fire.
Page 379 of 474
377 Practical hints
What to do if …?
Display
Possible cause
Possible solution
TIRE PRES. MONITOR
REACTIVE AFTER
CORRECTING PRESSURE
There was a tire inflation pressure warning
message.
The yellow warning lamp for the tire infla-
tion pressure monitor comes on and you
have not reactivated the system since the
last tire inflation pressure check.
�
Activate the tire inflation pressure monitor
after correcting the tire inflation pressure val-
ues (
�page 307).
TIRE PRES. MONITOR
REACTIVATED
The tire inflation pressure monitor is using
the current pressure values as the basis for
monitoring.
Warning!
G
Do not drive with a flat tire. A flat tire affects
the ability to steer or brake the vehicle.
You may lose control of the vehicle. Contin-
ued driving with a flat tire will cause exces-
sive heat build-up and possibly a fire.
Page 380 of 474

378 Practical hintsWhat to do if …?Display
Possible cause
Possible solution
TIRE PRES. MONITOR
CURRENTLY
UNAVAILABLE
The tire inflation pressure monitor* is un-
able to monitor the tire inflation pressure
due to:�
the presence of several when sensors in
the vehicle
�
excessive wheel sensor temperatures
�
a nearby radio interference source
�
unrecognized wheel sensors installed
�
Remove any extra wheel sensors from the ve-
hicle.
As soon as the causes of the malfunction have
been removed, the tire inflation pressure moni-
tor automatically becomes active again.
TIRE PRES. MONITOR
NOT OPERATIONAL DRIVE TO WORKSHOP
The tire inflation pressure monitor or a
wheel sensor is malfunctioning.
�
Have the tire inflation pressure monitor
checked by an authorized Mercedes-Benz
Center.
A wheel without proper sensor was in-
stalled.
�
Have the wheels checked.
Warning!
G
Do not drive with a flat tire. A flat tire affects
the ability to steer or brake the vehicle.
You may lose control of the vehicle. Contin-
ued driving with a flat tire will cause exces-
sive heat build-up and possibly a fire.
Page 383 of 474

381 Practical hints
Where will I find ...?
Spare wheel
Removing the spare wheel�
Take out the vehicle tool kit tray2.
�
Loosen the luggage bowl3. To do so,
turn the luggage bowl counterclock-
wise.
�
Remove the spare wheel4.
Storing the spare wheel
�
Place spare wheel4in wheel well.
�
Secure the spare wheel. To do so, turn
the luggage bowl3 clockwise to its
stop.
�
Place vehicle tool kit tray2 in luggage
bowl.
Spare wheel S 430, S 500 and S 600
(except Sport Package*)
The spare wheel rim is mounted with a full
sized tire of the same type as on the vehi-
cle, and it is fully functional.However, that spare wheel rim is weight
optimized and has a limited service life of
12 000 miles (20 000 km) use before a
standard wheel rim must replace it.
In case of flat tire, you may temporarily use
the spare wheel.
Do not operate vehicle with more than one
spare wheel mounted.
For more information, see “Rims and tires”
(
�page 422).
Warning!
G
The jack is designed exclusively for jacking
up the vehicle at the jack take-up brackets
built into both sides of the vehicle. To help
avoid personal injury, use the jack only to lift
the vehicle during a wheel change. Never
get beneath the vehicle while it is supported
by the jack. Keep hands and feet away from
the area under the lifted vehicle. Always
firmly set parking brake and block wheels
before raising vehicle with jack.
Do not disengage parking brake while the
vehicle is raised. Be certain that the jack is
always vertical (plumb line) when in use, es-
pecially on hills. Always try to use the jack
on level surface. Make sure the jack arm is
fully seated in the jack take-up bracket. Al-
ways lower the vehicle onto sufficient ca-
pacity jackstands before working under the
vehicle.
Warning!
G
Never operate the vehicle with more than
one spare wheel mounted.
The spare wheel rim is for temporary use
only. Use for over a total of 12 000 miles
(20 000 km) (aggregate of all uses) may
cause wheel rim failure leading to an acci-
dent and possible injuries.
The spare wheel should only be used tempo-
rarily and replaced with a regular road wheel
as quickly as possible.
Page 384 of 474

382 Practical hintsWhere will I find ...?Spare wheel S 55 AMG and Sport
Package*
In case of a flat tire, you may temporarily
use the spare wheel when observing the
following restrictions:�
Do not exceed a vehicle speed of
50 mph (80 km/h).
�
Drive to the nearest tire repair facility
to have the flat tire repaired or re-
placed as appropriate.
�
Do not operate vehicle with more than
one spare wheel mounted.For more information, see “Rims and tires”
(
�page 422).
Warning!
G
The dimensions of the spare wheel are dif-
ferent from those of the road wheels. As a
result, the vehicle handling characteristics
change when driving with a mounted spare
wheel. Adapt your driving style accordingly.
Never operate the vehicle with more than
one spare wheel mounted.
The spare wheel is for temporary use only.
When driving with spare wheel mounted, en-
sure proper tire inflation pressure and do
not exceed vehicle speed of 50 mph
(80 km).
The spare wheel rim is for temporary use
only. Use for over a total of 12 000 miles
(20 000 km) (aggregate of all uses) may
cause wheel rim failure leading to an acci-
dent and possible injuries.
The spare wheel should only be used tempo-
rarily and replaced with a regular road wheel
as quickly as possible.
Page 389 of 474

387 Practical hints
Replacing SmartKey batteries
�Replacing SmartKey batteries
If the batteries in the SmartKey or the
SmartKey with KEYLESS-GO* are dis-
charged, the vehicle can no longer be
locked or unlocked. It is recommended to
have the batteries replaced at an autho-
rized Mercedes-Benz Center.Batteries contain materials that can harm
the environment if disposed of improperly.
Recycling of batteries is the preferred
method of disposal. Many states require
sellers of batteries to accept old batteries
for recycling.
SmartKey�
Remove mechanical key out of the
SmartKey (
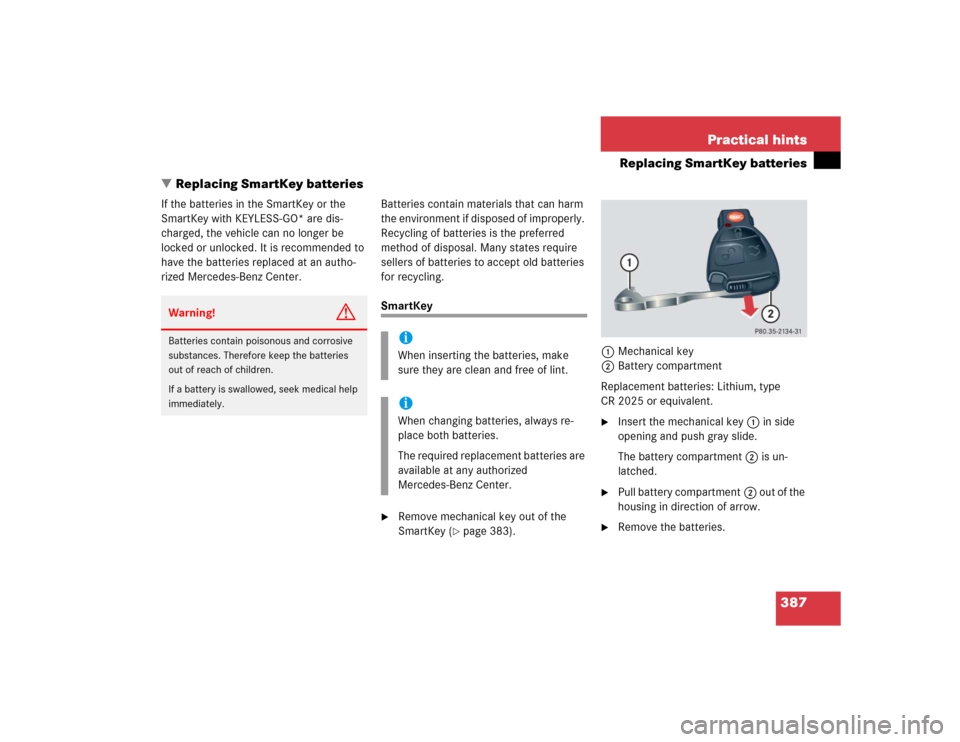
�page 383).1Mechanical key
2Battery compartment
Replacement batteries: Lithium, type
CR 2025 or equivalent.
�
Insert the mechanical key1 in side
opening and push gray slide.
The battery compartment2 is un-
latched.
�
Pull battery compartment2 out of the
housing in direction of arrow.
�
Remove the batteries.
Warning!
G
Batteries contain poisonous and corrosive
substances. Therefore keep the batteries
out of reach of children.
If a battery is swallowed, seek medical help
immediately.
iWhen inserting the batteries, make
sure they are clean and free of lint.iWhen changing batteries, always re-
place both batteries.
The required replacement batteries are
available at any authorized
Mercedes-Benz Center.
Page 393 of 474

391 Practical hints
Replacing bulbs
Notes on bulb replacement
�
Only use 12 volt bulbs of the same type
and with the specified watt rating.
�
Switch lights off before changing a bulb
to prevent short circuits.
�
Always use a clean lint-free cloth when
handling bulbs.
�
Your hands should be dry and free of oil
and grease.
�
If the newly installed bulb does not
come on, visit an authorized
Mercedes-Benz Center.Have the LEDs and bulbs for the following
lamps replaced by an authorized
Mercedes-Benz Center.
�
Additional turn signal lamps in the exte-
rior rear view mirrors
�
Bi-Xenon lamps*
�
High mounted brake lamp
�
Brake lamps
�
Rear side marker lamps
�
Rear parking lamps
Warning!
G
Keep bulbs out of reach of children.
Bulbs and bulb sockets can be very hot. Al-
low the lamp to cool down before changing
a bulb.
Halogen lamps contain pressurized gas. A
bulb can explode if you:�
touch or move it when hot
�
drop the bulb
�
scratch the bulb
Wear eye and hand protection.
Because of high voltage in Xenon lamps, it is
dangerous to replace the bulb or repair the
lamp and its components. We recommend
that you have such work done by a qualified
technician.
iHave the headlamp adjustment
checked regularly.
Page 394 of 474
392 Practical hintsReplacing bulbsReplacing bulbs for front lamps
Before you start to replace a bulb for a
front lamp, do the following first:�
Turn the exterior lamp switch to M
(�page 50).
�
Open the hood (
�page 286) (except
for side marker lamps).
1Headlamp cover for fog lamp
2Headlamp cover for high beam halogen
headlamp bulb, parking and standing
lamp
3Headlamp cover for Bi-Xenon* (low and
high beam) or halogen (low beam)
headlamp bulb4Bulb socket for fog lamp
5Bulb socket for parking and standing
lamp
6Electrical connector for high beam
halogen headlamp bulb
7Electrical connector for low beam
headlamp bulb
8Bulb socket for turn signal lampReplacing low beam bulbs
Bi-Xenon* headlamp
Warning!
G
Do not remove the cover for the Bi-Xenon
headlamp. Because of high voltage in Xenon
lamps, it is dangerous to replace the bulb or
repair the lamp and its components. We rec-
om men d t ha t y ou ha ve s uc h w o rk do n e by a
qualified technician.