Page 199 of 474

197 Controls in detail
Automatic climate control
Adjusting manually�
Press left or right buttonU.
The button emerges and theh,
», d and csymbols become
visible.
�
Turn the marking on the regulator to
the desired symbol.
The air will be directed to the vents cor-
responding to this symbol.
Adjusting automatically
�
Press left or right buttonU until it
clicks in.
Theh, », d and
csymbols are no longer visible.
The air distribution is adjusted auto-
matically.Windows fogged on the inside
�
Press button± to switch on the air
conditioning (
�page 194).
The indicator lamp in the button goes
out.
�
Press button, to switch off the air
recirculation (
�page 194).
The indicator lamp on the button goes
out.
�
Make sure left and right buttonU
emerges.
Theh, », d and
csymbols become visible.
�
Press left and rightd button.
�
Set blower to the maximum speed.
�
Adjust left and right air vents1
and6 upwards (
�page 192).
�
Increase temperature setting.
�
Open side air vents9 and direct them
onto the side windows (
�page 192).
Windshield fogged on the outside
�
Switch the windshield wipers on
(�page 52).
�
Press on both U buttons until they
click in.
Theh, », d and c sym-
bols are no longer visible.
Page 204 of 474

202 Controls in detailAutomatic climate control
Deactivating the climate control sys-tem
Deactivating
It is possible to completely deactivate the
automatic climate control system. �
Press button M (
�page 194).
The display shows “0”.
Reactivating
There are several ways to reactivate the
automatic climate control system:
�
Press one of the following buttons,
M, P, U, a temperature con-
trol switch (
�page 194) or air volume
switch 9 on the automatic climate
control panel.
Air conditioning
The air conditioning is operational while
the engine is running and cools the interior
air to the temperature set by the operator.
Deactivating
It is possible to deactivate the air condi-
tioning (cooling) function of the automatic
climate control system. The air in the vehi-
cle will then no longer be cooled or dehu-
midified.�
Press button± (
�page 194).
The indicator lamp on the button±
comes on.
Warning!
G
Any accumulation of snow and ice should be
removed from the rear window before driv-
ing. Visibility could otherwise be impaired,
endangering you and others.!If the rear window defroster switches
off too soon and the indicator lamp
starts flashing, this means that too
many electrical consumers are operat-
ing simultaneously and there is insuffi-
cient voltage in the battery. The system
responds automatically by deactivating
the rear window defroster.
As soon as the battery has sufficient
voltage, the rear window defroster au-
tomatically turns itself back on.
iCondensation may drip out from under-
neath the vehicle. This is normal and
not an indication of a malfunction.
Page 240 of 474

238 Controls in detailDriving systemsAs your vehicle approaches an object, one
or more distance segments will illuminate,
depending on the distance. When the
eighth distance segment illuminates, you
have reached the minimum distance.�
Front area: An intermittent acoustic
warning will sound as the first red dis-
tance segment illuminates and a con-
stant acoustic warning lasting a
maximum of two seconds will sound for
the second red distance segment. The
signal is canceled when the gear selec-
tor lever is placed in position P.
�
Rear area: An intermittent acoustic
warning will sound as the first red dis-
tance segment illuminates and a con-
stant acoustic warning lasting a
maximum of two seconds will sound for
the second red distance segment. The
signal is canceled when the gear selec-
tor lever is placed in position D orP.Switching the Parktronic system
on/off
The Parktronic system can be switched off
manually.
The Parktronic button is located in the up-
per part of the front center console.
1Indicator lamp
2Parktronic buttonSwitching off the Parktronic system
�
Press button 2.
Indicator lamp 1 comes on.
Switching on the Parktronic system
�
Press button 2 again.
Indicator lamp 1 goes out.iThe Parktronic system is automatically
switched on when the ignition is
switched on (
�page 34).
Page 247 of 474
245 Controls in detail
Useful features
Storage compartment in the center
console
The storage compartment is located on the
lower part of the front center console.
1Storage compartment
Opening�
Slide the mark on the compartment
cover forward.
Closing
�
Lightly press the mark on the compart-
ment cover forward. The cover closes
automatically.Storage compartment in front of arm-
rest
1Storage compartment
Opening
The compartment contains a cup holder
(
�page 248).
�
Lightly touch cover plate1.
The cover opens automatically.
Closing
�
Lightly push cover plate1 up until it
engages.Storage compartment below the front
armrest
Depending on vehicle model and configu-
ration, your vehicle is equipped with a stor-
age compartment below the front armrest.
The storage compartment below the front
armrest is illuminated with the exterior
lamps switched on.
The buttons are located under the cushion
of the armrest.
1Button to open storage compartment
2Button to open storage tray
Page 250 of 474

248 Controls in detailUseful featuresStorage compartment in rear shelf*
1Rear shelf compartment
Opening�
Lift the lid using the handle in the front.Storage compartments under the front
seats
1Lid
2Buttons
Opening
�
Press buttons2 together and fold
lid1 down.
Closing
�
Close lid1 until both buttons2 of
lock engage.Cup holder in front of seat armrest
Warning!
G
In order to help prevent spilling liquids on
vehicle occupants, only use containers that
fit into the cup holder. Use lids on open con-
tainers and do not fill containers to a height
where the contents, especially hot liquids,
could spill during braking, vehicle maneu-
vers, or in an accident.
When not in use, keep the cup holder
closed. An open cup holder may cause injury
to you or others when contacted during
braking, vehicle maneuvers, or in an acci-
dent.
Keep in mind that objects placed in the cup
holder may come loose during braking, vehi-
cle maneuvers, or in an accident and be
thrown around in the vehicle interior. Ob-
jects thrown around in the vehicle interior
may cause an accident and/or serious per-
sonal injury.
Page 256 of 474

254 Controls in detailUseful featuresTelephone*
Radio transmitters, such as a portable tele-
phone or a citizens band unit, should only
be used inside the vehicle if they are con-
nected to an antenna that is installed on
the outside of the vehicle.
The external antenna must be approved by
Mercedes-Benz. Please contact an autho-
rized Mercedes-Benz Center for informa-
tion on the installation of an approved
external antenna. Refer to the radio trans-
mitter operation instructions regarding use
of an external antenna.You can take and place telephone calls us-
ing thes andt buttons on the
steering wheel. To carry out other tele-
phone functions, use the control system
(
�page 143).
See separate operating manual for instruc-
tions on how to use the telephone.
Warning!
G
Never operate radio transmitters equipped
with a built-in or attached antenna (i.e. with-
out being connected to an external antenna)
from inside the vehicle while the engine is
running. Doing so could lead to a malfunc-
tion of the vehicle’s electronic system, pos-
sibly resulting in an accident and/or serious
personal injury.
Warning!
G
Please do not forget that your primary re-
sponsibility is to drive the vehicle. A driver’s
attention to the road must always be
his/her primary focus when driving. For
your safety and the safety of others, we rec-
ommend that you pull over to a safe location
and stop before placing or taking a tele-
phone call.
If you choose to use the telephone
1 while
driving, please use the hands-free device
and only use the telephone when road,
weather and traffic conditions permit. Some
jurisdictions prohibit the driver from using a
cellular telephone while driving a vehicle.
Only operate the COMAND (Cockpit Man-
agement and Data System)
1 if road, weather
and traffic conditions permit.
Bear in mind that at a speed of just 30 mph
(approximately 50 km/h), your vehicle is
covering a distance of 44 feet (approximate-
ly 14 m) every second.
1Observe all legal requirements.
Page 263 of 474

261 Controls in detail
Useful features
Upgrade scenario
An emergency call is possible even if other
services are active. Information calls can be terminated us-
ing the tbutton on the multifunc-
tion steering wheel or the respective
button for ending a telephone call on
the COMAND headunit.
!If the indicator lamps do not start flash-
ing after pressing one of the buttons or
remain illuminated (in red) at any time,
the Tele Aid system has detected a
fault or the service is not currently ac-
tive, and may not initiate a call. Visit an
Mercedes-Benz Center and have the
system checked or contact the Re-
sponse Center at 1-800-756-9018 (in
the USA) or 1-888-923-8367 (in Cana-
da) as soon as possible.
!If the indicator lamp continues to flash
or the system does not reset, contact
the Response Center at
1-800-756-9018 (in the USA) or
1-888-923-8367 (in Canada), or
Mercedes-Benz Customer Assistance
at 1-800-FOR-MERCedes
(1-800-367-6372) in the USA or
Customer Service at 1-800-387-0100
in Canada.
iThe indicator lamp in the respective
button flashes until the call is con-
cluded. Calls can only be terminated by
a Response Center or Customer
Assistance Center representative
except Roadside Assistance and
Information calls, which can also be
terminated by pressing buttont on
the multifunction steering wheel or the
respective button for ending a
telephone call on the COMAND head-
unit.
Page 266 of 474

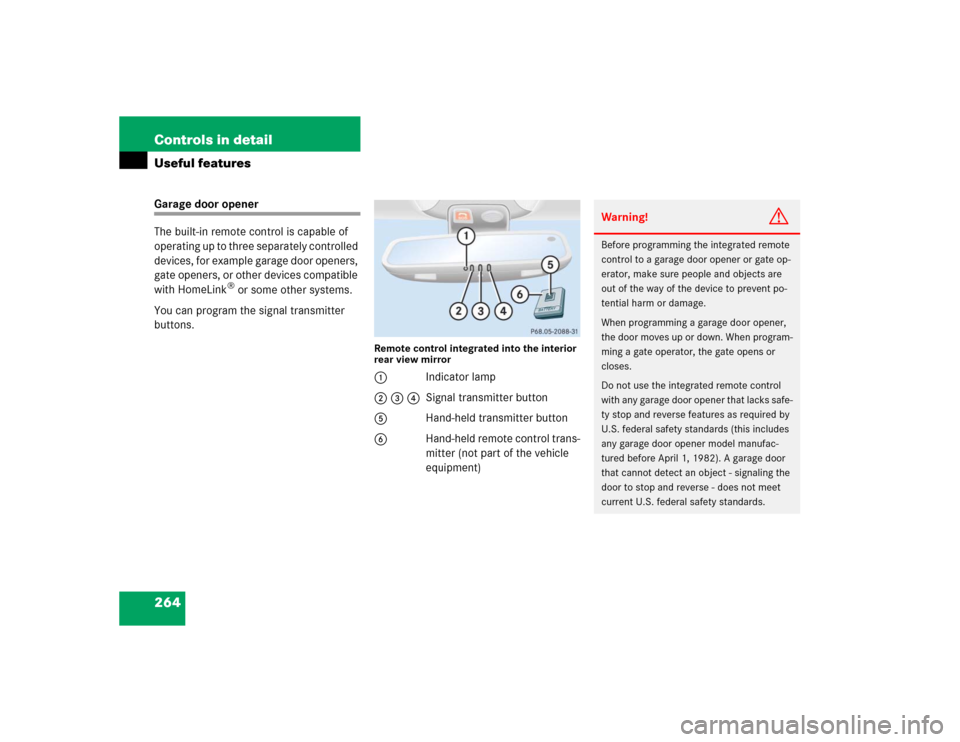
264 Controls in detailUseful featuresGarage door opener
The built-in remote control is capable of
operating up to three separately controlled
devices, for example garage door openers,
gate openers, or other devices compatible
with HomeLink
® or some other systems.
You can program the signal transmitter
buttons.
Remote control integrated into the interior
rear view mirror1Indicator lamp
2 3 4Signal transmitter button
5Hand-held transmitter button
6Hand-held remote control trans-
mitter (not part of the vehicle
equipment)
Warning!
G
Before programming the integrated remote
control to a garage door opener or gate op-
erator, make sure people and objects are
out of the way of the device to prevent po-
tential harm or damage.
When programming a garage door opener,
the door moves up or down. When program-
ming a gate operator, the gate opens or
closes.
Do not use the integrated remote control
with any garage door opener that lacks safe-
ty stop and reverse features as required by
U.S. federal safety standards (this includes
any garage door opener model manufac-
tured before April 1, 1982). A garage door
that cannot detect an object - signaling the
door to stop and reverse - does not meet
current U.S. federal safety standards.