Page 105 of 474

103 Controls in detail
Locking and unlocking
Front doors�
Pull on door handle2 on the respec-
tive front door to open door.
If door was locked, locking knob1 will
move up.
Rear doors
�
Pull up locking knob1 on the respec-
tive rear door to unlock door.
�
Pull on door handle2 on the respec-
tive rear door to open door.
Opening the trunk
Opening the trunk from the outside
A minimum height clearance of 6 ft.
(1.85 m) is required to open the trunk lid.
The trunk lid lock button is located in the
rear license plate recess.
1Trunk lid lock button
In vehicles without KEYLESS-GO*: The ve-
hicle must be unlocked.�
Press the outer left-hand side of trunk
lid button1.
The trunk lid opens.
iIf the vehicle has previously been
locked from the outside with the
SmartKey or KEYLESS-GO*, opening a
door from the inside will trigger the an-
ti-theft alarm system.
To cancel the alarm, do one of the fol-
lowing:�
Insert the SmartKey in the starter
switch.
�
Press button Œ or ‹ on the
SmartKey.
In vehicles with KEYLESS-GO*:
�
Grasp the outside door handle.
The SmartKey with KEYLESS-GO
must be within 3 ft. (1 m) of the ve-
hicle.
�
Press the KEYLESS-GO* start/stop
button (
�page 35).
The SmartKey with KEYLESS-GO
must be inside the vehicle.
Page 112 of 474

In vehicles with trunk lid opening/closing
system* and KEYLESS-GO,")
110 Controls in detailLocking and unlockingClosing the trunk and locking the vehi-
cle from the outside (vehicles with
KEYLESS-GO*)
In vehicles with trunk lid opening/closing
system* and KEYLESS-GO, you can close
the trunk lid and lock the vehicle simulta-
neously from the outside using the
KEYLESS-GO locking/closing switch.
1KEYLESS-GO locking/closing switch�
Make sure you have the SmartKey with
KEYLESS-GO with you.
�
Press switch1 briefly.
The vehicle is locked and the trunk lid
closes automatically. The turn signals
flash three times to confirm locking.
The locking knobs in the doors move
down. The anti-theft alarm system is
activated.
If the trunk lid comes into contact with an
object while closing (e.g. luggage that has
been piled too high), the closing procedure
is stopped and the trunk reopens slightly.iYou can also close the trunk by hand.iTo prevent a possible inadvertent lock-
out, the trunk lid will open automatical-
ly if a SmartKey with KEYLESS-GO is
recognized inside the vehicle or in the
trunk.
Warning!
G
Monitor the closing procedure carefully to
make sure no one is in danger of being in-
jured. To prevent possible personal injury,
always keep hands and fingers away from
the trunk opening when closing the trunk.
Be especially careful when small children
are around. To stop the closing procedure,
do one of the following:�
press KEYLESS-GO locking/closing
switch1
�
press the Š button on the SmartKey
with KEYLESS-GO
�
press the remote trunk lid switch (on the
driver’s door)
Even with the SmartKey with KEYLESS-GO
removed from the vehicle, the KEYLESS-GO
locking/closing switch can be operated.
Therefore, do not leave children unattended
in the vehicle, or with access to an unlocked
vehicle. Unsupervised use of vehicle equip-
ment may cause an accident and/or serious
personal injury.
Page 113 of 474

111 Controls in detail
Locking and unlocking
Trunk lid emergency release
The emergency release button is located
on the inside of the trunk lid.
1Emergency release button
�
Briefly press emergency release
button1.
The trunk unlocks and the trunk lid
opens.
Illumination of the emergency release but-
ton:
�
The button will flash for 30 minutes af-
ter opening the trunk.
�
The button will flash for 60 minutes af-
ter closing the trunk.
Warning!
G
Only drive with the trunk closed as, among
other dangers such as visibility blockage,
exhaust fumes may enter the vehicle interi-
or.
iThe emergency release button unlocks
and opens the trunk while the vehicle is
standing still or in motion.iThe emergency release button does
not open the trunk lid if the vehicle bat-
tery is discharged or disconnected.
iIf the emergency release button is
pressed and the vehicle was centrally
locked, the exterior lamps will flash and
the alarm will sound as the trunk lid
opens:
To cancel the alarm, do one of the fol-
lowing:�
Insert the SmartKey in the starter
switch.
�
Press button Œ or ‹ on the
SmartKey.
In vehicles with KEYLESS-GO*:
�
Grasp the outside door handle.
The SmartKey with KEYLESS-GO
must be within 3 ft. (1 m) of the ve-
hicle.
�
Press the KEYLESS-GO* start/stop
button (
�page 35).
The SmartKey with KEYLESS-GO
must be inside the vehicle.
Page 265 of 474
263 Controls in detail
Useful features
Stolen Vehicle Recovery services
In the event your vehicle was stolen:�
Report the incident to the police.
The police will issue a numbered
incident report.
�
Pass this number on to the
Mercedes-Benz Response Center along
with your password issued to you when
you subscribed to the service.
The Response Center will then attempt
to covertly contact the vehicle’s
Tele Aid system. Once the vehicle is
located, the Response Center will
contact the local law enforcement and
you. The vehicle’s location will only be
provided to law enforcement.
iWhen the anti-theft alarm or the
tow-away alarm stays on for more than
30 seconds, a call is initiated automat-
ically to the Response Center. See
anti-theft alarm system (
�page 87)
and tow-away alarm (
�page 89).
Page 385 of 474
383 Practical hints
Unlocking/locking in an emergency
�Unlocking/locking in an emergency
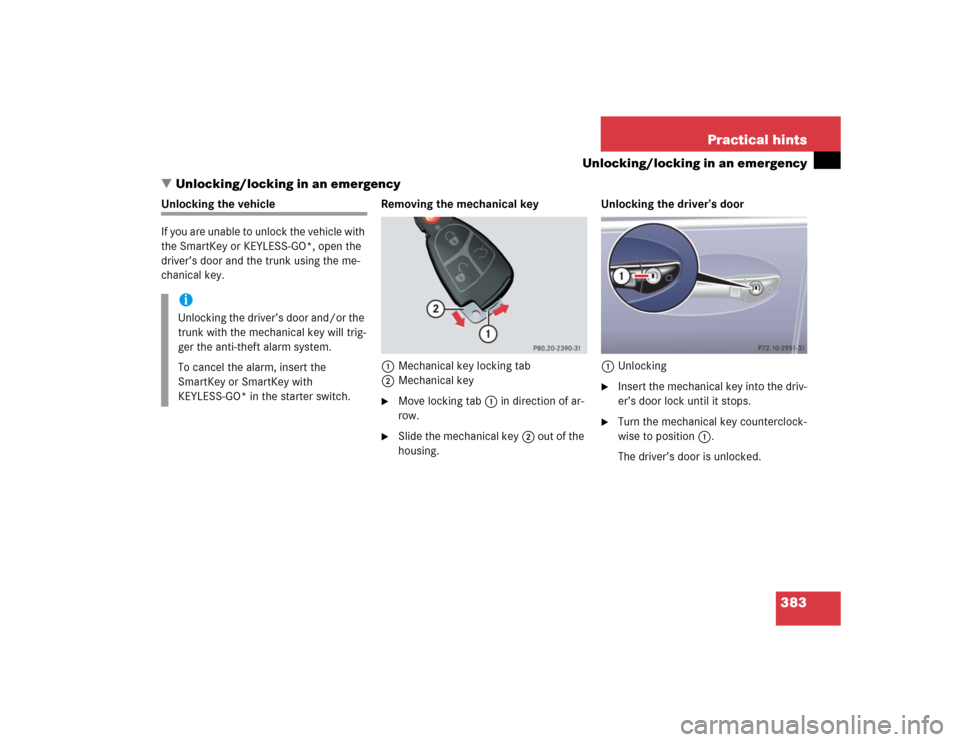
Unlocking the vehicle
If you are unable to unlock the vehicle with
the SmartKey or KEYLESS-GO*, open the
driver’s door and the trunk using the me-
chanical key. Removing the mechanical key
1Mechanical key locking tab
2Mechanical key
�
Move locking tab1 in direction of ar-
row.
�
Slide the mechanical key2 out of the
housing.Unlocking the driver’s door
1Unlocking
�
Insert the mechanical key into the driv-
er’s door lock until it stops.
�
Turn the mechanical key counterclock-
wise to position1.
The driver’s door is unlocked.
iUnlocking the driver’s door and/or the
trunk with the mechanical key will trig-
ger the anti-theft alarm system.
To cancel the alarm, insert the
SmartKey or SmartKey with
KEYLESS-GO* in the starter switch.
Page 410 of 474

408 Practical hintsTowing the vehicleMercedes-Benz recommends that the vehi-
cle be transported with all wheels off the
ground using flatbed or appropriate wheel
lift/dolly equipment. This method is pref-
erable to other types of towing.When circumstances do not permit the
recommended towing methods, the vehi-
cle may be towed with all wheels on the
ground or front wheels raised (except vehi-
cles with 4MATIC) only so far as necessary
to have the vehicle moved to a safe loca-
tion where the recommended towing
methods can be employed.
!Use flatbed or wheel lift/dolly equip-
ment with SmartKey in starter switch
turned to position0.
Do not tow with sling-type equipment.
Towing with sling-type equipment over
bumpy roads will damage radiator and
supports.
To prevent damage during transport,
do not tie down vehicle by its chassis or
suspension parts.
Switch off the tow-away alarm
(�page 89) and the automatic central
locking (
�page 112).
Do not tow-start the vehicle.
!Vehicles with 4MATIC:
Do not tow with one axle raised. Doing
so could damage the transfer case,
which is not covered by the
Mercedes-Benz Limited Warranty.
All wheels must be on or off the ground.
Observe instructions for towing the ve-
hicle with all wheels on the ground.
!If the vehicle is towed with the front
axle raised (not permissible for vehicles
with 4MATIC), the engine must be shut
off (SmartKey in starter switch
position0 or 1). Otherwise the ESP will
immediately be engaged and will apply
the rear wheel brakes.
When towing the vehicle with all wheels
on the ground, the selector lever must
be in positionN and the SmartKey
must be in starter switch position2.
When towing the vehicle with all wheels
on the ground or the front axle raised,
the vehicle may be towed only for dis-
tances up to 30 miles (50 km) and at a
speed not to exceed 30 mph
(50 km/h).
Page 412 of 474

410 Practical hintsTowing the vehicle
Installing towing eye bolt
1Cover on right side of front bumper
2Cover on right side of rear bumperRemoving cover
�
Press mark on cover in direction of ar-
row.
�
Lift cover off to reveal threaded hole for
towing eye bolt.
Installing towing eye bolt
�
Take towing eye bolt and wheel wrench
out of trunk (
�page 379).
�
Screw towing eye bolt clockwise into
its stop and tighten with wheel wrench.
Removing towing eye bolt
�
Loosen towing eye bolt counterclock-
wise with wheel wrench.
�
Unscrew towing eye bolt.
�
Store towing eye bolt and wheel
wrench in trunk.
Installing cover
�
Fit cover and snap into place.
!When towing the vehicle with all wheels
on the ground, please note the follow-
ing:
With the automatic central locking acti-
vated and the SmartKey in starter
switch position2, or KEYLESS-GO*
start/stop button (
�page 35) in
position2, the vehicle doors lock if the
le ft f ront whe el as wel l a s t he rig ht rea r
wheel are turning at vehicle speeds of
approximately 9 mph (15 km/h) or
more.
Switch off the tow-away alarm
(
�page 89).
To prevent the vehicle doors from lock-
ing, deactivate the automatic central
locking (
�page 112).
Towing of the vehicle should only be
done using the properly installed tow-
ing eye bolt. Never attach tow cable,
tow rope or tow rod to vehicle chassis,
frame or suspension parts.
Page 445 of 474

443 Index
A
ABC 231, 437
Messages in display 349, 354
Setting vehicle level 230, 232
ABS 25, 80, 437
Malfunction indicator lamp 338
Messages in display 350
Warning lamp 338
Accelerator position, automatic
transmission 180
Accessory weight 322
Accident
In case of 54
Activating
Air conditioner (cooling) 203
Air conditioning 202
Air recirculation mode 199
Anti-theft alarm system 87
Central locking (control system) 168
Charcoal filter 200
Distance warning function* 226
Distronic* 222
Easy-entry/exit feature 170ESP 84
Exterior lamps 132
Exterior rear view mirror parking
position 187
Front and rear fog lamp 132, 134
Hazard warning flasher 136
Headlamps 50
High beams 135
Ignition 34
Ignition with KEYLESS-GO* start/stop
button 36
Immobilizer 57, 86
Limiting opening height of trunk
lid* 169
Manual shift program S 55 AMG 183
Rear window defroster 201
Residual heat 203
Seat heater 125, 126
Seat ventilation* 127
Tow-away alarm 89
Windshield wipers 52Adaptive Damping System (ADS) 229,
437
Adding
Coolant 293
Engine oil 291
Additional turn signals 390
Adjustable air vents, rear passenger
compartment 204
Adjusting 37
Air distribution 196
Air volume 198
Backrest tilt 38
Drive-dynamic seat* 172
Exterior rear view mirror 41
Head restraint height 39
Head restraint tilt 39
Instrument cluster illumination 140
Interior rear view mirror 41
Lumbar support 122
Mirrors 41
Multicontour backrest* 122
Power seat bench* 117
Seat cushion depth 38, 123