Page 270 of 474
.
Step 13:
�
To program the remaining two")
268 Controls in detailUseful featuresStep 12:�
Confirm the garage door operation by
pressing the programmed integrated
signal transmitter button (2, 3
or4).
Step 13:
�
To program the remaining two buttons,
repeat the steps above starting with
step 3.Gate operator/Canadian programming
Canadian radio-frequency laws require
transmitter signals to “time-out” (or quit)
after several seconds of transmission
which may not be long enough for the inte-
grated signal transmitter to pick up the sig-
nal during programming. Similar to this
Canadian law, some U.S. gate operators
are designed to “time-out” in the same
manner.
If you live in Canada or if you are having dif-
ficulties programming a gate operator (re-
gardless of where you live) by using the
programming procedures, replace step 4
with the following:Step 4:
�
Continue to press and hold the inte-
grated signal transmitter button (2,
3 or4) while you press and re-press
(“cycle”) your hand-held remote con-
trol transmitter6 every two seconds
until the frequency signal has been
learned. Upon successful training, the
indicator lamp1 will flash slowly and
then rapidly after several seconds.
�
Proceed with programming step 5 and
step 6 to complete.
��
Page 271 of 474
.
�
Select and press the appropriate inte-
grated signal transmitter button (2,
3 or4) to")
269 Controls in detail
Useful features
Operation of integrated remote control�
Switch on ignition (
�page 34).
�
Select and press the appropriate inte-
grated signal transmitter button (2,
3 or4) to activate the remote con-
trolled device.
The integrated remote control trans-
mitter continues to send the signal as
long as the button is pressed – up to
20 seconds.Erasing the integrated remote control
memory
�
Switch on ignition (
�page 34).
�
Simultaneously hold down the signal
transmitter buttons 2and 4, for ap-
proximately 20 seconds, until the indi-
cator lamp1 flashes rapidly. Do not
hold for longer than 30 seconds.
The codes of all three channels are
erased.Reprogramming a single integrated sig-
nal transmitter button
To program a device using a signal trans-
mitter button previously trained, follow
these steps:
�
Press and hold the desired signal trans-
mitter button (2, 3 or4). Do not re-
lease the button.
�
The indicator lamp1 will begin to
flash after 20 seconds. Without releas-
ing the integrated signal transmitter
button, proceed with programming
starting with step 3.
iIf you sell your vehicle, erase the codes
of all three channels.
Page 277 of 474

275 Operation
Driving instructions
After hard braking, it is advisable to drive
on for some time, rather than immediately
parking, so that the air stream can cool
down the brakes faster.
Driving off
Apply the brakes to test them briefly after
driving off. Perform this procedure only
when the road is clear of other traffic.
Warm up the engine smoothly. Do not
place full load on the engine until the oper-
ating temperature has been reached.
When starting off on a slippery surface, do
not allow a drive wheel to spin for an ex-
tended period with the ESP switched off.
Doing so may cause serious damage to the
drive train which is not covered by the
Mercedes-Benz Limited Warranty.
Parking
Warning!
G
If other than recommended brake pads are
installed, or other than recommended brake
fluid is used, the braking properties of the
vehicle can be degraded to an extent that
safe braking is substantially impaired. This
could result in an accident.!When driving down long and steep
grades, relieve the load on the brakes
by shifting into a lower gear to use the
engine’s braking power. This helps pre-
vent overheating of the brakes and re-
duces brake pad wear.
!Simultaneously depressing the acceler-
ator pedal and applying the brake re-
duces engine performance and causes
premature brake and drivetrain wear.
Warning!
G
Do not park this vehicle in areas where com-
bustible materials such as grass, hay or
leaves can come into contact with the hot
exhaust system, as these materials could be
ignited and cause a vehicle fire.
To reduce the risk of personal injury as a re-
sult of inadvertent vehicle movement, be-
fore turning off the engine and leaving the
vehicle always:�
Keep right foot on brake pedal.
�
Firmly depress parking brake pedal.
�
Move the gear selector lever to
positionP.
�
Slowly release brake pedal.
�
When parked on an incline, turn front
wheel towards the road curb.
��
Page 289 of 474
.
The hood will lock audibly.
�
Check to make sure the hood is fully
closed.
If you can raise")
287 Operation
Engine compartment
Closing�
Let the hood drop from a height of ap-
proximately 1 ft. (30 cm).
The hood will lock audibly.
�
Check to make sure the hood is fully
closed.
If you can raise the hood at a point
above the headlamps, then it is not
properly closed. Open it again and let it
drop with somewhat greater force.
Engine oil
The amount of oil your engine needs will
depend on a number of factors, including
driving style. Higher oil consumption can
occur when�
the vehicle is new
�
the vehicle is driven frequently at
higher engine speeds
Engine oil consumption checks should only
be made after the vehicle break-in period.
Warning!
G
If you see flames or smoke coming from the
engine compartment, or if the coolant tem-
perature gauge indicates that the engine is
overheated, do not open the hood. Move
away from vehicle and do not open the hood
until the engine has cooled down. If neces-
sary, call the fire department.Warning!
G
The engine is equipped with a transistorized
ignition system. Because of the high voltage
it is dangerous to touch any components (ig-
nition coils, spark plug sockets, diagnostic
socket) of the ignition system�
with the engine running
�
while starting the engine
�
if ignition is “on” and the engine is
cranked manually
Warning!
G
Be careful that you do not close the hood on
anyone.
iDo not use any special lubricant addi-
tives, as these may damage the drive
assemblies. Using special additives not
approved by Mercedes-Benz may
cause damage not covered by the
Mercedes-Benz Limited Warranty.
More information on this subject is
available at any Mercedes-Benz
Center.
Page 320 of 474
 may, at the
option of the manufacturer, be used as a
descriptive code for identifying significant
characteristics of the tire.
Dat")
318 OperationTires and wheelsTire type code
The code4 (
�page 317) may, at the
option of the manufacturer, be used as a
descriptive code for identifying significant
characteristics of the tire.
Date of manufacture
The date of manufacture5 (
�page 317)
identifies the week and year of manufac-
ture.
The first two figures identify the week,
starting with “01” to represent the first full
week of the calendar year. The second two
figures represent the year.
For example, “3202” represents the 32nd
week of 2002.
Maximum tire load
1Maximum tire load rating
The maximum tire load is the maximum
weight the tires are designed to support.For more information on tire load rating
(
�page 313).
For information on calculating total and
cargo load capacities (
�page 302).
iFor illustration purposes only. Actual
data on tires is specific to each vehicle
and may vary from data shown in above
illustration.
Warning!
G
Do not overload the tires by exceeding the
specified load limit or vehicle capacity
weight as indicated on the placard located
on the driver’s door B-pillar. Overloading the
tires can overheat them, possibly causing a
blowout. Overloading the tires can also
result in handling or steering problems, or
brake failure.
Page 330 of 474

328 OperationMaintenanceWe strongly recommend that you have
your vehicle serviced by an authorized
Mercedes-Benz Center, in accordance with
the Maintenance Booklet at the times
called for by the maintenance service indi-
cator display.
Failure to have the vehicle maintained in
accordance with the Maintenance Booklet
and maintenance service indicator at the
designated times /mileage will result in ve-
hicle damage not covered by the
Mercedes-Benz Limited Warranty.
The maintenance service indicator will no-
tify you when your next maintenance ser-
vice is due.Starting approximately one month before
your next maintenance service is due, one
of the following messages will appear in
the multifunction display while you are
driving or when you switch on the ignition
(example service A):
'A' SERVICE IN XXXXX MILES (KM)
'A' SERVICE IN XXX DAYS
'A' SERVICE IN X DAY
'A' SERVICE DUE NOWThe type of maintenance service due is in-
dicated in the multifunction display:9
Basic service (A)
´
Extended service (B)Clearing the maintenance service indi-
cator
The maintenance service indicator is auto-
matically cleared after 30 seconds when
you switch on the ignition or when reach-
ing the maintenance service threshold
while driving. You can also clear it yourself.�
Press the reset buttonJ in the instru-
ment cluster (
�page 140).
iVehicles equipped with FSS (Flexible
Service System) only (Canada vehi-
cles):
The interval between services depends
on your driving habits. A gentle driving
style, moderate engine speeds and the
avoidance of short-distance trips will
lengthen the interval between services.
Page 339 of 474
337 Practical hints
What to do if …?
Where will I find ...?
Unlocking/locking in an emergency
Opening/closing in an emergency
Replacing SmartKey batteries
Replacing bulbs
Replacing wiper blades
Flat tire
Battery
Jump starting
Towing the vehicle
Fuses
Page 345 of 474
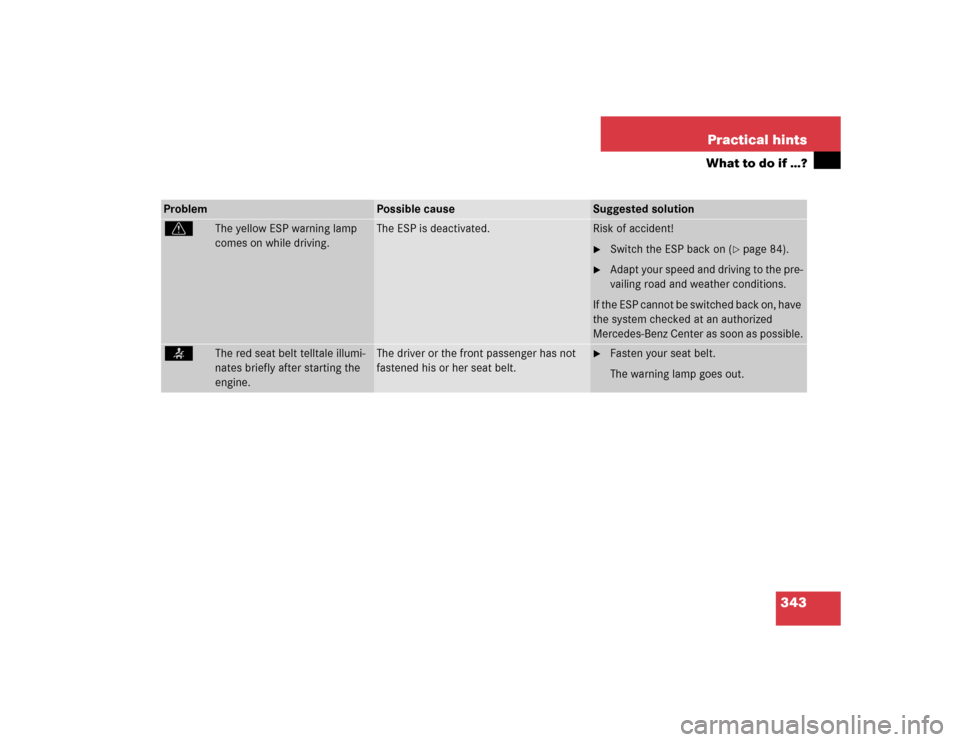
343 Practical hints
What to do if …?
Problem
Possible cause
Suggested solution
v
The yellow ESP warning lamp
comes on while driving.
The ESP is deactivated.
Risk of accident!�
Switch the ESP back on (
�page 84).
�
Adapt your speed and driving to the pre-
vailing road and weather conditions.
If the ESP cannot be switched back on, have
the system checked at an authorized
Mercedes-Benz Center as soon as possible.
<
The red seat belt telltale illumi-
nates briefly after starting the
engine.
The driver or the front passenger has not
fastened his or her seat belt.
�
Fasten your seat belt.
The warning lamp goes out.