Page 231 of 474

229 Controls in detail
Driving systems
Airmatic
Airmatic automatically selects the opti-
mum suspension tuning and ride height for
your vehicle. Airmatic consists of two com-
ponents:�
Adaptive Damping System (ADS)
�
Level control system
The ADS automatically selects the opti-
mum damping for the respective driving
conditions. At the same time the suspen-
sion is set to either sporty or regular.Suspension tuning
The suspension tuning is set according to:
�
Your driving style
�
Road surface conditions
�
Your choice of suspension style,
“sport” or “convenience”, which you
select using the damping switch.
The following suspension styles are avail-
able:
�
Convenience
Both indicator lamps1 are off.
�
Sports 1
One indicator lamp1 is on.
�
Sports 2
Both indicator lamps1 are on.1Indicator lamps
2Damping switch
�
Start the engine.
�
Press the damping switch2 until the
desired suspension style is set.iThe selected suspension style is stored
in memory, even after the SmartKey is
removed from the starter switch.
Page 233 of 474

231 Controls in detail
Driving systems
The indicator lamp is then lit. The dis-
play switches off when the vehicle is
raised.
�
Press switch2 again to lower the ve-
hicle. The indicator lamp is off.
The selected vehicle level setting remains
stored in memory even if the engine is
turned off and restarted except when you
�
exceed a speed of 75 mph (120 km/h)
or
�
maintain a speed of between 50 mph
(80 km/h) and 75 mph (120 km/h) for
more than 5 minutes
The vehicle then lowers to regular level.
The message:
AIRMATIC
LEVELING CANCELLEDappears in the multifunction display and
the indicator lamp is off. The display
switches off when the vehicle is raised.
Active Body Control (ABC)*
The ABC system automatically selects the
optimum suspension tuning and ride
height for your vehicle.
Suspension tuning
The suspension tuning is set according to:�
Your driving style
�
Road surface conditions
�
The vehicle loading
�
Your choice of suspension style,
“sporty” or “regular”, which you select
using the ABC button
The selected suspension style is stored
in memory, even after the SmartKey is
removed from the starter switch.The ABC button with the indicator lamps is
located on the upper part of the front cen-
ter console.
1Indicator lamp
2ABC button
�
Start the engine.
Page 246 of 474
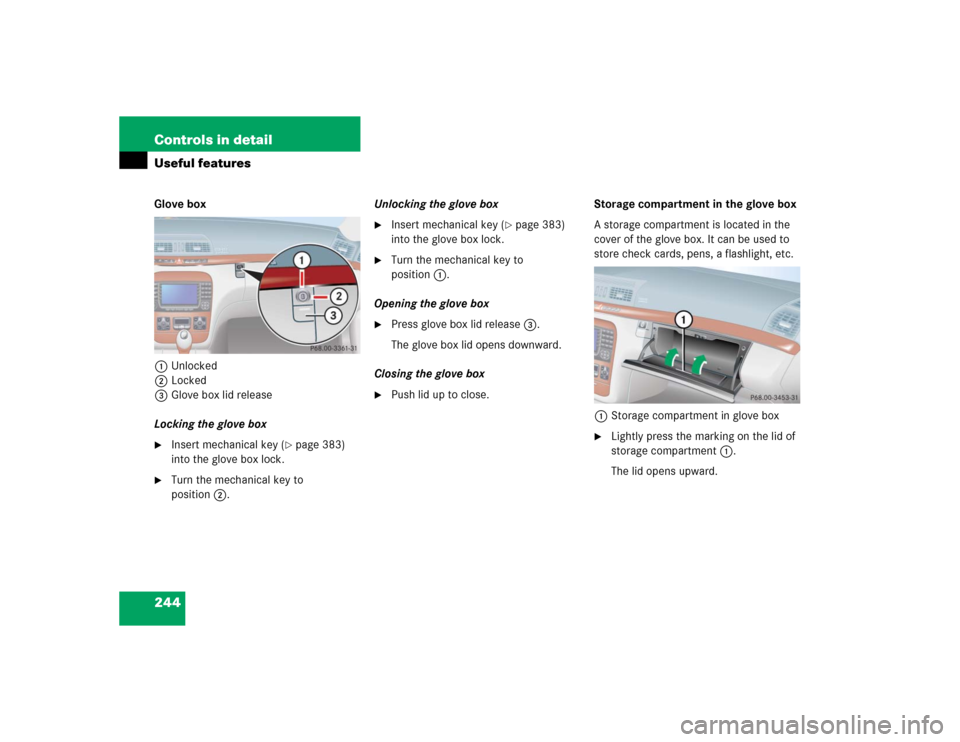
244 Controls in detailUseful featuresGlove box
1Unlocked
2Locked
3Glove box lid release
Locking the glove box�
Insert mechanical key (
�page 383)
into the glove box lock.
�
Turn the mechanical key to
position2.Unlocking the glove box
�
Insert mechanical key (
�page 383)
into the glove box lock.
�
Turn the mechanical key to
position1.
Opening the glove box
�
Press glove box lid release3.
The glove box lid opens downward.
Closing the glove box
�
Push lid up to close.Storage compartment in the glove box
A storage compartment is located in the
cover of the glove box. It can be used to
store check cards, pens, a flashlight, etc.
1Storage compartment in glove box
�
Lightly press the marking on the lid of
storage compartment1.
The lid opens upward.
Page 254 of 474

252 Controls in detailUseful featuresCigarette lighters
1Center console cigarette lighter�
Make sure the ignition is switched on.
All the lamps in the instrument cluster
should come on.
�
Push in cigarette lighter1.
The lighter will pop out automatically
when hot.1Rear door lighters
�
Make sure the ignition is switched on.
All the lamps in the instrument cluster
should come on.
�
Lightly touch the back of the ashtray to
open it (
�page 251).
�
Push in cigarette lighter1.
The lighter will pop out automatically
when hot.
Warning!
G
Never touch the heating element or sides of
the lighter; they are extremely hot. Hold the
knob only.
When leaving the vehicle, always remove the
SmartKey or SmartKey with KEYLESS-GO*
from the starter switch, take it with you, and
lock the vehicle. Do not leave children unat-
tended in the vehicle, or with access to an
unlocked vehicle. Unsupervised use of vehi-
cle equipment may cause an accident
and/or serious personal injury.iThe lighter socket can be used to ac-
commodate electrical accessories up
to a maximum 85 W.
iOperation of the rear door lighters is
only possible, if the override switch
(�page 78) is deactivated.
Page 255 of 474

253 Controls in detail
Useful features
Heated steering wheel*
The steering wheel heating warms up the
leather area of the steering wheel.
The stalk with the heated steering wheel
switch is on the lower left-hand side of the
steering wheel.
1Switching on
2Indicator lamp
3Switching offSwitching on
�
Switch on ignition (
�page 34).
All the lamps in the instrument cluster
should come on.
�
Turn switch at the tip of stalk in the di-
rection of arrow1.
The steering wheel is heated. Indicator
lamp2 comes on.
Switching off
�
Turn switch at the tip of stalk in direc-
tion of arrow3.
The steering wheel heating is turned
off. Indicator lamp2 goes out.
Warning!
G
Never touch the heating element or sides of
the lighter; they are extremely hot. Hold the
knob only.
To avoid possible injury to children sitting in
the rear seat, deactivate the operation of
the rear door windows, see (
�page 78). De-
activation of the rear windows also deacti-
vates the lighters.
When leaving the vehicle, always remove the
SmartKey or SmartKey with KEYLESS-GO*
from the starter switch, take it with you, and
lock the vehicle. Do not leave children unat-
tended in the vehicle, or with access to an
unlocked vehicle. Unsupervised use of vehi-
cle equipment may cause an accident
and/or serious personal injury.
iThe steering wheel heating does not
turn off automatically.
Page 264 of 474
,
and the reserve SmartKey is not handy:�
Contact the Mer")
262 Controls in detailUseful features
Remote door unlock
In case you have locked your vehicle unin-
tentionally (e.g. SmartKey inside vehicle),
and the reserve SmartKey is not handy:�
Contact the Mercedes-Benz Response
Center at 1-800-756-9018 (in the USA)
or 1-888-923-8367 (in Canada).
You will be asked to provide your pass-
word which you provided when you
completed the subscriber agreement.
�
Then return to your vehicle and press
the trunk lid button for a minimum of
20 seconds until the SOS button is
flashing.
The message
CALL CONNECTED
ap-
pears in the multifunction display.
As an alternative, you may unlock the vehi-
cle via Internet using the ID and password
sent to you shortly after the completion of
your acquaintance call.
The Response Center will then unlock your
vehicle with the remote door unlocking
feature.
iWhen a Tele Aid call has been initiated,
the audio system or the COMAND*
system audio is muted and the
selected mode (radio or CD) pauses.
The optional cellular phone (if installed)
switches off. If you must use this
phone, the vehicle must be parked.
Disconnect the coiled cord and place
the call. The COMAND* navigation
system (if engaged) will continue to
run. The display in the instrument
cluster is available for use, and spoken
commands are only available by press-
ing the RPT button on the COMAND*
unit. A pop-up window will appear in
the COMAND* display to indicate that
a Tele Aid call is in progress.
iThe remote door unlock feature is avail-
able if the relevant cellular phone net-
work is available.
The SOS button will flash and the mes-
sage
CALL CONNECTED
will appear in
the multifunction display to indicate re-
ceipt of the door unlock command.
Once the vehicle is unlocked, a Re-
sponse Center specialist will attempt
to establish voice contact with the ve-
hicle occupants.
If the trunk lid button was pressed for
more than 20 seconds before door un-
lock authorization was received by the
Response Center, you must wait
15 minutes before pressing the trunk
lid button again.
Page 278 of 474
 are required by
law. These indicators are located in six
places on the tread circumference and be-
come visible at a tread depth of")
276 OperationDriving instructions
Tires
Treadwear indicators (TWI) are required by
law. These indicators are located in six
places on the tread circumference and be-
come visible at a tread depth of approxi-
mately
1/16 in (1.6 mm), at which point the
tire is considered worn and should be re-
placed.The treadwear indicator appears as a solid
band across the tread.
Specified tire inflation pressures must be
maintained. This applies particularly if the
tires are subject to extreme operating con-
ditions (e.g. high speeds, heavy loads, high
ambient temperatures).
�
Turn the SmartKey to starter switch
position0 and remove the SmartKey
from the starter switch, or press the
KEYLESS-GO* start/stop button
(�page 35).
�
Take the SmartKey or the SmartKey with
KEYLESS-GO
* with you and lock vehicle
when leaving.
!Set the parking brake whenever park-
ing or leaving the vehicle. In addition,
move gear selector lever to positionP.
When parking on hills, always turn front
wheels towards the road curb.
Warning!
G
If you feel a sudden significant vibration or
ride disturbance, or you suspect that possi-
ble damage to your vehicle has occurred,
you should turn on the hazard warning flash-
ers, carefully slow down, and drive with cau-
tion to an area which is a safe distance from
the road.
Inspect the tires and the vehicle underbody
for possible damage. If the vehicle or tires
appear unsafe, have it towed to the nearest
Mercedes-Benz Center or tire dealer for re-
pairs.
Warning!
G
Although the applicable federal motor vehi-
cle safety laws consider a tire to be worn
when the treadwear indicators (TWI) be-
come visible at approximately
1/16 in
(1.6 mm), we recommend that you do not al-
low your tires to wear down to that level. As
tread depth approaches
1/8 in (3 mm), the
adhesion properties on a wet road are
sharply reduced.
Depending upon the weather and/or road
surface (conditions), the tire traction varies
widely.
��
Page 285 of 474

283 Operation
At the gas station
�At the gas station
RefuelingThe fuel filler flap is located on the
right-hand side of the vehicle towards the
rear. Locking/unlocking the vehicle with
the SmartKey or the SmartKey with
KEYLESS-GO* automatically locks/un-
locks the fuel filler flap.
�
Turn the engine off �
by turning the SmartKey to
position0. Remove the SmartKey
from the starter switch.
�
by pressing the KEYLESS-GO*
start/stop button (
�page 35).
Open the driver’s door (with the
driver’s door open, starter switch is now in position0, same as
SmartKey removed from starter
switch).
�
Open the fuel filler flap by pushing at
the point indicated by the arrow.
The fuel filler flap springs open.
�
Turn the fuel cap to the left and hold on
to it until possible pressure is released.
�
Take off the cap and set it in the recess
on the fuel filler flap.
To prevent fuel vapors from escaping
into open air, fully insert filler nozzle
unit.
�
Only fill your tank until the filler nozzle
unit cuts out – do not top up or over-
fill.
Warning!
G
Gasoline is highly flammable and poisonous.
It burns violently and can cause serious
injury. Whenever you are around gasoline,
avoid inhaling fumes and skin contact, extin-
guish all smoking materials. Never allow
sparks, flame or smoking materials near
gasoline!
��