Page 339 of 474
337 Practical hints
What to do if …?
Where will I find ...?
Unlocking/locking in an emergency
Opening/closing in an emergency
Replacing SmartKey batteries
Replacing bulbs
Replacing wiper blades
Flat tire
Battery
Jump starting
Towing the vehicle
Fuses
Page 382 of 474
380 Practical hintsWhere will I find ...?The vehicle tool kit includes:�
One interchangeable slot/Phillips
screwdriver
�
One towing eye bolt
�
One wheel bolt wrench with socket
wrench
�
One alignment bolt
�
One pair of gloves
�
One fuse extractor
�
One fuse chart for the main fuse box
�
Spare fusesVehicle jack
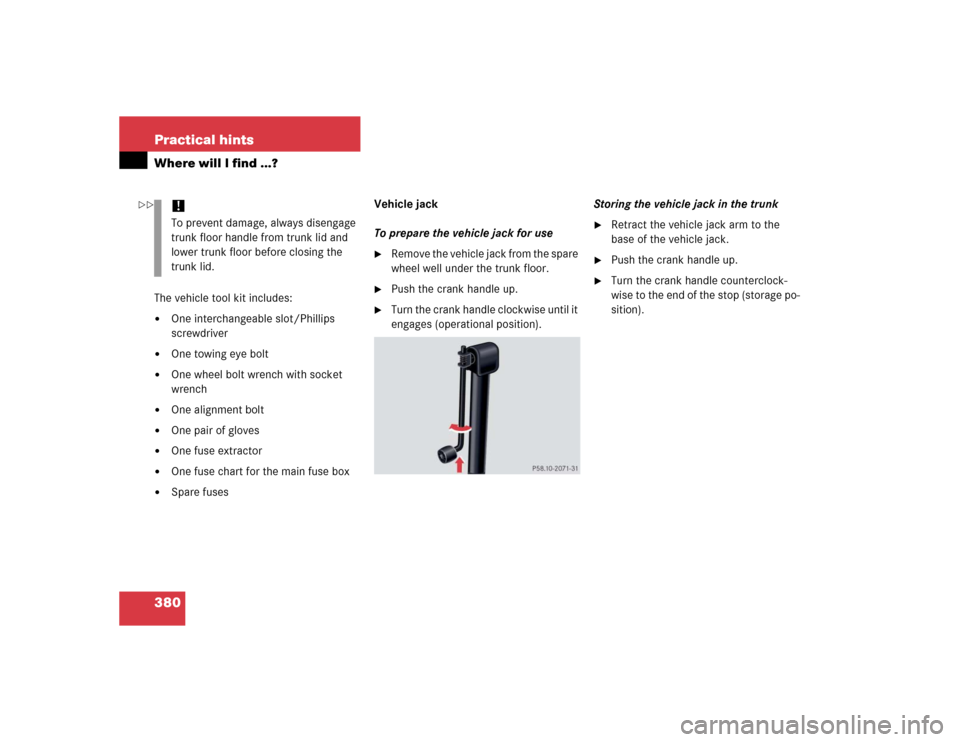
To prepare the vehicle jack for use
�
Remove the vehicle jack from the spare
wheel well under the trunk floor.
�
Push the crank handle up.
�
Turn the crank handle clockwise until it
engages (operational position).Storing the vehicle jack in the trunk
�
Retract the vehicle jack arm to the
base of the vehicle jack.
�
Push the crank handle up.
�
Turn the crank handle counterclock-
wise to the end of the stop (storage po-
sition).
!To prevent damage, always disengage
trunk floor handle from trunk lid and
lower trunk floor before closing the
trunk lid.
��
Page 396 of 474
394 Practical hintsReplacing bulbsParking and standing lamp bulb�
Press the tab on cover2 and remove
cover.
�
Pull out the bulb socket5 with the
bulb.
�
Pull the bulb out of the bulb socket5.
�
Insert a new bulb in the bulb socket5.
�
Reinstall the bulb socket5.
�
Press cover2 onto the housing until
the tab engages.Side marker lamp bulb
�
Carefully slide lamp towards rear.
�
Remove front end first.
�
Twist bulb socket counterclockwise
and pull out.
�
Pull bulb out of the bulb socket.
�
Insert new bulb in socket.
�
Reinstall bulb socket, push in and twist
clockwise.
�
To reinstall lamp, set rear end in
bumper and let front end snap into
place.
Replacing bulbs for rear lamps
Before you start to replace a bulb for a rear
lamp, do the following first:�
Turn the exterior lamp switch to M
(�page 50).
�
Open the trunk (
�page 103).
Page 402 of 474
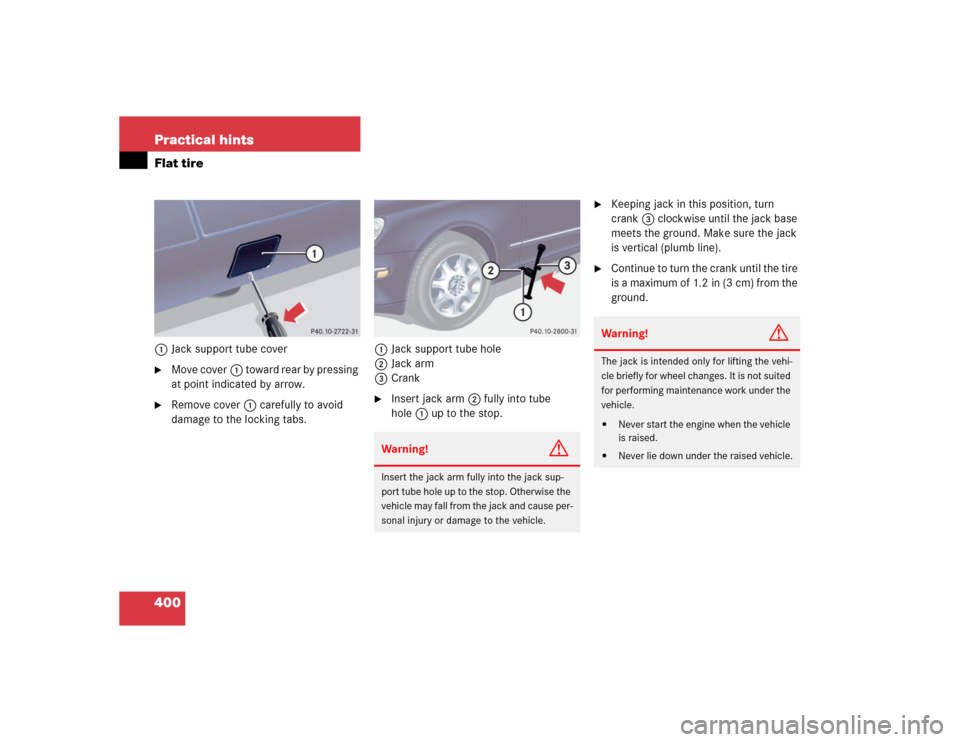
400 Practical hintsFlat tire1Jack support tube cover�
Move cover1 toward rear by pressing
at point indicated by arrow.
�
Remove cover1 carefully to avoid
damage to the locking tabs.1Jack support tube hole
2Jack arm
3Crank
�
Insert jack arm2 fully into tube
hole1 up to the stop.
�
Keeping jack in this position, turn
crank3 clockwise until the jack base
meets the ground. Make sure the jack
is vertical (plumb line).
�
Continue to turn the crank until the tire
is a maximum of 1.2 in (3 cm) from the
ground.
Warning!
G
Insert the jack arm fully into the jack sup-
port tube hole up to the stop. Otherwise the
vehicle may fall from the jack and cause per-
sonal injury or damage to the vehicle.
Warning!
G
The jack is intended only for lifting the vehi-
cle briefly for wheel changes. It is not suited
for performing maintenance work under the
vehicle.�
Never start the engine when the vehicle
is raised.
�
Never lie down under the raised vehicle.
Page 408 of 474

406 Practical hintsJump starting
If the battery is discharged, the engine can
be started with jumper cables and the bat-
tery of another vehicle. Observe the follow-
ing:�
Jump starting should only be performed
when the engine and catalytic convert-
er are cold.
�
Do not start the engine if the battery is
frozen. Let the battery thaw out first.
�
Only use 12 volt battery to jump start
your vehicle. Jump starting with a more
powerful battery could damage the ve-
hicle’s electrical system, which will not
be covered by the Mercedes-Benz Lim-
ited Warranty.
�
Only use jumper cables with sufficient
cross-section and insulated terminal
clamps.
�
Always make sure that the jumper ca-
bles are not on or near pulleys, fans or
other parts that move when an engine
is started or running.
Warning!
G
Failure to follow these directions will cause
damage to the electronic components, and
can lead to a battery explosion and severe
injury or death.
Never lean over batteries while connecting
or jump starting, you might get injured.
Battery fluid contains sulfuric acid. Do not
allow this fluid to come in contact with eyes,
skin or clothing. In case it does, immediately
flush affected area with water, and seek
medical help if necessary.
A battery will also produce hydrogen gas,
which is flammable and very explosive. Keep
flames or sparks away from battery, avoid
improper connection of jumper cables,
smoking, etc.
Attempting to jump start a frozen battery
can result in it exploding, causing personal
injury.
Read all instructions before proceeding.
!Avoid repeated and lengthy starting at-
tempts.
Do not attempt to start the engine us-
ing a battery quick charge unit.
If engine does not run after several un-
successful starting attempts, have it
checked at the nearest authorized
Mercedes-Benz Center.
Excessive unburned fuel generated by
repeated failed starting attempts may
damage the catalytic converter and
may present a fire risk.
Make sure the jumper cables do not
have loose or missing insulation.
Make sure the cable clamps do not
touch any other metal part while the
other end is still attached to a battery.!Do not tow-start the vehicle.
Page 410 of 474

408 Practical hintsTowing the vehicleMercedes-Benz recommends that the vehi-
cle be transported with all wheels off the
ground using flatbed or appropriate wheel
lift/dolly equipment. This method is pref-
erable to other types of towing.When circumstances do not permit the
recommended towing methods, the vehi-
cle may be towed with all wheels on the
ground or front wheels raised (except vehi-
cles with 4MATIC) only so far as necessary
to have the vehicle moved to a safe loca-
tion where the recommended towing
methods can be employed.
!Use flatbed or wheel lift/dolly equip-
ment with SmartKey in starter switch
turned to position0.
Do not tow with sling-type equipment.
Towing with sling-type equipment over
bumpy roads will damage radiator and
supports.
To prevent damage during transport,
do not tie down vehicle by its chassis or
suspension parts.
Switch off the tow-away alarm
(�page 89) and the automatic central
locking (
�page 112).
Do not tow-start the vehicle.
!Vehicles with 4MATIC:
Do not tow with one axle raised. Doing
so could damage the transfer case,
which is not covered by the
Mercedes-Benz Limited Warranty.
All wheels must be on or off the ground.
Observe instructions for towing the ve-
hicle with all wheels on the ground.
!If the vehicle is towed with the front
axle raised (not permissible for vehicles
with 4MATIC), the engine must be shut
off (SmartKey in starter switch
position0 or 1). Otherwise the ESP will
immediately be engaged and will apply
the rear wheel brakes.
When towing the vehicle with all wheels
on the ground, the selector lever must
be in positionN and the SmartKey
must be in starter switch position2.
When towing the vehicle with all wheels
on the ground or the front axle raised,
the vehicle may be towed only for dis-
tances up to 30 miles (50 km) and at a
speed not to exceed 30 mph
(50 km/h).
Page 411 of 474

409 Practical hints
Towing the vehicle
!
To be certain to avoid a possibility of
damage to the drive train, however, we
recommend the drive shaft be discon-
nected at the rear axle drive flange (ve-
hicles with 4MATIC: disconnected at
the front and rear axle drive flanges) for
any towing beyond a short tow to a
nearby garage.Warning!
G
If circumstances require towing the vehicle
with all wheels on the ground, always tow
with a tow bar if:�
the engine will not run
�
there is a malfunction in the power sup-
ply or in the vehicle’s electrical system
as that will be necessary to adequately con-
trol the towed vehicle.
Prior to towing the vehicle with all wheels on
the ground, make sure the SmartKey is in
starter switch position2.
If the SmartKey is left in starter switch
position0 for an extended period of time, it
can no longer be turned in the switch. In this
case, the steering is locked. To unlock, re-
move SmartKey from starter switch and re-
insert.Warning!
G
With the engine not running, there is no
power assistance for the brake and steering
systems. In this case, it is important to keep
in mind that a considerably higher degree of
effort is necessary to brake and steer the ve-
hicle. Adapt your driving accordingly.iThe gear selector lever will remain
locked in positionP and the SmartKey
will not turn in the starter switch if the
battery is disconnected or discharged.
See information on the battery
(�page 403) or on jump starting
(�page 406).
iTo signal turns while being towed with
the hazard warning flasher in use, turn
SmartKey in starter switch to
position2 and activate the combina-
tion switch for the left or right turn sig-
nal in the usual manner – only the
selected turn signal will operate.
Upon canceling the turn signal, the haz-
ard warning flasher will operate again.
Page 412 of 474

410 Practical hintsTowing the vehicle
Installing towing eye bolt
1Cover on right side of front bumper
2Cover on right side of rear bumperRemoving cover
�
Press mark on cover in direction of ar-
row.
�
Lift cover off to reveal threaded hole for
towing eye bolt.
Installing towing eye bolt
�
Take towing eye bolt and wheel wrench
out of trunk (
�page 379).
�
Screw towing eye bolt clockwise into
its stop and tighten with wheel wrench.
Removing towing eye bolt
�
Loosen towing eye bolt counterclock-
wise with wheel wrench.
�
Unscrew towing eye bolt.
�
Store towing eye bolt and wheel
wrench in trunk.
Installing cover
�
Fit cover and snap into place.
!When towing the vehicle with all wheels
on the ground, please note the follow-
ing:
With the automatic central locking acti-
vated and the SmartKey in starter
switch position2, or KEYLESS-GO*
start/stop button (
�page 35) in
position2, the vehicle doors lock if the
le ft f ront whe el as wel l a s t he rig ht rea r
wheel are turning at vehicle speeds of
approximately 9 mph (15 km/h) or
more.
Switch off the tow-away alarm
(
�page 89).
To prevent the vehicle doors from lock-
ing, deactivate the automatic central
locking (
�page 112).
Towing of the vehicle should only be
done using the properly installed tow-
ing eye bolt. Never attach tow cable,
tow rope or tow rod to vehicle chassis,
frame or suspension parts.