Page 131 of 474
.
or
�
Open the re")
129 Controls in detail
Memory function
The memory button and stored position
switch are located on the door.
1 Memory position buttons
2Memory button�
Switch on ignition (
�page 34).
or
�
Open the respective door and insert
the SmartKey in the starter switch.
Storing positions into memory�
Adjust the seats, steering wheel and
exterior rear view mirrors to the de-
sired position (
�page 37).
�
Press memory button2.
�
Release memory button2 and push
one of the position buttons1 within
three seconds.
All the settings are stored with the se-
lected position.
Recalling positions from memory�
Press and hold one of the position
buttons1 until the seat, steering
wheel and exterior rear view mirrors
have fully moved to the stored posi-
tions.iReleasing the button immediately
stops movement to the stored posi-
tions.Warning!
G
Do not operate the power seats using the
memory button if the seat backrest is in an
excessively reclined position. Doing so
could cause damage to front or rear seats.
First move seat backrest to an upright posi-
tion.
Page 171 of 474

169 Controls in detail
Control system
Limiting opening height of trunk lid*
This function is available in vehicles with
the trunk lid opening/closing system*.
Use this function to activate or deactivate
the limiting opening height of trunk lid.�
Move the selection marker with
theæ orç button to
VEHICLE
submenu.
�
Press buttonj ork repeatedly
until you see this message in the multi-
function display:OPENING LIMITER
TRUNK LIDThe selection marker is on the current
setting.
�
Press buttonæ orç to switch
the opening limiter for trunk lid
ON
or
OFF
.Convenience submenu
Access the
CONVENIENCE
submenu via the
SETTINGS
menu. Use the
CONVENIENCE
sub-
menu to change the settings for a number
of convenience features. The following
functions are available:Setting key-dependency
Use this function to set whether the mem-
ory settings for the seats, the steering
wheel, the mirrors, and the automatic cli-
mate control should be stored separately
for each SmartKey (
�page 128).
�
Move the selection marker with
theæ orç button to
the
CONVENIENCE
submenu.
�
Press buttonj ork repeatedly
until you see this message in the multi-
function display:
SETTINGS KEY-DEPEN-
DENT
.
The selection marker is on the current
setting.
�
Pressæ orç to set key-depen-
dency to
ON or
OFF
.
Function
Page
Setting key-dependency
169
Activating easy-entry/exit fea-
ture
169
Setting parking position for exte-
rior rear view mirror
171
Setting fold-in function for exteri-
or rear view mirrors
171
Adjusting the drive-dynamic seat
172
Page 174 of 474
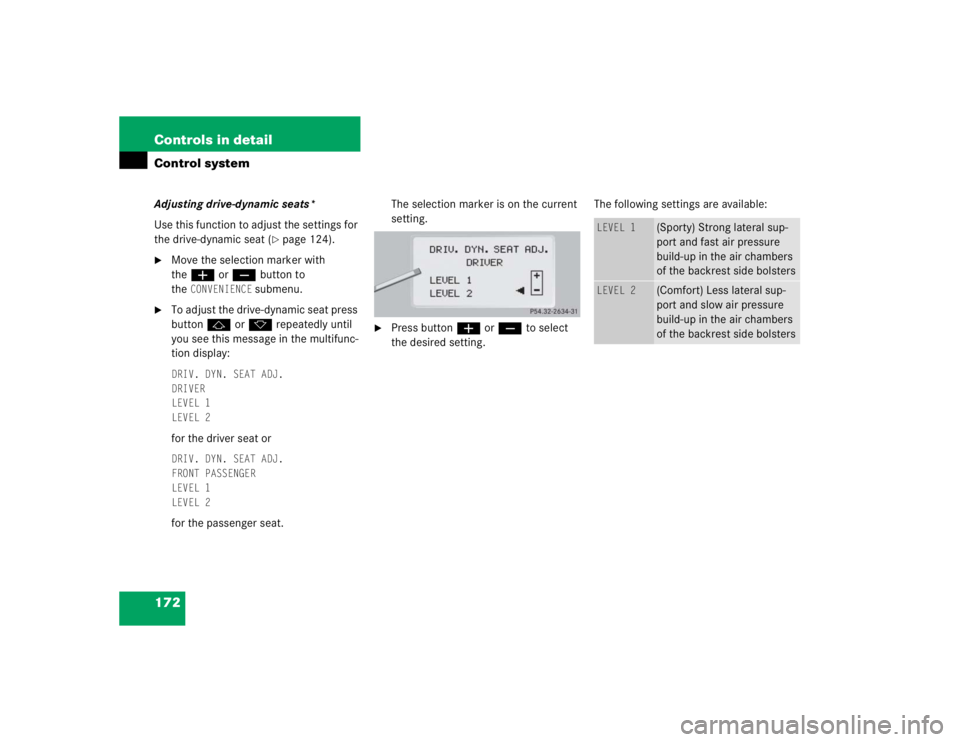
172 Controls in detailControl systemAdjusting drive-dynamic seats*
Use this function to adjust the settings for
the drive-dynamic seat (
�page 124).
�
Move the selection marker with
theæ orç button to
the
CONVENIENCE
submenu.
�
To adjust the drive-dynamic seat press
buttonj ork repeatedly until
you see this message in the multifunc-
tion display: DRIV. DYN. SEAT ADJ.
DRIVER
LEVEL 1
LEVEL 2for the driver seat orDRIV. DYN. SEAT ADJ.
FRONT PASSENGER
LEVEL 1
LEVEL 2for the passenger seat.The selection marker is on the current
setting.
�
Press buttonæ orç to select
the desired setting. The following settings are available:
LEVEL 1
(Sporty) Strong lateral sup-
port and fast air pressure
build-up in the air chambers
of the backrest side bolsters
LEVEL 2
(Comfort) Less lateral sup-
port and slow air pressure
build-up in the air chambers
of the backrest side bolsters
Page 208 of 474
206 Controls in detailAutomatic climate controlRear automatic climate control panel
iWhen the rear seats are not occupied
(rear seat belts unbuckled) the rear cli-
mate control system adopts the set-
tings of the front climate control
system.
Item
1
Left center air vent, adjustable
2
Display
3
Right center air vent, adjustable
4
Thumbwheel for air distribution
5
Temperature control, right
6
Air volume (automatic, manual)
7
Temperature control, left
8
Rear climate control system on/off
Residual engine heat utilization
Warning!
G
Follow the recommended settings for heat-
ing and cooling as given in the instructions
for the front automatic climate control
(�page 192). Otherwise the windows could
fog up, impairing visibility for the driver and
endangering you and others.
Page 249 of 474
247 Controls in detail
Useful features
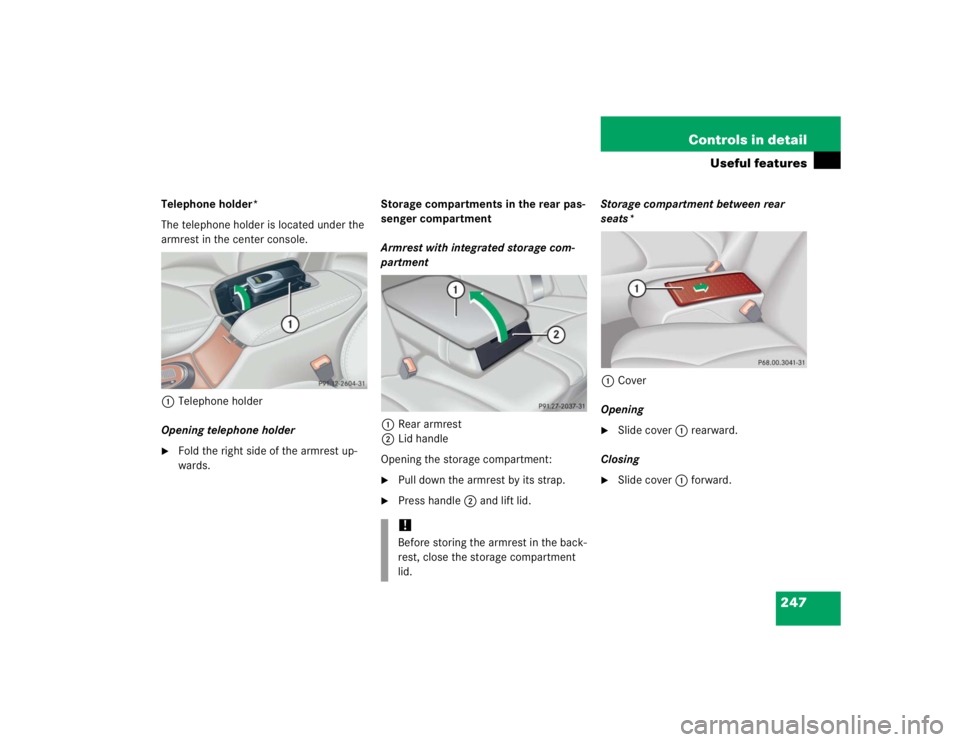
Telephone holder*
The telephone holder is located under the
armrest in the center console.
1Telephone holder
Opening telephone holder�
Fold the right side of the armrest up-
wards.Storage compartments in the rear pas-
senger compartment
Armrest with integrated storage com-
partment
1Rear armrest
2Lid handle
Opening the storage compartment:
�
Pull down the armrest by its strap.
�
Press handle2 and lift lid.Storage compartment between rear
seats*
1Cover
Opening
�
Slide cover1 rearward.
Closing
�
Slide cover1 forward.
!Before storing the armrest in the back-
rest, close the storage compartment
lid.
Page 250 of 474

248 Controls in detailUseful featuresStorage compartment in rear shelf*
1Rear shelf compartment
Opening�
Lift the lid using the handle in the front.Storage compartments under the front
seats
1Lid
2Buttons
Opening
�
Press buttons2 together and fold
lid1 down.
Closing
�
Close lid1 until both buttons2 of
lock engage.Cup holder in front of seat armrest
Warning!
G
In order to help prevent spilling liquids on
vehicle occupants, only use containers that
fit into the cup holder. Use lids on open con-
tainers and do not fill containers to a height
where the contents, especially hot liquids,
could spill during braking, vehicle maneu-
vers, or in an accident.
When not in use, keep the cup holder
closed. An open cup holder may cause injury
to you or others when contacted during
braking, vehicle maneuvers, or in an acci-
dent.
Keep in mind that objects placed in the cup
holder may come loose during braking, vehi-
cle maneuvers, or in an accident and be
thrown around in the vehicle interior. Ob-
jects thrown around in the vehicle interior
may cause an accident and/or serious per-
sonal injury.
Page 324 of 474
 of
automatic transmission, power steering,
p")
322 OperationTires and wheelsTire and loading terminology
Accessory weight
The combined weight (in excess of those
standard items which may be replaced) of
automatic transmission, power steering,
power brakes, power windows, power
seats, radio, and heater, to the extent that
these items are available as
factory-installed equipment (whether
installed or not).
Air pressure
The amount of air inside the tire pressing
outward on each square inch of the tire.
Air pressure is expressed in pounds per
square inch (psi), or kilopascal (kPa) or
bars.
Aspect ratio
Dimensional relationship between tire
section height and section width
expressed in percentage.Bar
Another metric unit for air pressure. There
are 14.5038 pounds per square inch (psi)
to 1 bar; there are 100 kilopascals (kPa)
to 1 bar.
Bead
The tire bead contains steel wires wrapped
by steel cords that hold the tire onto the
rim.
Cold tire inflation pressure
Tire inflation pressure when your vehicle
has been sitting for at least three hours or
driven no more than one mile (1.6 km).
Curb weight
The weight of a motor vehicle with stan-
dard equipment including the maximum
capacity of fuel, oil, and coolant, and, if so
equipped, air conditioning and additional
optional equipment, but without passen-
gers and cargo.DOT (D
epartment o
f T
ransportation)
A tire branding symbol which denotes the
tire meets requirements of the
U.S. Department of Transportation.
GAWR (G
ross A
xle W
eight R
ating)
The GAWR is the maximum permissible
axle weight. The gross vehicle weight on
each axle must never exceed the GAWR for
the front and rear axle indicated on the
Certification label located on the driver's
door B-pillar.
GVW (G
ross V
ehicle W
eight)
The GVW comprises the weight of the
vehicle including fuel, tools, spare wheel,
installed accessories, passengers and
cargo and, if applicable, trailer tongue
load. The GWV must never exceed the
GWVR indicated on the Certification label
located on the driver's door B-pillar.
Page 338 of 474
 may cause
the upholstery to become permanentl")
336 OperationVehicle careUpholstery
Using aftermarket seat covers or wearing
clothing that have the tendency to give off
coloring (e.g. when wet, etc.) may cause
the upholstery to become permanently dis-
colored. By lining the seats with a proper
intermediate cover, contact-discoloration
will be prevented.
Leather upholstery
Wipe leather upholstery with a damp cloth
and dry thoroughly or clean with
Mercedes-Benz approved Leather Care.
Exercise particular care when cleaning per-
forated leather as its underside should not
become wet.Nubuck leather upholstery (S 55 AMG)
The nubuck leather upholstery is treated
with a protective coating. Wipe nubuck
leather upholstery with damp microfiber
cloth to remove dust and other light stains.
Carefully dab nubuck leather upholstery
with a dry microfiber cloth to remove oil
stains.Plastic and rubber parts
Do not use oil or wax on these parts.
Wood trims
Dampen cloth using water and use damp
cloth to clean wood trims in your vehicle.
Do not use solvents like tar remover or
wheel cleaner nor polishes or waxes as
these may be abrasive.
!Do not use Mercedes-Benz approved
Leather Care or any solvents to clean
nubuck leather upholstery.
Avoid hard scrubbing on nubuck leath-
er upholstery.
 the rear cli-
mate control system adopts the set-")