Page 188 of 474
.Headlamp cleaning system*
(Standardon S500, S600, S55AMG)
The switch is located")
186 Controls in detailGood visibilityFor information on the windshield wipers,
see “Windshield wipers” (
�page 52).Headlamp cleaning system*
(Standardon S500, S600, S55AMG)
The switch is located on the left side of the
dashboard.
1Headlamp washer switch�
Switch on ignition (
�page 34).
�
Press switch1.
The headlamps are cleaned with a
high-pressure water jet.
For information on filling up the washer
reservoir, see “Windshield washer system
and headlamp cleaning system*”
(
�page 295).
Rear view mirrors
For information on setting the rear view
mirrors, see “Mirrors” (
�page 41).
Auto-dimming rear view mirror
The reflection brightness of the exterior
rear view mirror on the driver’s side and
the interior rear view mirror will respond
automatically to glare when
�
the ignition is switched on
and
�
incoming light from headlamps falls on
the sensor in the interior rear view
mirror
The interior rear view mirror will not react if
�
reverse gear is engaged
�
the interior lighting is turned on
Page 189 of 474

187 Controls in detail
Good visibility
Activating exterior rear view mirror
parking position
Follow these steps to activate the mirror
parking position so that the passen-
ger-side exterior rear view mirror will be
turned downward to the stored position.�
Make sure you have stored a parking
position for the passenger-side exterior
rear view mirror (
�page 130).
�
Make sure the
MIRROR SETTING WHEN
PARKING
function in the
CONVENIENCE
submenu of the control system is
switched to
ON (�page 171).
�
Switch on ignition (
�page 34).
Warning!
G
The auto-dimming function does not react if
incoming light is not aimed directly at sen-
sors in the interior rear view mirror.
The interior rear view mirror and the exterior
rear view mirror on the driver’s side do not
react, for example, if the rear window sun
shade* is in raised position.
Glare can endanger you and others.Warning!
G
In the case of an accident, liquid electrolyte
may escape from the mirror housing if the
mirror glass breaks.
Electrolyte has an irritating effect. Do not al-
low the liquid to come into contact with
eyes, skin, clothing, or respiratory system.
In case it does, immediately flush affected
area with water, and seek medical help if
necessary.
!Electrolyte drops coming into contact
with the vehicle paint finish can be
completely removed only while in the
liquid state by applying plenty of water.Warning!
G
Exercise care when using the passen-
ger-side exterior rear view mirror. The mirror
surface is convex (outwardly curved surface
for a wider field of view). Objects in mirror
are closer than they appear. Check your in-
side rear view mirror or glance over your
shoulder before changing lanes.
��
Page 190 of 474

188 Controls in detailGood visibility�
Press button2 for the passenger-side
exterior rear view mirror.
�
Place the gear selector lever in reverse
gearR.
The passenger-side exterior rear view
mirror will be turned downward to the
stored position.
1Driver’s side exterior rear view mirror
button
2Passenger-side exterior rear view mir-
ror buttonThe exterior rear view mirror returns to its
previously stored driving position:
�
ten seconds after you put the gear se-
lector lever out of positionR
�
immediately once your vehicle exceeds
a speed of approximately 6 mph
(10 km/h)
�
immediately when you press button1
for driver’s side mirror.
Electrically folding exterior rear view
mirrorsFolding exterior rear view mirrors in
and out automatically
When the corresponding function in the
control system is activated (
�page 171):
�
The exterior rear view mirrors automat-
ically fold in as soon as the vehicle is
locked from the outside.
�
The exterior rear view mirrors automat-
ically fold out as soon as the vehicle is
unlocked and the driver’s or front pas-
senger door are subsequently opened.
!Before driving the vehicle through an
automatic car wash, fold the exterior
mirrors in. Otherwise they may get
damaged.
iIf you are driving at more than approxi-
mately 9mph (15km/h), you will not
be able to fold the exterior mirrors in.
��
Page 191 of 474

189 Controls in detail
Good visibility
Folding exterior rear view mirrors in
and out manually
The exterior rear view mirrors can vibrate if
they are not folded out completely.
The buttons are located on the driver’s
door.
1Folds the exterior mirrors out
2Folds the exterior mirrors in�
Switch on ignition (
�page 34).Folding in
�
Press button2 briefly.
Both mirrors fold in.
Folding out
�
Press button1 briefly.
Both mirrors fold out.
Windshield wipers
For more information on the windshield
wipers, see “Windshield wipers”
(�page 52).
A rain sensor automatically controls the
windshield wipers depending on how wet
the windshield is.
�
Switch on ignition (
�page 34).
�
Set wiper switch to position I
(�page 52).
After the initial wipe, pauses between
wipes are automatically controlled by the
rain sensor.
!If an exterior rear view mirror housing
is forcibly pushed forward (hit from the
rear), reposition it manually by applying
firm pressure until it snaps back into
place.
If an exterior rear view mirror housing
is forcibly pushed rearward (hit from
the front), press button2 to fold mir-
rors in, then press button1 to fold
mirrors out. Do not force mirrors by
hand as this may damage the adjust-
ment mechanism.
iIntermittent wiping is interrupted when
the vehicle is at a standstill and a front
door is opened.
Page 192 of 474

190 Controls in detailGood visibility
Sun visors
The sun visors protect you from sun glare
while driving.Glare from the front
1Mounting
2Sun visor
�
Swing sun visor2 down.
Glare from the front and sides
�
Swing sun visor2 down.
�
Disengage sun visor2 from
mounting1.
�
Pivot sun visor to the side.
!Do not leave windshield wipers in inter-
mittent setting when vehicle is taken to
an automatic car wash or during wind-
shield cleaning. Wipers will operate in
the presence of water sprayed on the
windshield, and wipers may be dam-
aged as a result.
The switch should not be left in inter-
mittent setting as the wipers will wipe
the windshield once every time the en-
gine is started. Dust that accumulates
on the windshield might scratch the
glass and/or damage the wiper blades
when wiping occurs on a dry wind-
shield.
Warning!
G
Do not use the vanity mirror while driving.
Keep the mirrors in the sun visors closed
while vehicle is in motion. Reflected glare
can endanger you and others.iFor information on vanity mirrors
(�page 242).
Page 244 of 474
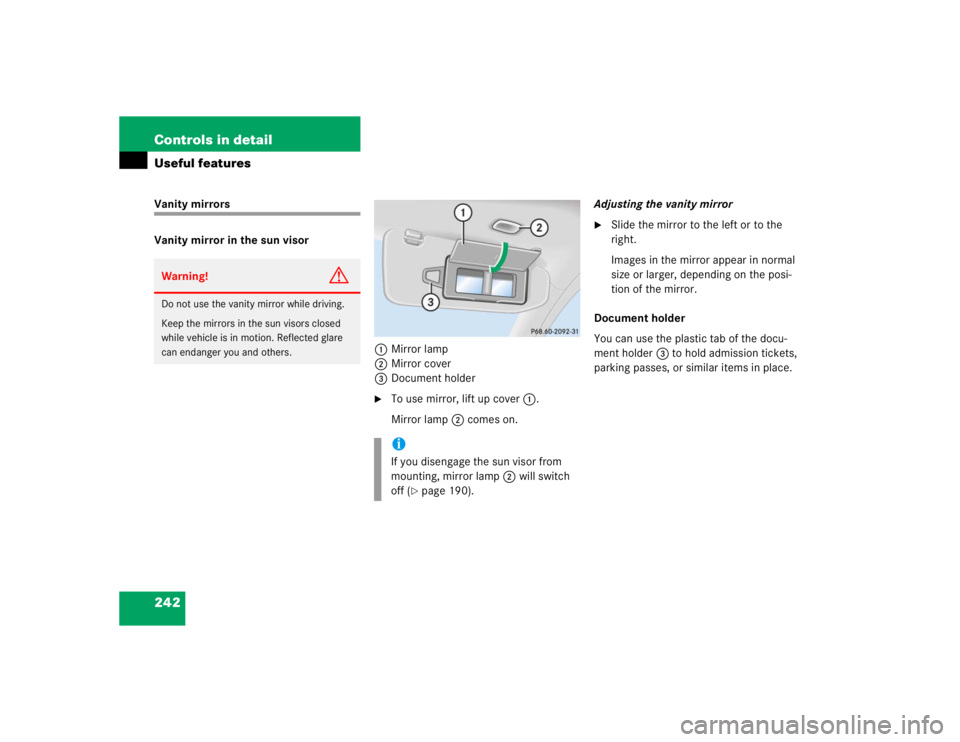
242 Controls in detailUseful featuresVanity mirrors
Vanity mirror in the sun visor
1Mirror lamp
2Mirror cover
3Document holder
�
To use mirror, lift up cover1.
Mirror lamp2 comes on.Adjusting the vanity mirror
�
Slide the mirror to the left or to the
right.
Images in the mirror appear in normal
size or larger, depending on the posi-
tion of the mirror.
Document holder
You can use the plastic tab of the docu-
ment holder3 to hold admission tickets,
parking passes, or similar items in place.
Warning!
G
Do not use the vanity mirror while driving.
Keep the mirrors in the sun visors closed
while vehicle is in motion. Reflected glare
can endanger you and others.
iIf you disengage the sun visor from
mounting, mirror lamp2 will switch
off (
�page 190).
Page 245 of 474

243 Controls in detail
Useful features
Vanity mirror in the rear
The vanity mirrors are located in the roof
lining for the rear seat passengers.
Opening the vanity mirror�
Press the cover of the vanity mirror.
The vanity mirror folds down and the
mirror lamp comes on.
Closing the vanity mirror
�
Push the vanity mirror up until it engag-
es in place.
Storage compartments
!Before tilting a front seat backrest from
the reclined position to an upright posi-
tion, close the respective vanity mirror
in the rear. Otherwise the vanity mirror
may get damage.
Warning!
G
To help avoid personal injury during a colli-
sion or sudden maneuver, exercise care
when stowing objects in the vehicle. Put lug-
g a g e o r c a r g o i n t h e t r u n k i f p o s s i b l e . D o n o t
pile luggage or cargo higher than the seat
backs.
Luggage nets cannot secure hard or heavy
objects.
Keep compartment lids closed. This will help
to prevent stored objects from being thrown
about and injuring vehicle occupants during
an accident.
Page 257 of 474

The Tele Aid system consists of three
types of response:
�
automatic and manual em")
255 Controls in detail
Useful features
Tele Aid
The Tele Aid system
(Tele
matic A
larm I
dentification on D
e-
mand)
The Tele Aid system consists of three
types of response:
�
automatic and manual emergency
�
roadside assistance, and
�
informationThe Tele Aid system is operational provid-
ing that the vehicle’s battery is charged,
properly connected, not damaged and cel-
lular and GPS coverage is available.
The speaker volume of a Tele Aid call can
be adjusted when using the volume control
on the multifunction steering wheel. To
raise, press buttonæ and to lower,
press buttonç or use the volume knob
on your COMAND headunit.
�
To activate, press the SOS button, the
Roadside Assistance button• or
the Information button¡, depend-
ing on the type of response required.Shortly after the completion of your Tele
Aid acquaintance call, you will receive a
user ID and password. By visiting
www.mbusa.com and selecting “Tele Aid”
(USA only), you will have access to account
information, remote door unlock and
more.
!The initial activation of the Tele Aid sys-
tem may only be performed by com-
pleting the subscriber agreement and
placing an acquaintance call using the
Information button¡. Failure to
complete either of these steps will re-
sult in a system that is not activated.
If you have any questions regarding ac-
tivation, please call the Response Cen-
ter at 1-800-756-9018 (in the USA) or
1-888-923-8367 (in Canada).
iThe SOS button is located above the in-
terior rear view mirror.
The Roadside Assistance button•
and the Information button¡ are
located below the center armrest cov-
er.
iThe Tele Aid system utilizes the cellular
network for communication and the
GPS (Global Positioning System) satel-
lites for vehicle location. If either of
these signals are unavailable, the
Tele Aid system may not function and if
this occurs, assistance must be sum-
moned by other means.