Page 388 of 474
386 Practical hintsOpening/closing in an emergencyTilt/sliding sunroof
You can open or close the tilt/sliding sun-
roof manually should an electrical malfunc-
tion occur.
The tilt/sliding sunroof drive is located be-
hind the lens of the interior overhead light.
1Lens
�
Pry off lens1 using a flat blade srew-
driver (
�page 379).
�
Switch on ignition (
�page 34).
�
Take crank the crank from the opera-
tor’s manual pouch.
2Crank
�
Insert crank2 through hole.
�
Turn crank2 clockwise to:�
slide sunroof closed
�
raise roof at the rear
�
Turn crank2 counterclockwise to:�
slide sunroof open
�
lower roof at the rear
iTurn crank2 slowly and smoothly.
The tilt/sliding sunroof must be syn-
chronized after being operated manual-
ly (
�page 213).
Page 395 of 474

393 Practical hints
Replacing bulbs
Halogen headlamp�
Press the tab on cover3 and remove
cover.
�
Pull connector7 off of the lamp.
�
Release the retaining springs and take
out the bulb.
�
Insert the new bulb in the socket so
that the base is in the recess on the
lower left.
�
Attach the retaining springs.
�
Insert connector7 into the bulb.
�
Press cover3 onto the housing until
the tab engages.Replacing halogen high beam bulbs
�
Press the tab on cover2 and remove
cover.
�
Pull connector 6 off of the bulb.
�
Apply pressure on the bulb contacts
from above until the bulb releases from
the retaining springs.
�
Remove bulb.
�
Insert the new bulb in the socket with
the marking facing upward.
�
Press the bulb upward on the contacts
until it engages in the retaining springs.
�
Insert connector6 onto the bulb.
�
Press cover2 onto the housing until
the tab engages.Front turn signal lamp bulb
�
Turn bulb socket8 counterclockwise
and pull out.
�
Gently push bulb into socket, turn
counterclockwise and remove.
�
Insert new bulb in socket, push in and
twist clockwise.
�
Reinstall bulb socket in lamp and twist
clockwise until it engages.
Page 396 of 474
394 Practical hintsReplacing bulbsParking and standing lamp bulb�
Press the tab on cover2 and remove
cover.
�
Pull out the bulb socket5 with the
bulb.
�
Pull the bulb out of the bulb socket5.
�
Insert a new bulb in the bulb socket5.
�
Reinstall the bulb socket5.
�
Press cover2 onto the housing until
the tab engages.Side marker lamp bulb
�
Carefully slide lamp towards rear.
�
Remove front end first.
�
Twist bulb socket counterclockwise
and pull out.
�
Pull bulb out of the bulb socket.
�
Insert new bulb in socket.
�
Reinstall bulb socket, push in and twist
clockwise.
�
To reinstall lamp, set rear end in
bumper and let front end snap into
place.
Replacing bulbs for rear lamps
Before you start to replace a bulb for a rear
lamp, do the following first:�
Turn the exterior lamp switch to M
(�page 50).
�
Open the trunk (
�page 103).
Page 397 of 474
395 Practical hints
Replacing bulbs
Tail lamp unit
1Black socket:
Backup lamp
2White socket:
Turn signal lamp
3Red socket:
Tail, standing and parking lamp
4Red socket:
Driver’s side: tail, parking and rear fog
lamp
Passenger’s side: tail and parking lamp
�
Turn the catch, and move the trim to
the side.
�
Turn bulb socket counterclockwise and
pull out.
�
Gently twist bulb counterclockwise and
pull out of bulb holder.
�
Insert new bulb into the holder and turn
it clockwise.
�
Reinstall bulb socket.
The bulb socket should audibly click.
�
Replace trim and secure with lock. License plate lamp
1Screws
�
Loosen both screws1.
�
Remove the license plate lamp.
�
Replace the bulb.
�
Reinstall the license plate lamp.
�
Retighten screws1.
Page 402 of 474
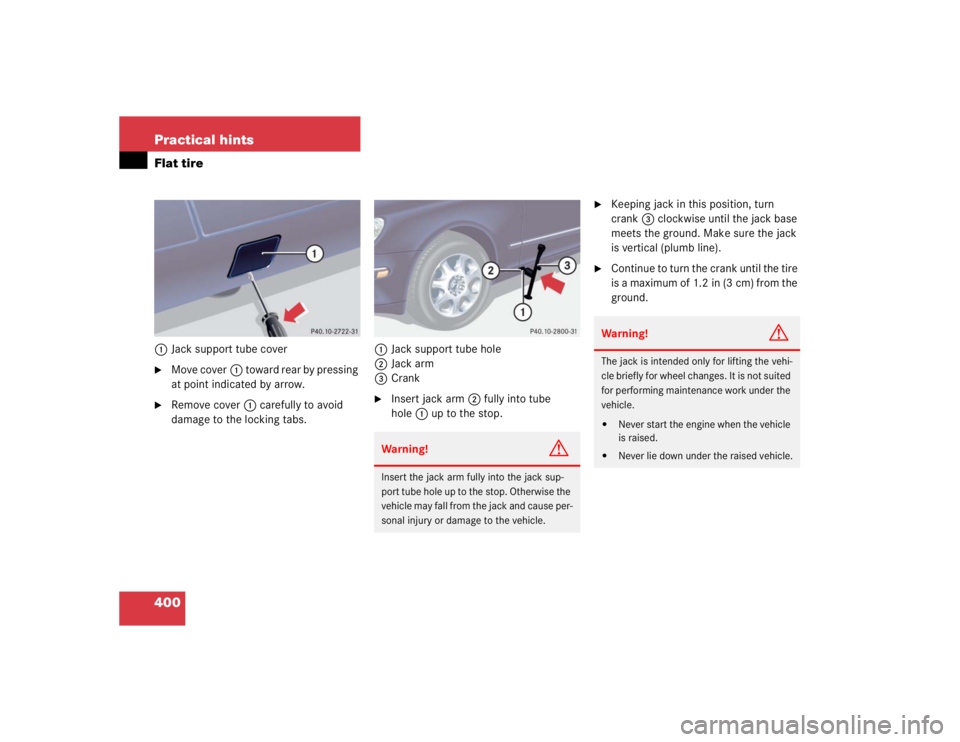
400 Practical hintsFlat tire1Jack support tube cover�
Move cover1 toward rear by pressing
at point indicated by arrow.
�
Remove cover1 carefully to avoid
damage to the locking tabs.1Jack support tube hole
2Jack arm
3Crank
�
Insert jack arm2 fully into tube
hole1 up to the stop.
�
Keeping jack in this position, turn
crank3 clockwise until the jack base
meets the ground. Make sure the jack
is vertical (plumb line).
�
Continue to turn the crank until the tire
is a maximum of 1.2 in (3 cm) from the
ground.
Warning!
G
Insert the jack arm fully into the jack sup-
port tube hole up to the stop. Otherwise the
vehicle may fall from the jack and cause per-
sonal injury or damage to the vehicle.
Warning!
G
The jack is intended only for lifting the vehi-
cle briefly for wheel changes. It is not suited
for performing maintenance work under the
vehicle.�
Never start the engine when the vehicle
is raised.
�
Never lie down under the raised vehicle.
Page 404 of 474

402 Practical hintsFlat tireLowering the vehicle�
Lower vehicle by turning crank coun-
terclockwise until vehicle is resting ful-
ly on its own weight.
�
Remove the jack.
1 - 5 Wheel bolts
�
Tighten the five wheel bolts evenly, fol-
lowing the diagonal sequence illustrat-
ed (1 to 5), until all bolts are tight.
Observe a tightening torque of
110 lb-ft (150 Nm).
�
Before storing the jack in the trunk, it
should be fully collapsed, with handle
folded in.
�
Place the wheel bolt wrench, alignment
bolt and jack back in the vehicle tool kit
in the trunk and close the covering lid.Replacing jack support tube cover
�
Slide tongue of cover under the upper
edge of the tube opening.
�
Applying even pressure, press cover
until it snaps into place. Be careful not
to damage the locking tabs or clamp
the plastic retaining strap.
Warning!
G
Have the tightening torque checked after
changing a wheel. The wheels could come
loose if they are not tightened to a torque of
110 lb-ft (150 Nm).
!You can also screw the faulty wheel
down into the spare wheel well in the
trunk.
Do not activate the tire inflation pres-
sure monitor* until the depressurized
tire is no longer in the vehicle.
Page 407 of 474
405 Practical hints
Battery
Reconnecting the battery�
Turn off all electrical consumers.
�
Connect the positive lead and fasten its
cover2.
�
Connect negative lead3.Batteries contain materials that can harm
the environment if disposed of improperly.
Large 12-volt storage batteries contain
lead. Recycling of batteries is the preferred
method of disposal. Many states require
sellers of batteries to accept old batteries
for recycling.!Never invert the terminal connections.!The battery, its filler caps and the vent
tube must always be securely installed
when the vehicle is in operation.
iThe following procedures must be car-
ried out following any interruption of
battery power (e.g. due to reconnect-
ing):�
Set the clock (see COMAND opera-
tor’s manual).
�
Synchronize the ESP (
�page 352).
�
Synchronize side windows
(�page 209).
�
Synchronize tilt/sliding sunroof
(�page 213).
Page 412 of 474

410 Practical hintsTowing the vehicle
Installing towing eye bolt
1Cover on right side of front bumper
2Cover on right side of rear bumperRemoving cover
�
Press mark on cover in direction of ar-
row.
�
Lift cover off to reveal threaded hole for
towing eye bolt.
Installing towing eye bolt
�
Take towing eye bolt and wheel wrench
out of trunk (
�page 379).
�
Screw towing eye bolt clockwise into
its stop and tighten with wheel wrench.
Removing towing eye bolt
�
Loosen towing eye bolt counterclock-
wise with wheel wrench.
�
Unscrew towing eye bolt.
�
Store towing eye bolt and wheel
wrench in trunk.
Installing cover
�
Fit cover and snap into place.
!When towing the vehicle with all wheels
on the ground, please note the follow-
ing:
With the automatic central locking acti-
vated and the SmartKey in starter
switch position2, or KEYLESS-GO*
start/stop button (
�page 35) in
position2, the vehicle doors lock if the
le ft f ront whe el as wel l a s t he rig ht rea r
wheel are turning at vehicle speeds of
approximately 9 mph (15 km/h) or
more.
Switch off the tow-away alarm
(
�page 89).
To prevent the vehicle doors from lock-
ing, deactivate the automatic central
locking (
�page 112).
Towing of the vehicle should only be
done using the properly installed tow-
ing eye bolt. Never attach tow cable,
tow rope or tow rod to vehicle chassis,
frame or suspension parts.