Page 164 of 356

162 Controls in detailLoadingHooks
Four hooks located on the rear compart-
ment trim panels, two on each side.HooksUse the hooks to secure light weight items.
The maximum permissible weight per hook
is 9 lbs (4 kg).
Partition net*Use of the partition net is a particularly im-
portant safety factor when the vehicle is
loaded higher than the top of the seat
backrests with smaller objects.
The partition net can be installed behind
the backrests of the front or rear seats.
Engaging partition net
1Holder
2Mounting hookWarning!
G
Always lock backrest in its upright position
when rear seat bench is occupied by pas-
sengers, or cargo is being carried behind the
seat bench.
To help avoid personal injury from smaller
objects flying in the occupant compartment
during a collision or sudden maneuver, al-
ways use partition net when transporting
cargo.
The partition net cannot prevent the move-
ment of large, heavier objects into the pas-
senger compartment in an accident. Such
items must be properly secured using the
cargo tie-down rings in the cargo compart-
ment floor (
�page 161).
Passenger use of seats behind installed par-
tition net is restricted because of the foot-
well being taken up by the net.
Page 165 of 356
163 Controls in detail
Loading
�
One after the other, press the two
mounting hooks2 inward against the
spring pressure and turn them.
The mounting hooks are locked in this
position and you can move the net into
position more easily.
�
Turn one of the mounting hooks2 in
the opposite direction.
The spring pressure will push it out.
�
Engage mounting hook2 in
holder1.
�
Turn the other mounting hook and en-
gage it in the opposite holder.
�
Push both mounting hooks2 forward
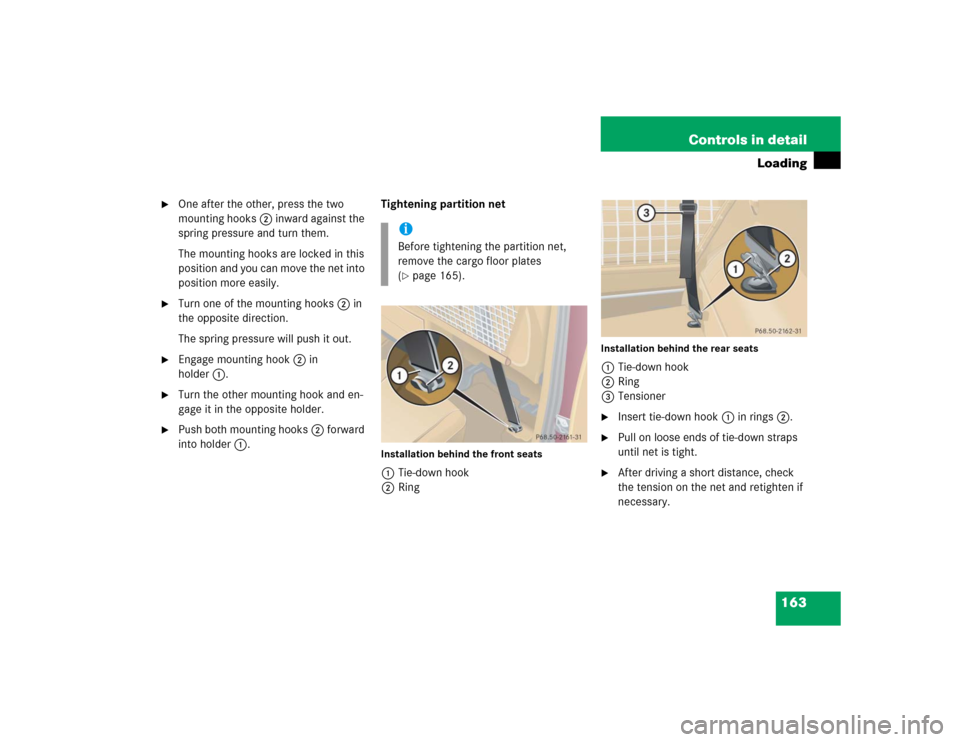
into holder1.Tightening partition net
Installation behind the front seats1Tie-down hook
2Ring
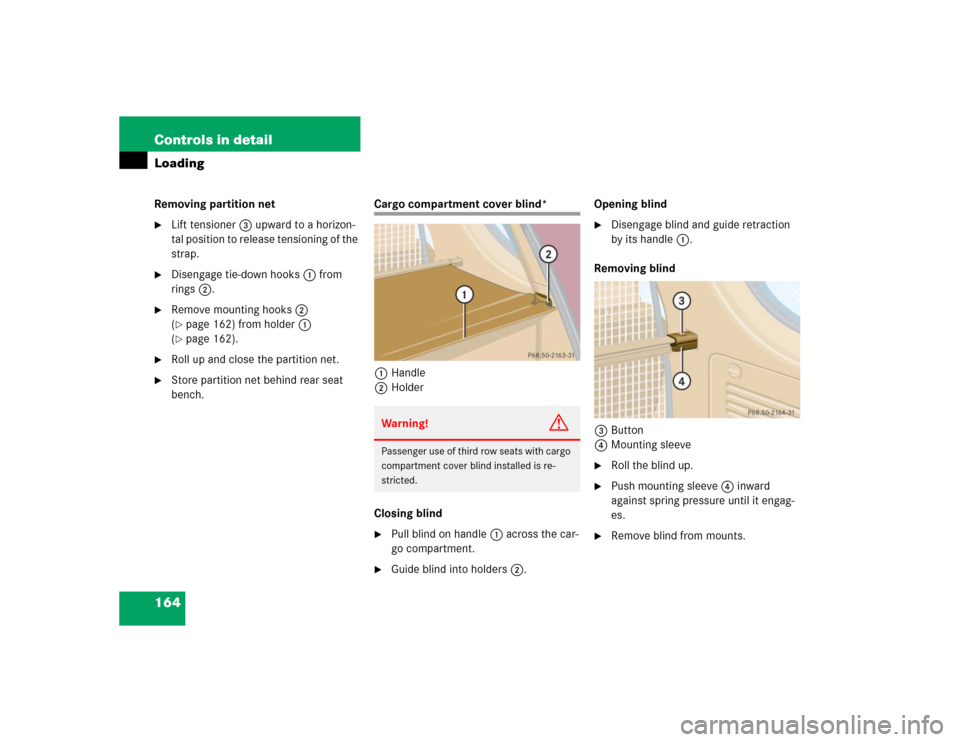
Installation behind the rear seats1Tie-down hook
2Ring
3Tensioner�
Insert tie-down hook1 in rings2.
�
Pull on loose ends of tie-down straps
until net is tight.
�
After driving a short distance, check
the tension on the net and retighten if
necessary.
iBefore tightening the partition net,
remove the cargo floor plates
(�page 165).
Page 166 of 356
164 Controls in detailLoadingRemoving partition net�
Lift tensioner3 upward to a horizon-
tal position to release tensioning of the
strap.
�
Disengage tie-down hooks1 from
rings2.
�
Remove mounting hooks2
(�page 162) from holder1
(�page 162).
�
Roll up and close the partition net.
�
Store partition net behind rear seat
bench.
Cargo compartment cover blind*
1Handle
2Holder
Closing blind�
Pull blind on handle1 across the car-
go compartment.
�
Guide blind into holders2.Opening blind
�
Disengage blind and guide retraction
by its handle1.
Removing blind
3Button
4Mounting sleeve
�
Roll the blind up.
�
Push mounting sleeve4 inward
against spring pressure until it engag-
es.
�
Remove blind from mounts.
Warning!
G
Passenger use of third row seats with cargo
compartment cover blind installed is re-
stricted.
Page 167 of 356
165 Controls in detail
Loading
Installing blind�
Place left side of blind in left mount.
�
Position right side of blind over right
mount.
�
Push button3, releasing mounting
sleeve to slide into mount.
Cargo floor plates
Removing cargo floor plates�
Lift cargo floor plate at rear edge
(arrow).
Cargo floor plate unhinges automati-
cally.
�
Remove cargo floor plate by pulling it
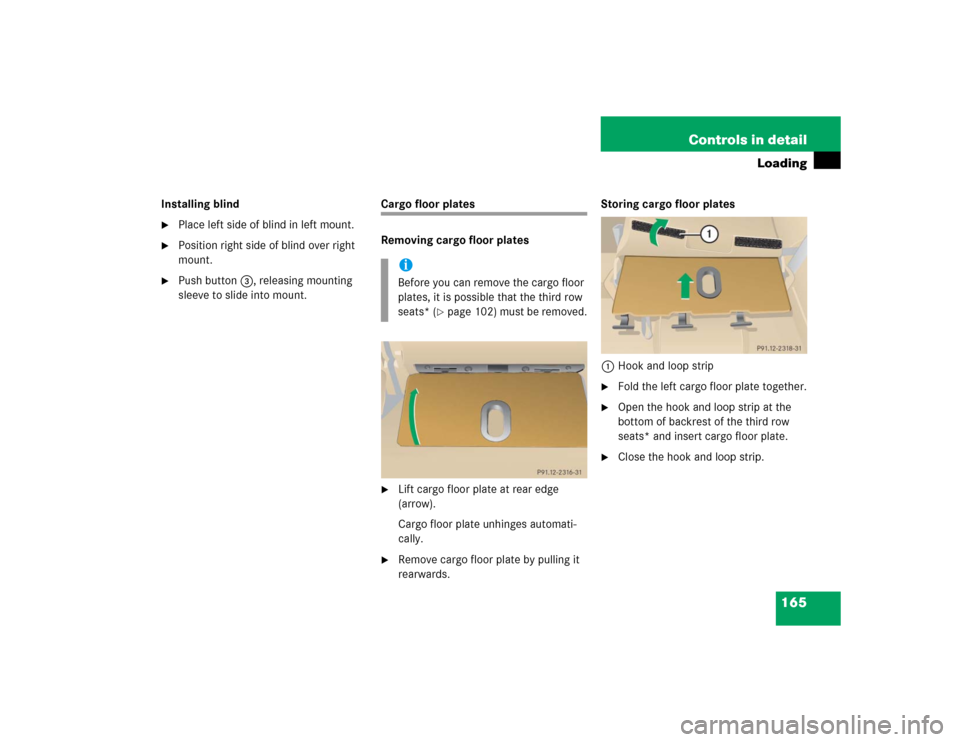
rearwards.Storing cargo floor plates
1Hook and loop strip
�
Fold the left cargo floor plate together.
�
Open the hook and loop strip at the
bottom of backrest of the third row
seats* and insert cargo floor plate.
�
Close the hook and loop strip.
iBefore you can remove the cargo floor
plates, it is possible that the third row
seats* (
�page 102) must be removed.
Page 247 of 356
245 Operation
Vehicle care
Upholstery
Using aftermarket seat covers or wearing
clothing that has the tendency to give off
coloring (e.g. when wet, etc.) may cause
the upholstery to become permanently dis-
colored. By lining the seats with a proper
intermediate cover, contact-discoloration
will be prevented.
Leather upholstery*
Wipe leather upholstery with a damp cloth
and dry thoroughly or clean with
Mercedes-Benz approved Leather Care.
Exercise particular care when cleaning
perforated leather as its underside should
not become wet.MB Tex upholstery
Pour Mercedes-Benz approved Interior
Care onto soft lint-free cloth and apply
with light pressure.
Plastic and rubber parts
Do not use oil or wax on these parts.
Wood trims
Dampen cloth using water and use damp
cloth to clean wood trims in your vehicle.
Do not use solvents like tar remover or
wheel cleaner nor polishes or waxes as
these may be abrasive.
Page 325 of 356

Prevents the wheels from locking up
during braking so that the vehicle can
continue to be steered.
BabySmart
TM airbag deactivation
system
This sy")
323 Technical terms
ABS
(A
ntilock B
rake S
ystem)
Prevents the wheels from locking up
during braking so that the vehicle can
continue to be steered.
BabySmart
TM airbag deactivation
system
This system detects if a special system
compatible child restraint seat is in-
stalled on the front passenger seat. The
system will automatically deactivate
the passenger front airbag when such a
seat is properly installed (indicator
lamp7 in the instrument cluster
lights up). See an authorized
Mercedes-Benz Light Truck Center for
availability.
BabySmartTM compatible child seats
Special restraint system for children.
The sensor system for the passenger
seat prevents deployment of the pas-
senger front airbag if a BabySmart
TM
compatible child seat is installed.BAS
(B
rake A
ssist S
ystem)
System for potentially reducing braking
distances in emergency braking situa-
tions. The system is activated when it
senses an emergency based on how
fast the brake is applied.
Bi-Xenon headlamps*
Headlamps which use an electric arc as
the light source and produce a more
intense light than filament headlamps.
Bi-Xenon headlamps produce low
beam and high beam.
CAC
(C
ustomer A
ssistance C
enter)
Mercedes-Benz customer service
center, which can help you with any
questions about your vehicle and
provide assistance in the event of a
breakdown.CAN system
(C
ontroller A
rea N
etwork)
Data bus network serving to control
vehicle functions such as door locking
or windshield wiping.
Cockpit
All instruments, switches, buttons and
indicator / warning lamps in the
passenger compartment needed for
vehicle operation and monitoring.
Cruise control
Driving convenience system for
automatically maintaining the vehicle
speed set by the driver.
Engine number
The number set by the manufacturer
and placed on the cylinder block to
uniquely identify each engine
produced.
Page 331 of 356

329 Index
A
ABS 25, 76, 323
ABS control 76
LOW RANGE mode 77
Malfunction indicator lamp 248
Warning lamp 248
Accelerator position,
automatic transmission 124
Accident
In case of 53
Activating
Air circulation mode 141
Air recirculation mode 141
Anti-theft alarm system 83
Automatic climate control 137
ESP 82
Exterior headlamps 50
Hazard warning flasher 113
Headlamps 50
Ignition 33
Immobilizer 55, 83Rear passenger compartment
ventilation and climate control 143
Rear window defroster 135
Rear window wiper 52
Residual heat 142
Seat heater* 98
Tow-away alarm 85
Warning indicators (Parktronic*) 158
Windshield wipers 51
Activating automatic central locking 94
Adding
Coolant 228
Engine oil 226
Additional turn signals 274
Adjustable steering column
Indicator lamp 260
Adjusting 35
Backrest tilt 37, 39
Exterior rear view mirror 41
Head restraint height 37, 39
Head restraint tilt 38, 40Headlamp aim 282
Instrument cluster illumination 117
Interior rear view mirror 41
Manual seat 36
Mirrors 41
Seat cushion tilt 39
Seat fore and aft 36
Seat fore and aft adjustment 38
Seat height 37, 39
Seats 35
Steering wheel 40
Adjusting air distribution
Automatic climate control 139
Adjusting air volume
Automatic climate control 139
Air conditioning
Cooling 141
Air conditioning refrigerant 314
Air pressure see Tire inflation pressure
Page 333 of 356

331 Index
Automatic headlamp mode 108
Automatic interior lighting control
Activating 114
Deactivating 114
Automatic locking when driving 93
Automatic transmission
Accelerator position 124
Emergency operation
(Limp Home Mode) 126
Gear ranges 122
Gear selector lever position 123
Gear shifting malfunctions 126
Kickdown 124
Manual shifting 121
One-touch gearshifting 121
Selector lever position 120
Towing a trailer 125
Transmission fluid 227
B
BabySmart
TM
Airbag deactivation system 70
Compatible child seats 70, 323
Self-test 70
BabySmart
TM airbag
deactivation system 323Backrest tilt 36
Backup lamps 275, 279
Bulbs 275
BAS 78, 323
Malfunction indicator lamp 251, 252,
253
Warning lamp 251
Batteries, remote control
Replacing 273
Battery discharged
Jump starting 291
Battery indicator lamp
Indicator lamp 261
Battery, vehicle 228, 272
Charging 289
Disconnecting 289
Reconnecting 289
Reinstalling 289
Removing 289
Bi-Xenon headlamps* 323
Block heater (Canada only) 236
Blocking
Rear door window operation 74
Brake assist system (BAS) 323
Brake fluid 314
Brake lamp bulbs 275Brake pad wear
Indicator lamp 261
Brakes 198
Warning lamp 250
Break-in period 196
Bulbs, replacing 274
Additional turn signals 274
Backup lamps 275
Brake lamps 275
Fog lamps 274
Front fog lamp 279
Front lamps 274
High beam 274
High mounted brake lamp 281
License plate lamps 275, 281
Low beam 274
Parking, standing lamp 274
Rear fog lamps 279
Rear side marker lamp bulbs 279
Side marker lamps 274, 275
Standing lamps 274
Tail lamp assemblies 279
Turn signal lamps 274, 275
Turn signal, side marker lamp 274
 may cause
the upholstery to become permanent")