Page 269 of 356
267 Practical hints
Where will I find ...?
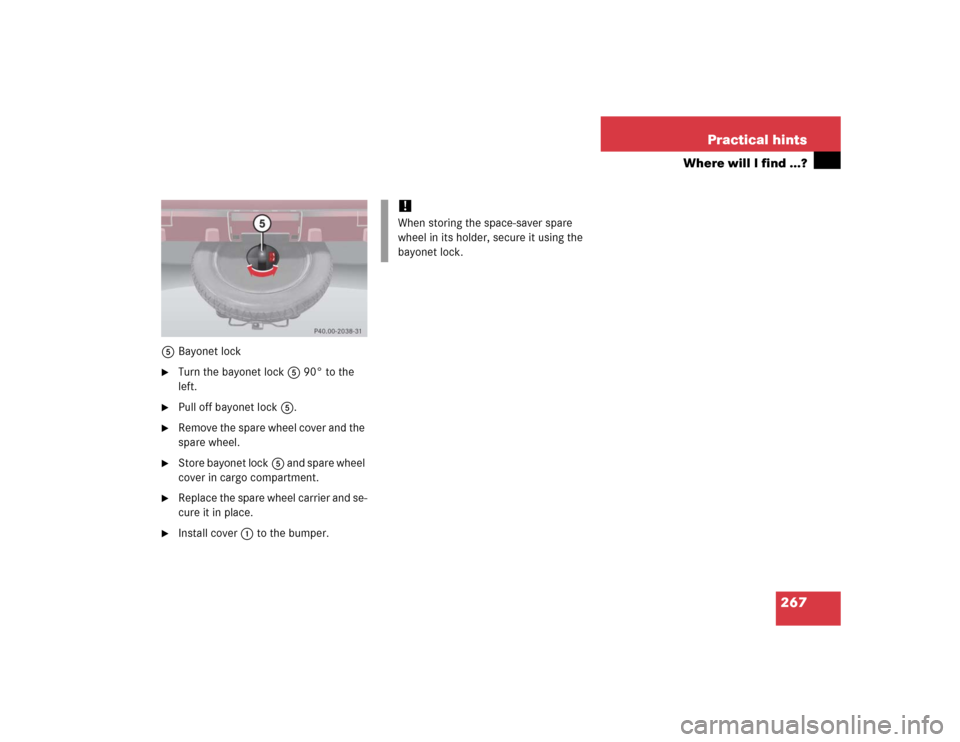
5Bayonet lock�
Turn the bayonet lock5 90° to the
left.
�
Pull off bayonet lock5.
�
Remove the spare wheel cover and the
spare wheel.
�
Store bayonet lock5 and spare wheel
cover in cargo compartment.
�
Replace the spare wheel carrier and se-
cure it in place.
�
Install cover1 to the bumper.
!When storing the space-saver spare
wheel in its holder, secure it using the
bayonet lock.
Page 278 of 356
276 Practical hintsReplacing bulbsHave the LEDs and bulbs for the following
lamps replaced by an authorized
Mercedes-Benz Light Truck Center:�
Additional turn signals in the exterior
rear view mirrors
�
Xenon*-lamps
�
Front fog lamps (vehicles with sport
package*)
�
High mounted brake lamp (only vehi-
cles with an exterior spare-wheel
rack*)
Replacing bulbs for front lamps
Before you start to replace a bulb for a
front lamp, do the following first:�
Turn the combination switch to
positionD (
�page 107).
�
Open the hood (
�page 222).
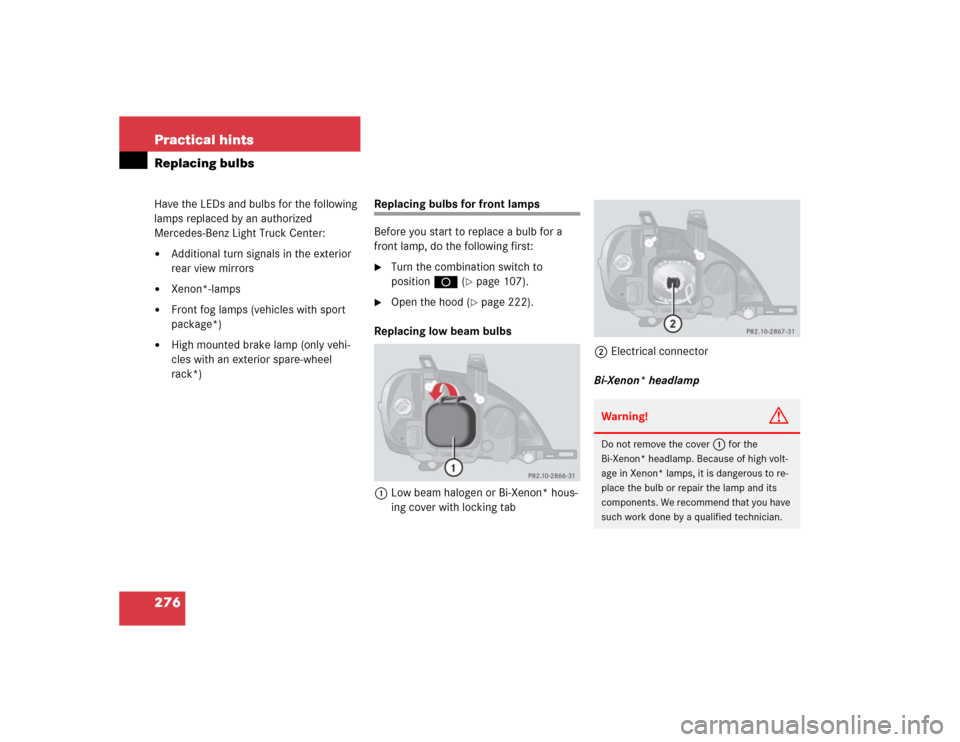
Replacing low beam bulbs
1Low beam halogen or Bi-Xenon* hous-
ing cover with locking tab2Electrical connector
Bi-Xenon* headlamp
Warning!
G
Do not remove the cover
1
for the
Bi-Xenon* headlamp. Because of high volt-
age in Xenon* lamps, it is dangerous to re-
place the bulb or repair the lamp and its
components. We recommend that you have
such work done by a qualified technician.
Page 283 of 356

281 Practical hints
Replacing bulbs
License plate lamp
1License plate lamp
2Screw�
Loosen both screws2.
�
Remove license plate lamp1.
�
Replace the tubular bulb.
�
Reinstall license plate lamp1.
�
Retighten screws2.High mounted brake lamp
1Cover
2Tab
�
Press gently on both sides of cover1
in direction of arrows.
�
Fold it backwards and remove.
�
Press tab2 on the reflector and re-
move it.
�
Press gently onto the bulb and turn
counterclockwise out of the bulb sock-
et.
�
Press the new bulb gently into the bulb
socket and turn clockwise until it en-
gages.
�
Reinstall the reflector on the left side
first and let it engage on the right side.
�
Align cover1 with its tabs in the slots
and press gently onto cover1 until it
engages.iVehicles with an exterior spare-wheel
rack*:
You cannot replace the LEDs of the
high mounted brake light with an exte-
rior spare-wheel rack installed. Have
therefore the high mounted brake light
checked and, if necessary, the LEDs re-
placed by an authorized
Mercedes-Benz Light Truck Center.
Page 286 of 356

284 Practical hintsFlat tireMounting the spare wheel Preparing the vehicle
�
Park the vehicle as far as possible from
moving traffic on a hard surface.
�
Turn on the hazard warning flashers.
�
Engage the steering wheel lock in the
straight ahead position.
�
Set the parking brake.
�
Move the gear selector lever toP.
�
Have any passenger exit the vehicle at
a safe distance from the roadway.
�
Take the spare wheel out of its carrier
(�page 266).Lifting the vehicle
�
Prevent the vehicle from rolling away
by blocking wheels with wheel chocks
(not included) or other sizable objects.
When changing wheel on a level surface:
�
Place one chock in front of and one be-
hind the wheel that is diagonally oppo-
site to the wheel being changed.
When changing wheel on a hill:
�
Place chocks on the downhill side
blocking both wheels of the other axle.
�
Take the two-piece wheel wrench and
the jack out of the rear cargo compart-
ment (
�page 264). Assemble wheel
wrench.
Warning!
G
The dimensions of the spare wheel are dif-
ferent from those of the road wheels. As a
result, the vehicle handling characteristics
change when driving with a mounted spare
wheel. Adapt your driving style accordingly.
The spare wheel is for temporary use only.
When driving with spare wheel mounted,
make sure proper tire pressure and do not
exceed vehicle speed of 50 mph (80 km / h).
Drive to the nearest Mercedes-Benz Light
Truck Center as soon as possible to have the
spare wheel replaced with a regular road
wheel.
Never operate the vehicle with more than
one spare wheel mounted.
iOpen door only when conditions are
safe to do so.
Page 288 of 356

286 Practical hintsFlat tireRemoving the wheel�
Unscrew and remove all wheel bolts.
�
Remove the remaining bolts.
�
Grip the wheel from the sides and re-
move it.
Mounting the new wheel
�
Clean contact surfaces of wheel and
wheel hub.
�
Install spare wheel on wheel hub.
�
Insert wheel bolts and tighten them
slightly.!Do not place wheel bolts in sand or dirt.
This could result in damage to the bolt
and wheel hub threads.
!To avoid paint damage, place wheel flat
against hub and hold it there while in-
stalling first wheel bolt.Warning!
G
Always replace wheel bolts that are
damaged or rusted.
Never apply oil or grease to wheel bolts.
Damaged wheel hub threads should be
repaired immediately. Do not continue to
drive under these circumstances! Contact
an authorized Mercedes-Benz Light Truck
Center or call Roadside Assistance.
Incorrect wheel bolts or improperly tight-
ened wheel bolts can cause the wheel to
come off. This could cause an accident.
Make sure to use the correct wheel bolts.
Warning!
G
Use only genuine equipment
Mercedes-Benz wheel bolts. Other wheel
bolts may come loose.
Do not tighten the wheel bolts when the ve-
hicle is raised. Otherwise the vehicle could
tip over.
Page 289 of 356
287 Practical hints
Flat tire
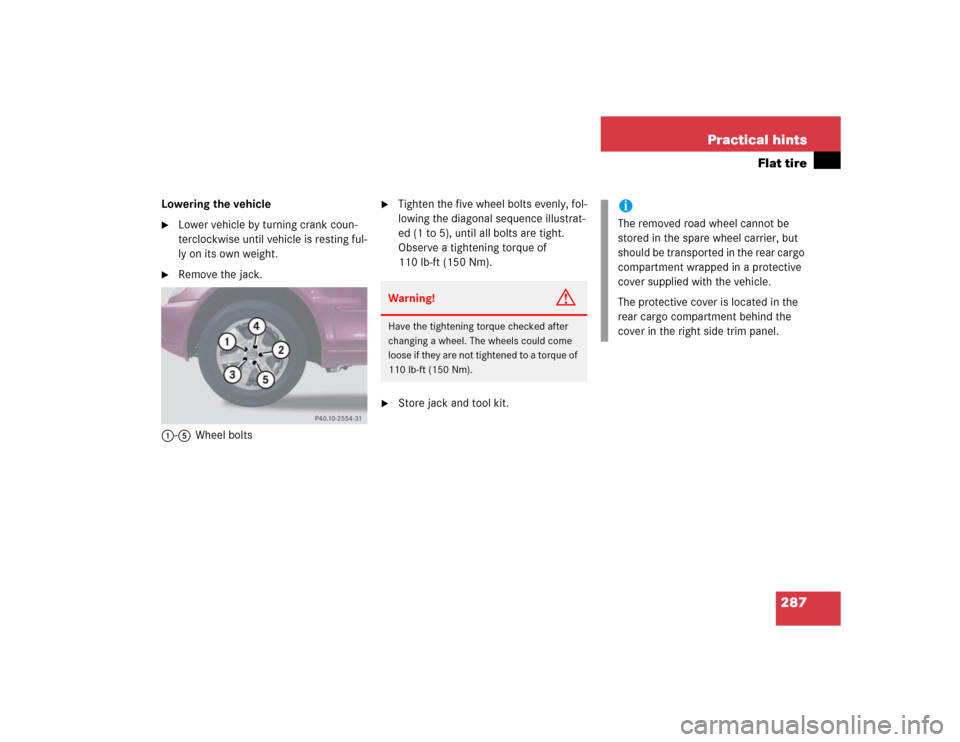
Lowering the vehicle�
Lower vehicle by turning crank coun-
terclockwise until vehicle is resting ful-
ly on its own weight.
�
Remove the jack.
1-5Wheel bolts
�
Tighten the five wheel bolts evenly, fol-
lowing the diagonal sequence illustrat-
ed (1 to 5), until all bolts are tight.
Observe a tightening torque of
110 lb-ft (150 Nm).
�
Store jack and tool kit.Warning!
G
Have the tightening torque checked after
changing a wheel. The wheels could come
loose if they are not tightened to a torque of
110 lb-ft (150 Nm).
iThe removed road wheel cannot be
stored in the spare wheel carrier, but
should be transported in the rear cargo
compartment wrapped in a protective
cover supplied with the vehicle.
The protective cover is located in the
rear cargo compartment behind the
cover in the right side trim panel.
Page 310 of 356
308 Technical dataRims and tiresSpare wheelModel
ML 350, ML 500
Rim
4Jx18 H2 ET0
Wheel offset
0in (0mm)
Space-saver tire
T155 / 90 D18 113M
1
1Must not be used with snow chains.
Page 326 of 356
 of the oil at different tempera-
tures. The higher the temperature an
oil can tolerate without becoming thin,")
324 Technical termsEngine oil viscosity
Measurement for the inner friction (vis-
cosity) of the oil at different tempera-
tures. The higher the temperature an
oil can tolerate without becoming thin,
or the lower the temperature it can tol-
erate without becoming viscous, the
better the viscosity.
ESP
(E
lectronic S
tability Pr
ogram)
Improves vehicle handling and direc-
tional stability.
ETD
(E
mergency T
ensioning D
evice)
Device which deploys in certain frontal
and rear collisions exceeding the sys-
tem's threshold to tighten the seat
belts.
->SRSFSS (Canada vehicles)
(F
lexible S
ervice S
ystem)
Maintenance service indicator in the
speedometer display that informs the
driver when the next vehicle mainte-
nance service is due. FSS evaluates en-
gine temperature, oil level, vehicle
speed, engine speed, distance driven
and the time elapsed since your last
service, and calls for the next mainte-
nance service accordingly.
GAWR
(G
ross A
xle W
eight R
ating)
The GAWR is the maximum permissible
axle weight. The gross vehicle weight
on each axle must never exceed the
GAWR for the front and rear axle indi-
cated on the certification label located
on the driver’s door pillar.GVW
(G
ross V
ehicle W
eight)
The GVW comprises the weight of the
vehicle including fuel, tools, spare
wheel, installed accessories, passen-
gers and cargo. The GVW must never
exceed the GVWR, indicated on the
certification label located on the driv-
er’s door pillar.
GVWR
(G
ross V
ehicle W
eight R
ating)
This is the maximum permissible vehi-
cle weight. It is indicated on certifica-
tion label located on the driver’s door
pillar.
Gear range
Number of gears which are available to
the automatic transmission for shifting.
The automatic gear shifting process
can be adapted to specific operating
conditions using the gear selector
lever.

Space-saver tire
T155 / 90 D18 113M
1
1Must not be used with snow chains.")